Using the Fujifilm X100T

Using the Fujifilm X100T
first impressions / practical review / shooting experience / tutorial
Talk to Rico (open forum for questions & feedback)
Fuji X Secrets Workshops – Rico’s Flickr Sets
Rico’s X100T Sample Images – X100T Specs
—
As the Fujifilm X100T is about to become available all over the world, I think this is a good time to share my first impressions with this classic, modern camera. I was able to evaluate a pre-production model for several weeks, going through a few revisions of beta firmware in the process.

Same, Same, But Different
The X100T uses the same 16.3 MP X-Trans II sensor and 23mm (35mm full-frame equivalent) lens as its predecessor, the X100S. Despite that, it often feels like a different camera—in a good sense. How’s that even possible? It appears that Fujifilm kept what made the X100 and X100S popular (and also quite unique), so the DNA remains intact. On the other hand, there is a plethora of enhancements affecting both hardware and firmware. They all seem to share one common goal: to make the camera more accessible and user-friendly, to make sure that the camera doesn’t get in the way between you and your photography, and to be a genuine pleasure to work with.

X100T – Lightroom 5.6.
Click on the image for larger sizes.
B(u)y the Books
Before we go into the details (there will be plenty to discuss), let me thank all of you who kindly bought my ebook in the X-E2. It’s also been a pleasure to read your encouraging feedback. I know that many of you have wondered if or when an X-T1 edition of the ebook will become available, so here’s your answer: An X-T1 ebook is on its way for an early 2015 release in German and English. Obviously, I want to incorporate the latest firmware additions that Fuji has promised us for X-mas, and in order to do so, I need to spend some time with the new firmware when it is finally available.
I am currently evaluating firmware 2.00 in my black X-T1, which appears to be the standard firmware of the brand-new X-T1GS, featuring a silent electronic shutter with a maximum shutter speed of 1/32000s, the new Classic Chrome film simulation and several other enhancements. However, the “real deal” will be the next firmware revision (probably 3.00) in December.

Classic Chrome SOOC (straight-out-of-camera = no external post-processing) JPEG taken with a Fujifilm X-T1 (firmware 2.00) and a pre-production copy of the upcoming XF50-140mmF2.8 R LM OIS WR zoom lens at 140 mm and f/2.8. Click on the image for larger sizes.
In case you haven’t yet downloaded The Fujifilm X-E2: Beyond the Manual but are contemplating doing so, make sure you browse through my free reading samples first. I am basically giving away a third of the eBook to make sure that you don’t have to take my word for it. I don’t want to disappoint you, so don’t buy it blindly.

Due to the similarities of most X-series cameras, the eBook isn’t only useful to X-E2 users, but also to those using the X-T1 or other models, including the new X30 and X100T. If you decide to buy it, please get it here to receive it DRM-free in three different formats: PDF, iBook and Kindle.
X100T with TCL-X100 teleconverter at f/2 – Lightroom 5.6.
Click on the image for larger sizes.
There’s also a very well-made book on the X100S by famous Fuji X-Photographer Kevin Mullins. It’s titled Fujifilm X100S: From Snapshots to Great Shots. If you are new to the X100S (or X100T) and want to get more serious with your photography, this book will set you on the right track.

X100T – Lightroom 5.6.
Click on the image for larger sizes.
What’s Up?
According to Fuji, the T in the X100T stands for Third Generation, Traditional, True, Top or Travel. I am not making this up. Personally, I think after the X100S, the marketing people simply used the letter in the alphabet that came next.

X100T – Lightroom 5.6.
Click on the image for larger sizes.
Targeting professional photographers and photo enthusiasts as well as existing users of the X100S (which will be discontinued), the X100T needs to offer more than a half-hearted facelift in order to be successful. While Fuji claims that the X100 series is unique and without real competition in the premium compact camera segment, there’s still the matter of cannibalization. After all, why would anyone buy a brand-new and rather expensive X100T when they can also get a new or used X100S with the same lens and sensor at a lower price?
X100T – Lightroom 5.6.
Click on the image for larger sizes.
At first glance, the answer isn’t obvious. The X100S and X100T look very much alike, they use the same batteries, and accessories (like lens hoods, wide / tele conversion lenses, carrying cases or the new optional hand grip with a built-in Arca Swiss tripod plate) remain compatible throughout all three X100 models.
Right from the start, the Japan-made X100T is available in either black or silver. The main body is made of die-cast magnesium and the dials on top are milled from aluminum.
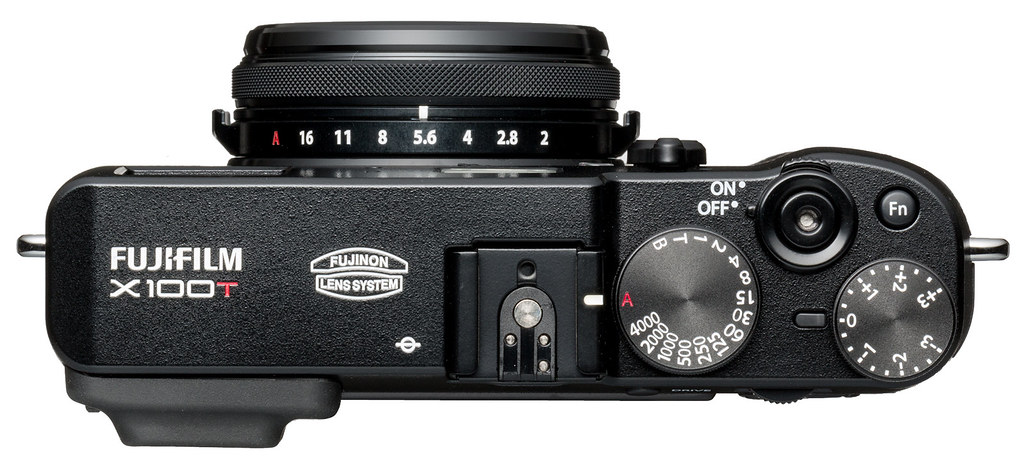
Body Building
Looks can be deceiving, as the X100T actually offers plenty of improvements over its predecessor. Let’s start with changes Fuji made to the body exterior:

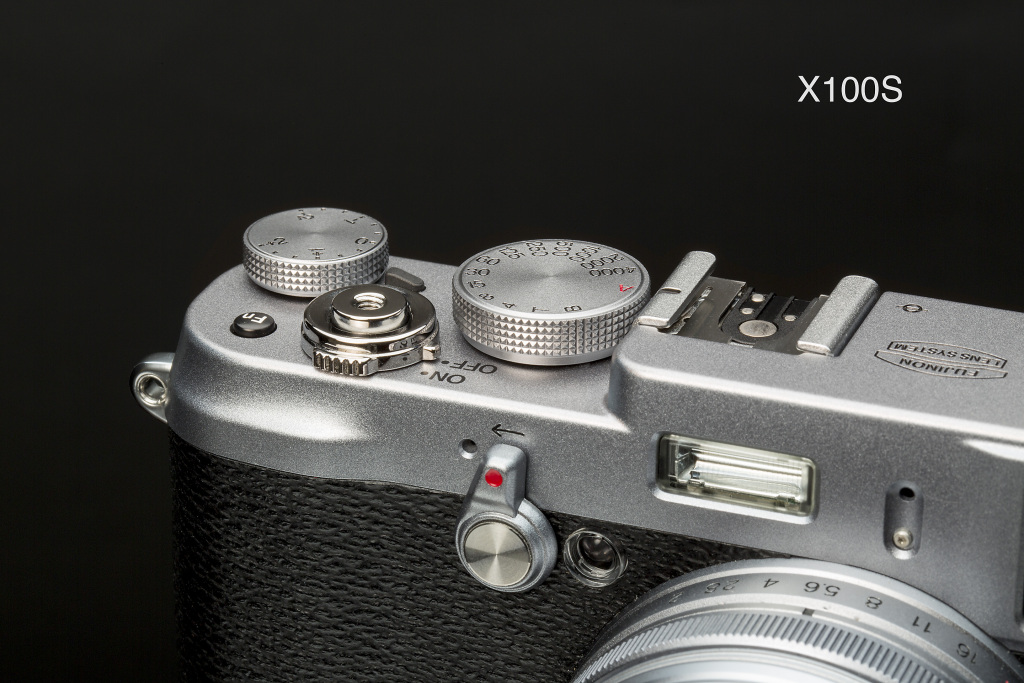
As you can see comparing the two images above, the X100T features a less glossy shutter button, a silver Fn button (in the camera’s silver edition) and an enlarged exposure compensation (EC) dial that encompasses ± 3 EV (as opposed to ± 2 EV in the X100S) and offers more resistance when it’s turned. Even better, the EC dial now also works in manual exposure mode when Auto-ISO is active.
The EVF/OVF switch has changed from a one-directional to a two-directional lever in order to accommodate the new electronic rangefinder (ERF) function of the improved hybrid viewfinder. We’ll discuss this feature later in more detail.
The revamped aperture ring is now turning in 1/3 EV stops (compared to full stops in the X100S) and the texture of the manual focus ring has been improved. In playback mode, the manual focus ring now also serves as a second command dial and lets you quickly browse through your images.
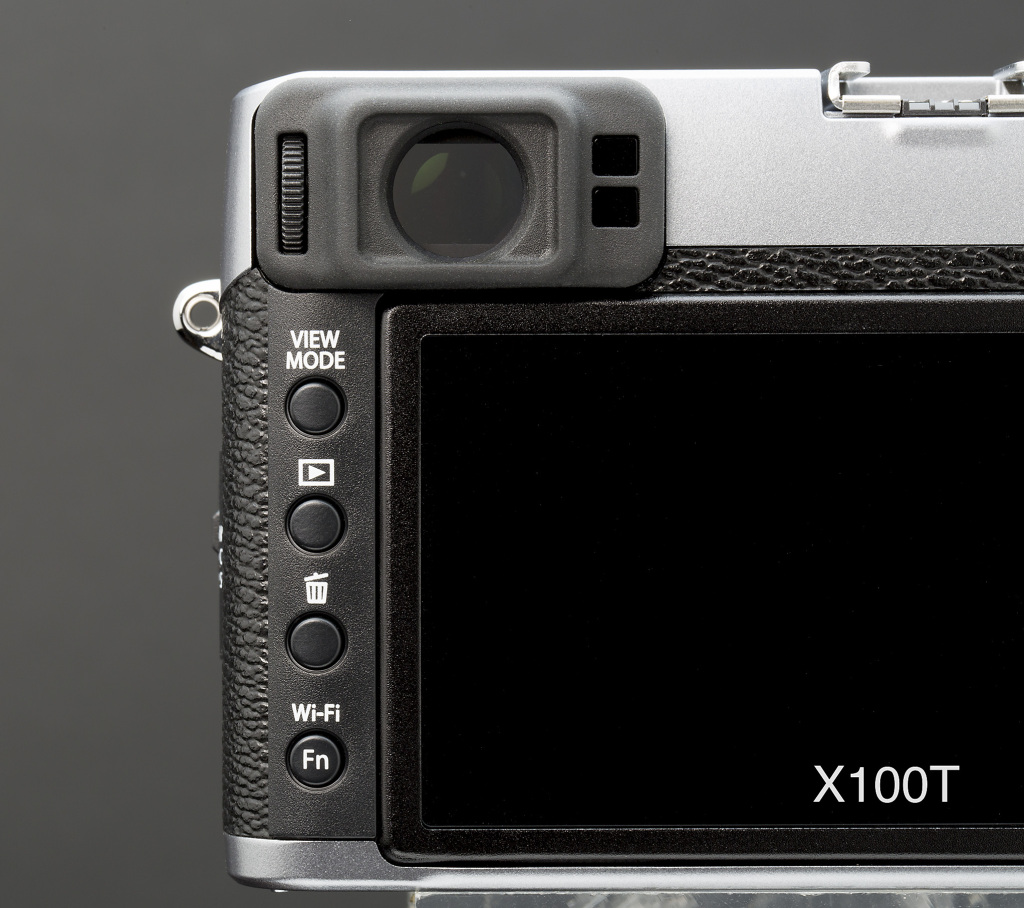
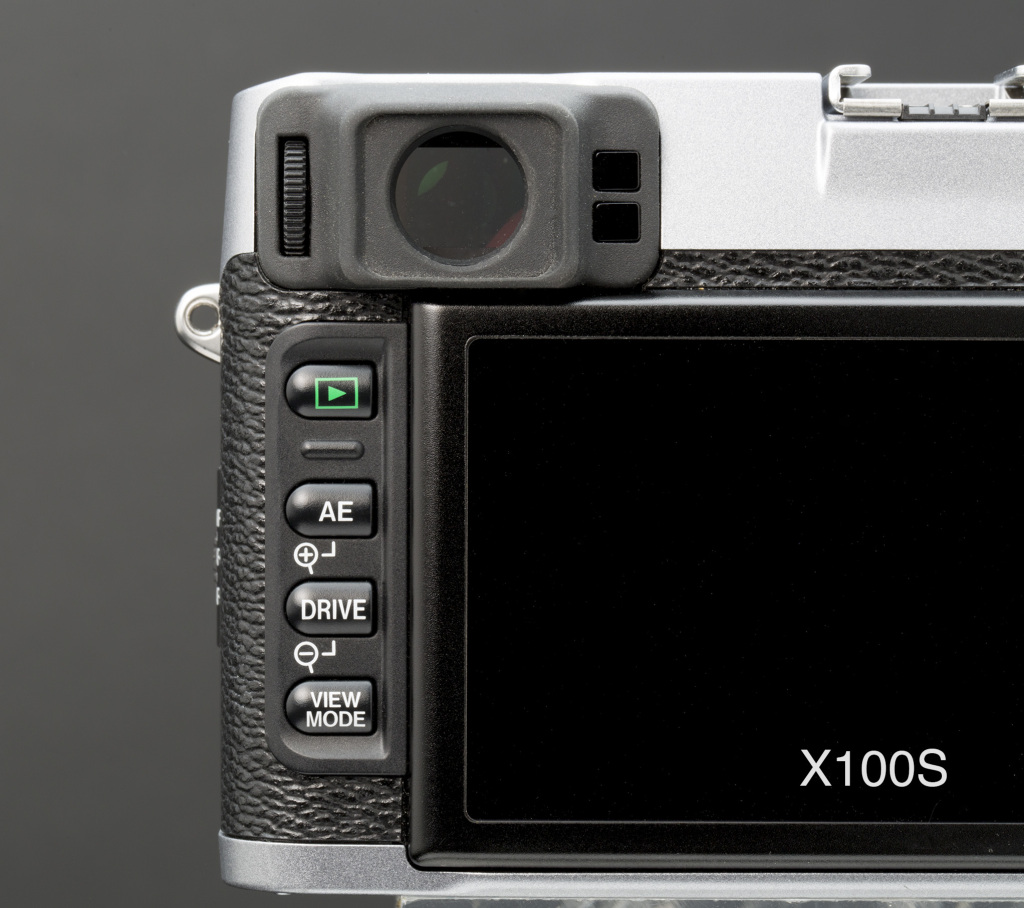
The layout and shape of the control buttons on the left side of the camera’s back have been changed to fit a larger 3-inch LCD display with a 3:2 aspect ratio and a much-improved resolution of 1040K dots (X100S: 2.8-inch, 4:3 aspect ratio with only 460K dots). Sadly, the LCD display isn’t tiltable like the display in the new X30.
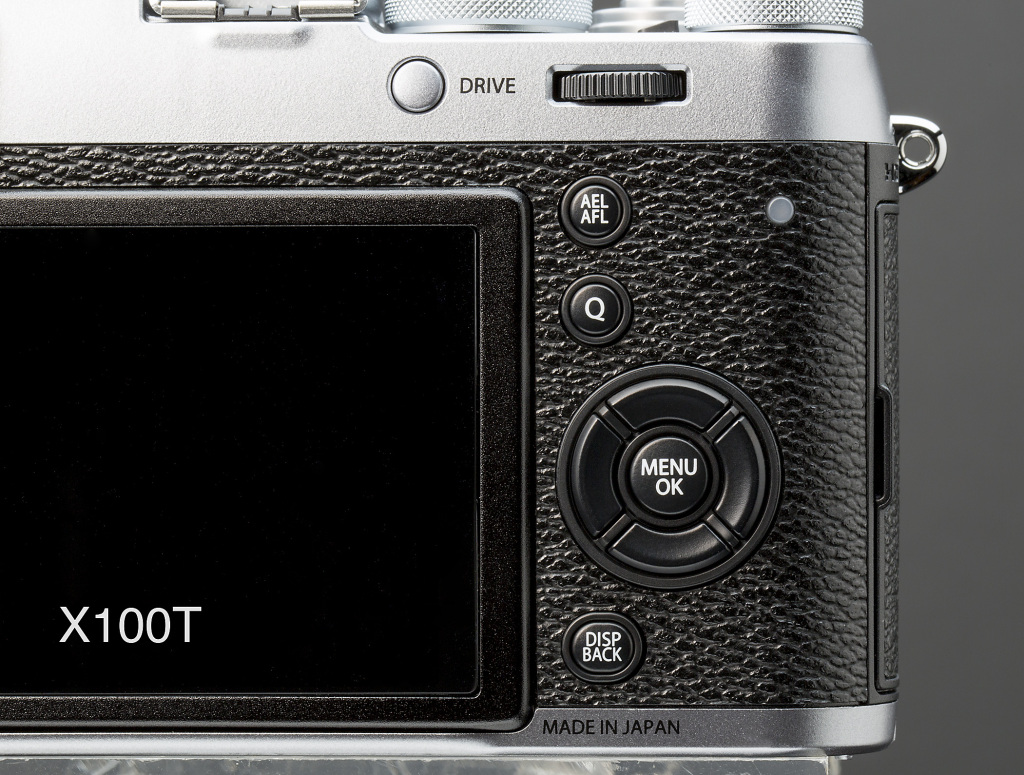
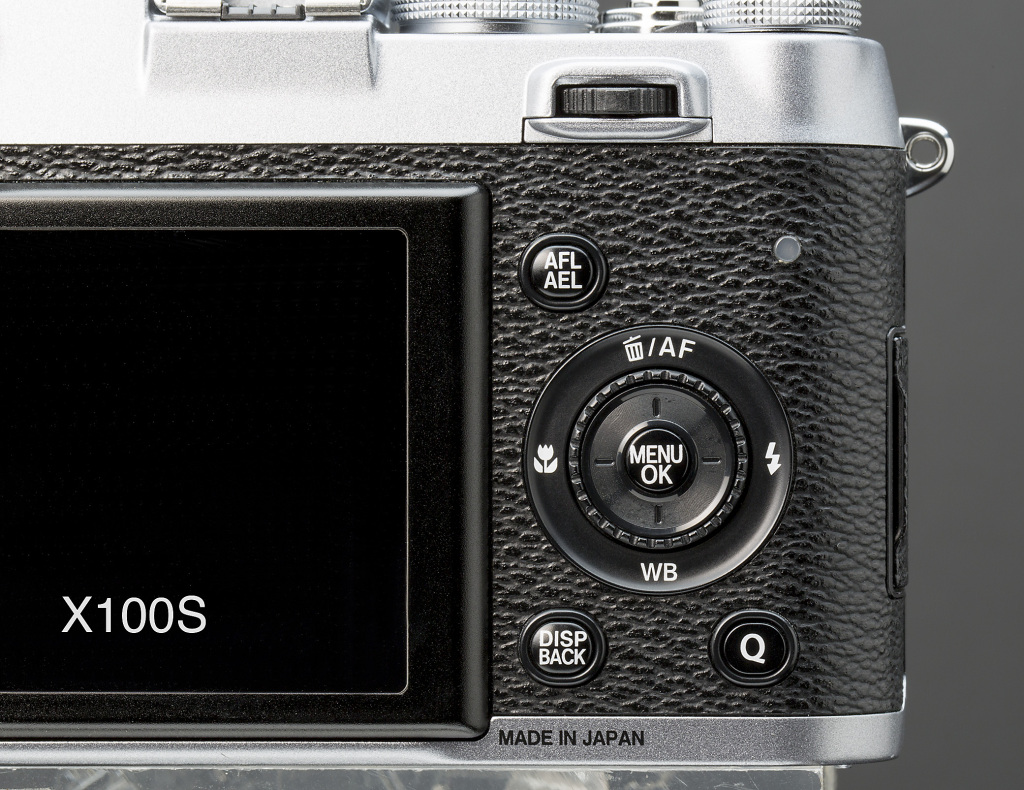
There have been some changes to the right side of the back, as well. The sub-command dial has been replaced by a 4-way selector switch similar to the X-E2, while the primary “rocker” command dial of the X100S is now a proper thumb-wheel similar to the one in most other X-series cameras. The DRIVE button has been relocated to be reachable with the right thumb, and each selector key now also serves as a customizable function (Fn) button, comfortably expanding their number from a single Fn key in the X100S to seven custom Fn buttons in the X100T.
There’s also a larger port door that covers a Micro USB port (that also serves as an RR-90 remote control input), an HDMI output and a 2.5 mm microphone input that can moonlight as a Canon Rebel-style remote control input that’s compatible with dozens of tethered or radio-driven aftermarket remote control devices. If you don’t want to use an external interval triggering device, you can utilize the camera’s built-in intervalometer that lets you specify the number of and the interval between the shots the camera is supposed to record.

X100T – Lightroom 5.6.
Click on the image for larger sizes.
Like the X-T1 and X30, the X100T features wifi remote control by downloading an app to your Android or iOS device. This free remote control app also offers image transfer from the X100T to your smartphone or tablet, and there is a wifi option to print directly from the camera to a Fuji Instax SP-1 printer.
Leading the Charge
In-camera battery charging via USB is another new feature, but an external battery charger is still supplied, so you can basically charge two batteries at once. USB charging means that you can recharge the camera’s battery not only with USB wall-chargers (like the one for your smartphone or tablet), but also directly with your laptop, with USB outlets in cars or planes and with mobile USB batteries that can recharge the camera multiple times in case you plan to stay in remote areas without electricity.
You can also operate the camera in playback and shooting mode while it is charging via USB, and according to Fuji, the battery life indicator has been improved to be more accurate.

X100T with TCL-X100 teleconverter – Lightroom 5.6.
Click on the image for larger sizes.
Inside Job
Of course, the improvements of the user interface don’t stop on the outside. Just like the X30, the X100T also features a renewed graphical user interface: Information overlays have become more transparent and less obtrusive. They obscure less of the scene, and they do not obstruct image corners. Like the X-T1 and X30, the 2.36 Mdot electronic viewfinder (EVF) of the X100T offers different views depending on wether you hold the camera in landscape (horizontal) or portrait (upright) orientation. Sadly, this feature doesn’t extend to the LCD display on the camera’s back.
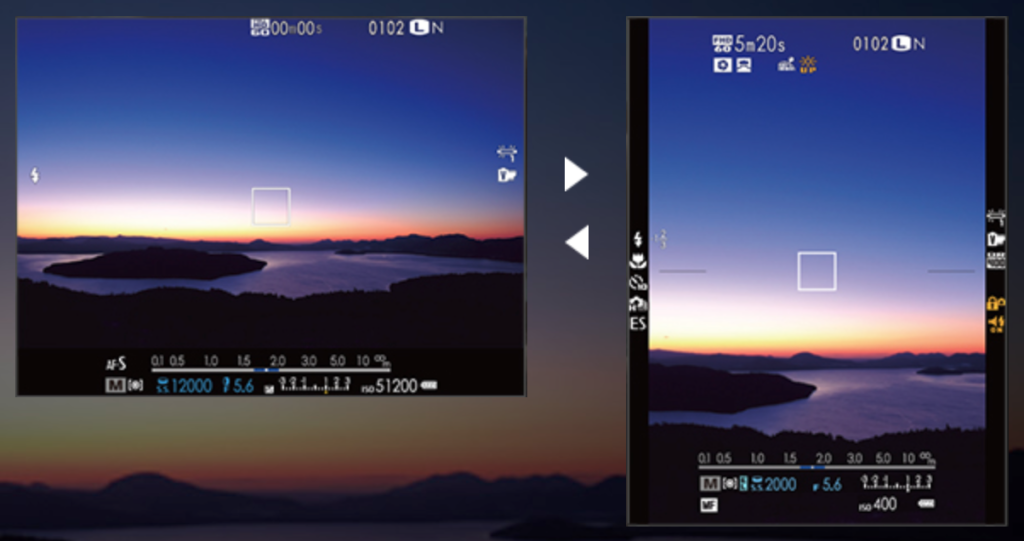
The X100T’s revamped EVF user interface in landscape and portrait orientation. The electronic level, live histogram and grid options are missing in this simulated illustration.
Fn button functions like Macro On/Off or Preview Pic. Effect On/Off are now simple toggles and don’t open a cumbersome menu.

You can assign one of the following 27 functions to any of the camera’s seven Fn buttons:
- Advanced Filter (transparent menu)
- Multiple Exposure On/Off (toggle)
- Macro On/Off (toggle)
- Preview Depth of Field (toggle)
- ISO (transparent menu, now also includes three Auto-ISO configurations: AUTO1, AUTO2 and AUTO3)
- Self-Timer (transparent menu)
- Image Size (transparent menu)
- Image Quality (transparent menu)
- Dynamic Range (transparent menu)
- Film Simulation (transparent menu)
- White Balance (transparent menu)
- ND Filter On/Off (toggle)
- Photometry (transparent menu for selecting a metering mode)
- AF Mode (transparent menu)
- Focus Area
- Corrected AF Frame On/Off (toggle)
- Flash Mode (transparent menu)
- Flash Exposure Compensation (± 2EV, transparent menu)
- Select Custom Setting (C1-C7, transparent menu)
- Movie (record on/off button)
- Face Detection On/Off (toggle)
- Preview Pic. Effect On/Off (toggle, to turn the new Natural Live View function on or off)
- High Performance Mode On/Off (toggle)
- RAW On/Off (toggle)
- Wireless Communication
- Conversion Lens (toggle, to select one of three lens options)
- Shutter Type (toggle, to select one of three shutter options: mechanical shutter [MS], electronic shutter [ES] and MS+ES)
As you can see, there’s plenty to choose from. The new transparent Fn menus are quite useful, as they display a WYSIWYG (what you see is what you get) live view of the scene, so you can immediately see any changes as you browse through the different menu options. This is particularly helpful when choosing a white balance preset or manually setting the dynamic range.
Like the X30, the X100T now offers a full dynamic range simulation on its EVF and LCD displays, which also extends to the live histogram. So manually selecting either DR100%, DR200% (one stop of extra highlight dynamic range) or DR400% (two stops of extra highlight dynamic range) is immediately affecting the live view and the live histogram, simulating the resulting JPEG image.

X100T – Lightroom 5.6.
Click on the image for larger sizes.
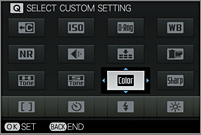
The Quick menu (Q button) gives quick access to 16 frequently used functions. It is now user-customizable, so you can assign one of the following 29 functions to any of the 16 blocks of the 4×4 matrix:
- Select Custom Setting (C1-C7)
- ISO
- Dynamic Range
- White Balance
- Noise Reduction
- Image Size
- Image Quality
- Film Simulation
- Highlight Tone
- Shadow Tone
- Color
- Sharpness
- Self-Timer
- Face Detection
- Photometry
- AF Mode
- Flash Mode
- Flash Exposure Compensation
- MF Assist
- Movie Mode
- Movie ISO
- Mic Level Adjustment
- Silent Mode
- EVF/LCD Brightness
- EVF/LCD Color
- Advanced Filter
- Conversion Lens
- Shutter Type
- ND Filter
Sadly, there is currently no option to make the Quick menu or main shooting menu transparent in order to immediately see the effect of any changes on the live view image.
Walk On the Bright Side…
Another user interface improvement is the camera’s automatic brightness control for the EVF. Instead of manually adjusting the EVF brightness to different surrounding light conditions, this option always provides a view with optimal brightness and contrast. Unfortunately, this feature is not available for the LCD display.

X100T – Lightroom 5.6.
Click on the image for larger sizes.
You can now separately adjust the color saturation of the EVF and LCD displays to better match them to each other and your personal viewing habits. Additionally, the new Natural Live View feature (aka Preview Pic. Effect Off) ignores film simulations and JPEG settings and thus provides a “natural” live view image–with maximum dynamic range (DR400%) in the highlights and boosted shadows–that pretty much simulates an optical viewfinder (or how our eyes would see a scene).

This SOOC JPEG was shot with factory settings and Provia film simulation at DR100%. The WYSIWYG live view in the EVF or LCD provided an accurate preview of the final image, but this can also make it difficult to see what’s going on in the dark foreground. Click on the image for larger sizes.
This Lightroom version (based on the RAW file of the same image) simulates what the new Natural Live View can do for you when you are composing a high-contrast scene. Instead of providing a WYSIWYG preview, shadows are boosted and the highlight dynamic range is increased by two stops. This means that you don’t have to turn to the OVF to see what’s actually going on in those dark areas. Click on the image for larger sizes.
…and the Dark Side
The electronic live view’s display lag has been drastically reduced, although Fuji didn’t provide a hard number, so it may be a little bit slower than the 0.005s display lag of the X-E2, X-T1 and X30. Of course, you can always switch to the optical viewfinder (OVF) with zero lag. More importantly, the camera’s fluid EVF display frame-rate of 55 fps (frames per second) is now available down to a light level of 1.6 EV (as opposed to 5.6 EV in the X100S). This makes shooting in poor light much easier.
X100T with TCL-X100 – SOOC JPEG (Classic Chrome).
Click on the image for larger sizes and additional information.
Going Hybrid
Friends of Fuji’s unique hybrid viewfinder technology will be quite happy with the new X100T, as it features not only a larger bright frame area that covers 92% of the actual image (90% in the X100S), but also a real-time parallax correction in manual focus (MF) mode. This means that when you are manually focusing a scene in the optical viewfinder (OVF), the position of the bright frame and of the focus area indicator are automatically adjusted according to the set distance.
But how is it even possible to manually focus in the OVF? This is where the magic of the new electronic rangefinder (ERF) comes into play. The ERF is basically a modern, digital re-imagination of a traditional optical rangefinder (as found in Leica’s M series). The ERF displays an enlarged view of the current focus area in the bottom-right corner of the OVF. This EVF crop of the active focus area is an accurate representation of the exposure, and it can be further magnified by pressing the command dial in order to better fine-tune manual focusing. The ERF also supports the camera’s manual focus aids (focus peaking and Digital Split Screen), both of which can be combined with the magnification option for maximum focusing accuracy.
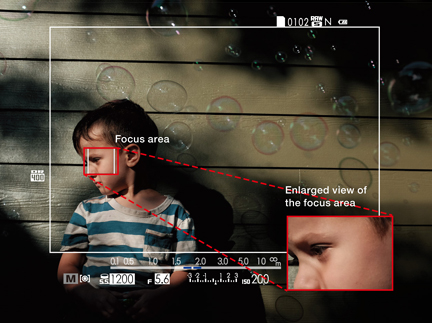
This simulated image illustrates the workings of the electronic rangefinder in the X100T’s optical viewfinder: The region covered by the active focus area (in MF or AF mode) is electronically displayed as an EVF crop in the bottom-right corner of the OVF. This way, users can check the correct exposure and focus while they are looking through the OVF.
The electronic rangefinder is also available in the X100T’s autofocus (AF) modes, where it can help determine if the selected focus area actually covers the part of the image that’s supposed to be in focus. It’s basically a real-time WYSIWYG focus and exposure check when you are shooting with the OVF.
Run, Fuji, Run!
Like the X30, the X100T is a very responsive camera, so it’s recommended to utilize fast SD memory cards with a nominal write speed of 90 MB/s or better. According to Fuji, the shutter lag is only 0.01 seconds, with a shooting interval of 0.5 seconds. This means that when you take a picture in single-shot mode, the camera is ready to take another one after 0.5 seconds.
The X100T’s hybrid autofocus system combines standard contrast detection autofocus (CDAF) with the faster phase detection autofocus (PDAF) method. However, PDAF is only available in the nine central (out of a total of 49) autofocus frames. This comes as no surprise, of course, since the X100T uses the same X-Trans II sensor as its predecessor.
However, AF algorithms have been improved since the X100S. I have learned that the algorithms in the X100T are actually more advanced than those in the X-T1, but that these improvements will quietly sneak into X-T1 with the upcoming firmware upgrade.

X100T – Lightroom 5.6.
Click on the image for larger sizes.
A major improvement of the X100T over the X100S is the addition of predictive AF tracking with the PDAF system. This means that the camera’s autofocus can follow an object that’s quickly moving towards or away from the camera, as long as the object is covered by the selected AF frame.
The X100T is able to perform predictive AF tracking at burst rates of 3 or 6 fps, but its frame buffer is so ridiculously small that the burst performance collapses after only 6 or 7 FINE+RAW exposures (basically after just one second of burst shooting at 6 fps) and is then depending on the write speed of the memory card. With my 95 MB/s SanDisk Extreme Pro card, I could achieve a continuous burst rate of about 1.4 fps after the camera’s buffer was full.
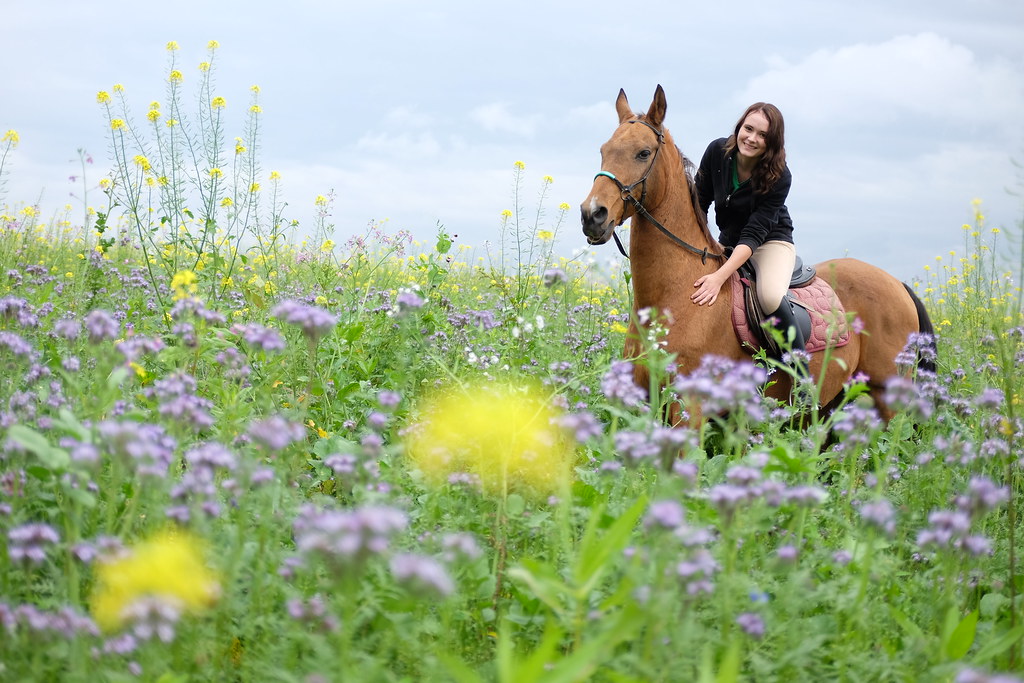
X100T with TCL-X100 at f/2, predictive PDAF tracking with 3 fps – Lightroom 5.6.
Click on the image for larger sizes.
Focus On Focus
Faster AF and predictive AF tracking aren’t the only improvements to the autofocus system. Basically, the X100T features the same AF settings and options as the X-T1, like setting the autofocus to either Focus or Release priority. I tend to use the Focus priority option for both AF-S and AF-C, as it makes sure that the camera will only take a shot when there’s an autofocus confirmation. I don’t want to waste the small frame buffer by filling it with out-of-focus pictures.
Using the AF-Lock (autofocus lock) function has become easier, too. Like in the X-T1 and X30, pressing the AF-Lock button now first takes a new AF measurement and then locks it. That’s in line with how the AE-Lock (exposure lock) feature has always worked in Fuji’s cameras, so this is a remedy for a long-standing user interface inconsistency between AF-Lock and AE-Lock.

X100T with TCL-X100 – Lightroom 5.6.
Click on the image for larger sizes.
In previous models, Instant-AF / One-Touch-AF (pressing the AF-L button to autofocus in MF mode) used to work only with CDAF. In the X100T, Instant-AF also supports the faster PDAF if one of the nine central autofocus frames is selected. Speaking of manual focus: The size of the selected AF frame can now also be changed in MF mode (there are five size options for each of the 49 AF frames) in order to make Instant-AF more versatile and effective.
In case you need to quickly change the position of the active AF frame, there’s now a vital option to perform this function directly with the four selector keys, without a prior push of the AF button. Of course, this means that the number of available Fn buttons is reduced from seven to three.
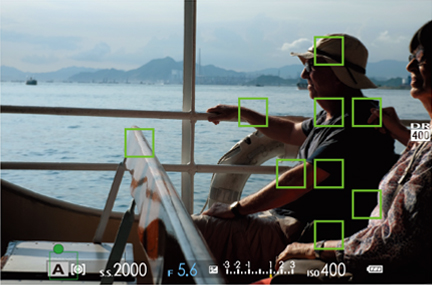
There’s also a new multi-point AF-S option that will automatically spread green autofocus confirmation frames over all parts of the scene that are in focus.
Spot exposure metering can now be coupled with the position and size of the active AF frame. This option has been high on the wish list of many users. Luckily, Fuji has listened.
Face Off
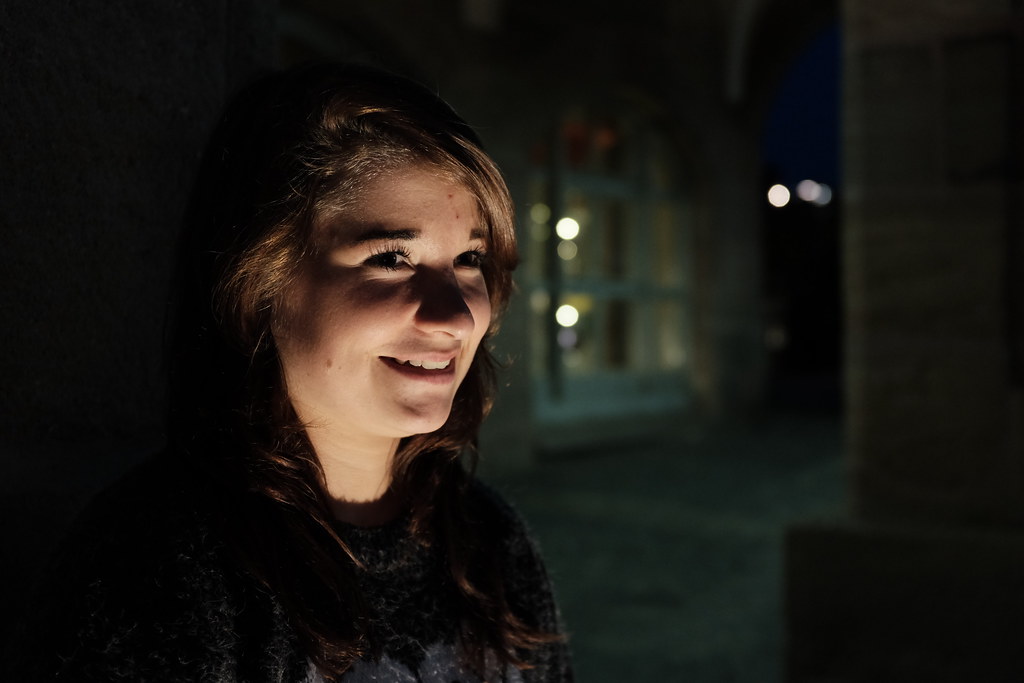
The X100T also features face detection. It works pretty well, but its most crucial benefit comes to light when it fails! How’s that? Well, in previous X camera models, failed face detection meant that the camera would always default to the central AF frame. Obviously, this was quite impractical. In the X100T, when face detection fails, the camera’s AF will fall back to the user-selected AF frame and its selected size. So you can now use face detection and—just in case it fails—still place a small AF frame on one of the eyes of your subject.

X100T with TCL-X100 – Lightroom 5.6.
Click on the image for larger sizes.
Please don’t forget that face detection isn’t just a focusing mode, it’s also an exposure metering mode—basically a derivate of multi metering that concentrates on the part of the image where a face has been detected. This means that when face detection suddenly fails while you take a series of portrait shots, the exposure metering of the scene can change. This isn’t an issue for me, as I shoot almost all of my images in manual exposure mode, so my exposure isn’t affected by metering changes. However, if you use face detection in concert with one of the camera’s auto exposure (AE) modes, you might want to keep this tidbit in mind.
Make It Quick
The X100T’s mechanical leaf shutter is almost silent, but there’s a catch: Shot wide-open at f/2, the maximum shutter speed is limited to 1/1000s (as opposed to 1/4000s when the lens is stopped down to f/8). Obviously, 1/1000s isn’t always sufficient when shooting in bright light. That’s why all X100 series cameras feature a built-in ND filter that takes 3 stops of light away when it is activated.
With the X100T’s new electronic shutter setting, the ND filter may no longer be required in such situations. Using the electronic shutter, the maximum shutter speed increases to 1/32000s at all aperture settings, and since there are no moving parts, its operation is completely silent.
That said, the electronic shutter has some issues of its own: Due to its nature as a rolling shutter, it can’t be used with flash photography, and it also shouldn’t be used with fast moving objects as they can look distorted in the final image. This is also why AF-C object tracking in burst mode isn’t available when the electronic shutter is active.

X100T with electronic shutter at 1/32000s and f/2 – SOOC JPEG (Classic Chrome).
Click on the image for larger sizes and additional information.
The electronic shutter is a tool for quite specific tasks, such as wide-open portrait shots (for maximum subject/background separation) in bright light. It is by no means a one-fits-all solution, but it is an elegant way to beat the leaf shutter’s 1/1000s open aperture limit. The “elegance” part is provided by the MS+ES setting which combines the mechanical with the electronic shutter. As soon as the mechanical shutter breaches a technical limit, the electronic shutter automatically takes over. This makes MS+ES a convenient standard setting. Just make sure to set the camera back to MS if you want to use a flash or shoot some action.
Of course, the electronic shutter and the ND filter can also be combined. Together, they can absorb up to 8 stops of light when shooting at f/2.

X100T – Lightroom 5.6.
Click on the image for larger sizes.
At the Movies
Video recording has been improved, with full manual control over aperture and shutter speed during recording. ISO can be set manually or automatically, and you can pick one of the camera’s eleven film simulations to add a certain style to your recording. It’s possible to record full-HD with frame rates of either 60, 50, 30, 25 or 24 fps.

X100T – Lightroom 5.6.
Click on the image for larger sizes.
Autofocus and manual focusing are both available during recording. However, focus peaking isn’t possible during movie recording, only before you press the record button. On a more innovative note, it’s now possible to record movies using the optical viewfinder.
Up Close
Using the fixed 23 mm F2 lens of the X100 series wide-open at close distances is generally not recommended due to increasing softness at decreasing focus distances, although the resulting dreamy effect can be used deliberately:

X100T, f/2 – Lightroom 5.6.
Click on the image for larger sizes.

X100T, f/2.8 – Lightroom 5.6 (Astia).
Click on the image for larger sizes.
Stopping the lens down a bit more restores nice sharpness and detail at close range:

X100T, f/4 – Lightroom 5.6.
Click on the image for larger sizes.
With a minimum focus distance of about 4 inches, you can get pretty cozy with your subjects:

X100T, f/11 – Lightroom 5.6.
Click on the image for larger sizes.
ISOless Sensor
Like all X cameras, the sensor in the X100T is of the “ISOless” kind. This means that at higher ISO settings, it doesn’t make a visible quality difference whether the necessary signal amplification of the recorded image information occurs in the camera before the RAW file is generated, or later when the RAW file is processed. Boosting the image data to the required ISO setting later during RAW processing has the distinct advantage that the digital push can be performed selectively, amplifying the shadows and midtones more than the highlights, hence increasing the dynamic range of the result.
This is exactly how the DR function works. At DR200%, the highlights are pushed 1 stop less than the shadows, resulting in an image (JPEG) with highlights that have been less exposed (amplified) then the shadows and midtones, hence extending the highlight dynamic range by 1 EV. At DR400%, the difference between highlight and shadow/midtone amplification is 2 stops, practically extending the highlight dynamic range of the result by 2 EV.
In the X100T, you can now actually see the effect of your DR settings in the live view of the electronic viewfinder, and you can also see in realtime how they affect the live histogram. This means that the shooting process becomes even more intuitive. You can now simply expose your shadows and midtones “to taste”, then add DR200% or DR400% as necessary to recover or mitigate any blown highlights. To facilitate this, I like to add the DR function to one of the X100T’s seven Fn buttons.
I do not recommend using the DR-Auto setting in the X100T, because the camera cannot (yet) read your mind. For example, it’s possible that you want to expose to the highlights and appreciate strong contrast, like in the following example that was shot with the camera’s factory settings and DR100%:

X100T – SOOC JPEG, DR100% (Provia).
Click on the image for larger sizes and additional information.
If you change your mind later, you can recover information that appears lost in the shadows by pushing the shadows up using an external RAW converter. Thanks to the ISOless sensor, this will usually yield very good results. In our example, I used Lightroom to perform a selective push of the lower black area:

X100T – Lightroom 5.6 (Provia).
Click on the image for larger sizes and additional information.
Of course, there are instances when a higher ISO setting is required, anyway. For example, in order to realize the following handheld shot at 1/30s and f/3.2, an ISO setting of 800 was necessary. So why not manually set DR400% to protect as many highlights as possible? I had nothing to lose, because if the result had turned out too soft in the highlights, I could always have re-processed it at a lower DR setting (DR200% or DR100%) with the camera’s built-in RAW converter. Doing so is just a matter of a few seconds.

X100T – SOOC JPEG, DR400% (Astia).
Click on the image for larger sizes and additional information.
The nature of the ISOless sensor also means that classic ETTR is only effective at the camera’s base ISO of 200. ETTR means “expose to the right”, and in its classic form it’s used as a technique to overexpose a scene and later adjust the exposure back down to its appropriate (lower) level during RAW processing. This method is particularly popular with Canon shooters, because Canon is pretty much the only major camera maker that isn’t using ISOless sensor technology in their APS-C and full-frame cameras.
As a Fuji shooter, thanks to the ISOless sensor, classic ETTR is only effective at base ISO (that’s ISO 200 in the X100T). Of course, the camera’s image quality (IQ) is very good at base ISO, so in most cases there won’t be much to gain from classic ETTR in terms of any visible IQ improvement.
Let’s look at an example. To begin with, you have to find a subject with limited dynamic range that you can actually overexpose at base ISO without blowing critical highlights in the RAW file. Here’s one:

X100T – Lightroom 5.6, uncorrected classic ETTR exposure (Pro Neg. Hi).
Click on the image for larger sizes.
In this example, I overexposed the midtones and highlights to a level that destroyed the late-afternoon mood of the scene. The shadows look great, but the rest is just too bright and flat due to my rich exposure at base ISO. However, in this exposure everything (that is the full tonal range of the scene) still fits on the sensor without blowing critical highlights, so I went with it to capture as much light as possible. Rule of thumb: the more photons (aka light) you can capture, the better. Just make sure not to blow critical highlights. Here, the critical part of the scene is the white ferry, so this is where I had to make sure not to breach the sensor’s saturation limit. Basically, this is a matter of experience and observing the live histogram, that’s why I am quite happy that Fuji isn’t changing the sensor with each new model. As a rough rule of thumb one might say that you can expose the sensor (and hence the RAW file) about 0.4 EV richer than the in-camera JPEG at factory settings would allow.
Processing the above shot in Lightroom allowed me to reduce its overall exposure by at least one stop (using the Exposure slider) while keeping the dark tones largely as they were by pushing the Shadows slider to the right:

X100T – Lightroom 5.6, corrected classic ETTR exposure (Pro Neg. Hi).
Click on the image for larger sizes.
This corrected (darkened) version better preserves the intended mood, and the texture in the white parts of the ferry is now clearly visible.
Start Your Engine!
Much has been written about Fujifilm’s JPEG engine. It is the part of the camera that turns the RAW data of a shot into a JPEG image we can actually look at. Sadly, this involves some common misunderstandings.
For example, let’s take a look at the neverending dynamic range discussion: As many of you know, the folks at Digital Photography Review provide dynamic range measurements for most of the cameras they review. Here are their findings for the X100S, and there’s no reason to believe that the results for the X100T will be different.
It’s important to understand that these dynamic range charts have very little to do with the actual dynamic range of the camera’s sensor or hardware. Instead, these charts illustrate the tonal range of the camera’s JPEG processing for different film simulation modes and DR settings. Please note that more dynamic range doesn’t mean that images are better-looking. Quite to the contrary! That’s why Fujifilm has actually decreased the JPEG dynamic range of its standard Provia film simulation in the shadow areas when they made the transition from the EXR I engine of the X100, X-E1 and X-Pro1 to the EXR II engine that was introduced in the X100S.
DPR’s Andy Westlake himself asked for this change in his review of the original X100 in May 2011. Quote: “The default Provia color mode isn’t our favorite, due mainly to its rather low-contrast tone curve and somewhat open shadows, which means the images lack a little ‘punch’.” So here you have it: Folks (including professional reviewers) love JPEGs with “a little punch”. So Fuji listened, and now Provia is a favorite, albeit one with less dynamic range in shadow areas:

X100T – SOOC JPEG (Provia, factory settings).
Click on the image for larger sizes.
In order to increase the shadow dynamic range of a straight-out-of-camera JPEG, you can either use a different film simulation (Pro Neg. Std is less contrasty than all other film modes) or decrease the Shadow Tone setting of the X100T’s JPEG engine. Here’s how the Provia shot looks like with Shadow Tone -2:

X100T – SOOC JPEG (Provia, Shadow Tone -2).
Click on the image for larger sizes and additional information.
Here’s the same shot with a different look thanks to the X100T’s new Classic Chrome film simulation:

X100T – SOOC JPEG (Classic Chrome, Shadow Tone -2).
Click on the image for larger sizes and additional information.
As you can see, dynamic range and overall look of SOOC JPEGs have little to do with the dynamic range of the camera hardware. This is particularly the case with ISOless sensors, because they allow camera manufacturers to manipulate the tonal range in a quite flexible fashion—before and after the RAW file is generated.
Designing the shadow and highlight clipping points of a JPEG engine that’s supposed to deliver pleasing (“punchy”) straight-out-of-camera JPEGs is a tricky issue, because a one-fits-all solution for all tastes and subjects doesn’t exist. As good as Fuji’s JPEG engine is (especially compared to the pathetic efforts of some competitors), it’s still always a compromise.
Since we have already discussed the shadows, let’s also take a quick look at the highlight limit of the JPEG engine’s dynamic range. This sample illustrates how bright highlights in the sky are clipped at Provia factory settings:

X100T – SOOC JPEG (Provia).
Click on the image for larger sizes and additional information.
Processing the RAW file with Lightroom’s Fuji-approved Provia preset (moving the Highlights slider all the way to the left) leads to the following result:

X100T – Lightroom 5.6 (Provia).
Click on the image for larger sizes.
Obviously, the RAW file contains more highlight dynamic range than the built-in JPEG engine is willing to extract. Of course, using the DR function could have extended the highlight dynamic range of the shot by one or two stops, but at the expense of image quality in the darker parts. As photographers, it’s our task to determine whether highlights or shadows/midtones are more important to a scene—and to expose accordingly. Luckily, the X100T can already show us the results in its live view before we take the shot. What we see is what we get. However, we can always extract a little bit more highlight dynamic range and boost shadows by subjecting the RAW file to an external workflow with software like Lightroom or Iridient Developer.
Here’s a practical example of a shot that required external processing of the RAW file in order to retrieve more highlight tones:
X100T with TCL-X100 – SOOC JPEG (Pro Neg. Std).
Click on the image for larger sizes.
X100T with TCL-X100 – Lightroom 5.6.
Click on the image for larger sizes.
One of the more advanced features of Fujifilm’s current JPEG engine is its so-called Lens Modulation Optimizer (LMO). In the X100T, the LMO is not an option—it is always on. This means that the JPEG engine will always use the LMO to mitigate diffraction that occurs with smaller aperture openings, typically starting at f/9 and higher. Here’s an example shot taken with the X100T’s maximum aperture setting of f/16 and manually set hyperfocal distance:
X100T – SOOC JPEG, f/16 (Provia).
Click on the image for larger sizes and additional information.
Fujifilm’s engineers are proud of their film heritage and put film simulations at the very heart of what distinguishes their cameras from competing offerings. In Fujifilm’s ideal world, photographers would only utilize an X camera’s JPEG engine or built-in RAW converter (which are just two different names for the same thing).
Of course, there is no ideal world, and many users do not care about the JPEG engine or “Fuji Colors”. However, those who do will appreciate that the X100T features a brand-new film simulation: Classic Chrome. Introduced in the X30, Classic Chrome will soon arrive in the X-T1, and it might also come to older X camera models like the X100S.

X100T – SOOC JPEG (Classic Chrome).
Click on the image for larger sizes and additional information.
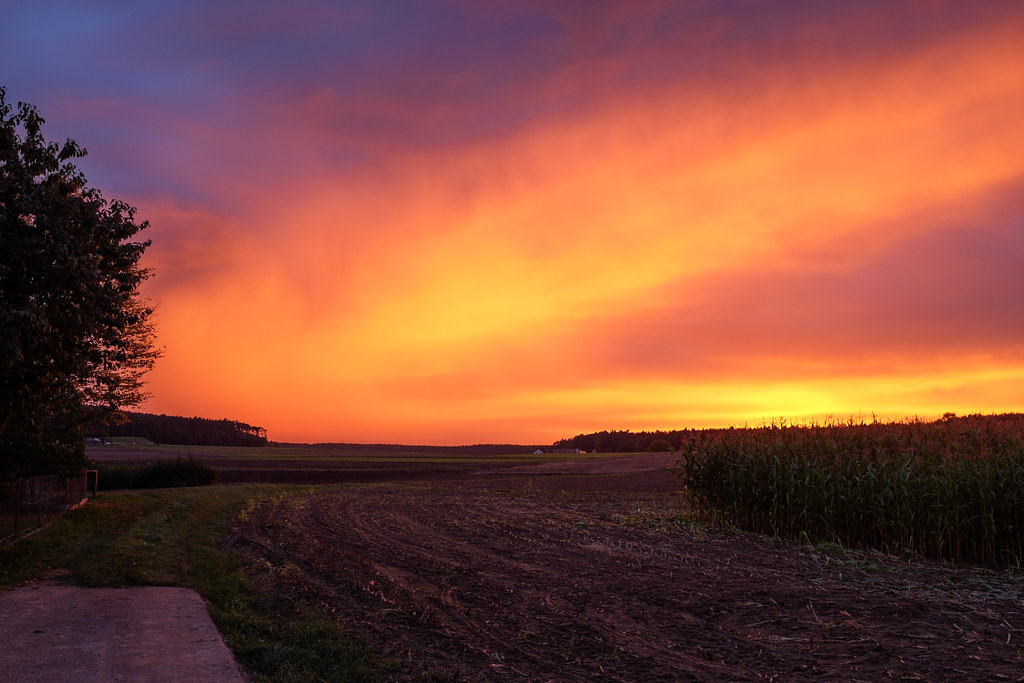
Classic Chrome is supposed to remind us of the golden age of LIFE magazine photography. Its distinct look appeals to me for a variety applications, from landscapes to portraits.

X100T – SOOC JPEG (Classic Chrome).
Click on the image for larger sizes and additional information.

X100T – SOOC JPEG (Classic Chrome).
Click on the image for larger sizes and additional information.

X100T – SOOC JPEG (Classic Chrome).
Click on the image for larger sizes and additional information.
X100T – SOOC JPEG (Classic Chrome).
Click on the image for larger sizes and additional information.
Each of Fuji’s currently six color film simulations radiates a distinct look. Luckily, you don’t have to decide on one of them before you take a picture, as you can always change your film simulation settings later with the camera’s internal RAW converter. The same convenience applies to all the other JPEG parameters, such as Shadow Tone, Highlight Tone, Color, Sharpness or Noise Reduction. You can also change the white balance with one of the provided presets or to a Kelvin value. So instead of obsessing about JPEG settings before taking a shot, you can focus on the subject.
You can use the built-in RAW converter to try out different settings in order to determine which one better suits your needs or meets your taste. For example, here are three versions of the same shot—one was processed with Classic Chrome, one with Velvia and one with Monochrome + Red Filter:

X100T – SOOC JPEG (Classic Chrome).
Click on the image for larger sizes and additional information.

X100T – SOOC JPEG (Velvia).
Click on the image for larger sizes and additional information.

X100T – SOOC JPEG (Monochrome + Red Filter).
Click on the image for larger sizes and additional information.
I have a hard time deciding which version I like best. So how could I possibly have known before I took the picture? This is why the built-in RAW converter is a great tool for photographers who appreciate Fuji’s JPEG output. Just remember to always shoot in FINE+RAW instead of JPEG only.
Three of the X100T’s monochrome conversion options involve virtual color filters for yellow, red and green that can remap luminance levels based on different colors. For example, the red filter will darken blue skies and brighten skin tones in the black-and-white result. I often combine black-and-white film simulations with increased contrast settings (Shadow Tone and Highlight Tone at +1 or +2), minimal noise reduction (-2) and increased sharpness (+1 or +2).

X100T – SOOC JPEG (Monochrome + Green Filter).
Click on the image for larger sizes and additional information.

X100T with TCL-X100 – SOOC JPEG (Monochrome + Yellow Filter).
Click on the image for larger sizes and additional information.
X100T vs. X100S
We’ve covered many changes and improvements on the inside and outside of the X100T, but what about image quality? Since the X100S and X100T use the same sensor, the same lens and the same 14-bit RAW file format, I doubt there is a visible quality difference between these two cameras at the RAW level.
There are a few differences at the JPEG level, though: The X100T’s JPEGs are much (often between 40% and 80%) larger than those of the X100S, which means that they are less compressed and hence better suited for post-processing. The X100T also offers a new extended ISO setting of 51200, but like its counterpart in the X-T1, this feature is mostly for show. Extended ISO means that no RAW file is saved, so practically, you are better off using the camera’s normal ISO range of 200-6400. If necessary, you can always push an underexposed ISO 6400 RAW with an external or the built-in RAW converter.
Have there been any further changes to the JPEG engine? Sure, there’s Classic Chrome, and there may be little tweaks in the auto white balance measurement. However, regarding the overall look, color gradation and noise reduction, I had a hard time spotting differences between JPEGs from the X100S and X100T. Just one little thing: The RAWs and JPEGs of my X100T (pre-production) were a bit brighter than those of my production X100S at all ISO levels, but still within the allowed margin of error of 1/6 EV.
The two following shots were taken with an X100T and X100S at ISO 4000 with identical exposure and JPEG settings:

X100T – SOOC JPEG, ISO 4000 (Provia).
Click on the image for larger sizes and additional information.

X100S – SOOC JPEG, ISO 4000 (Provia).
Click on the image for larger sizes and additional information.
Home On the Range
In order to shoot a scene with very high dynamic range (meaning scenes with a lot of contrast between highlights that you don’t want to appear blown and shadows that you don’t want to appear blocked), Fujifilm X-series cameras feature a DR function that extends the highlight dynamic range by one or two exposure values (EV). It’s a powerful feature, and the X100T makes it more accessible by providing a WYSIWYG live preview of the DR function that also extends to the live histogram. Basically, this ends the guessing game about which DR setting is optimal for any given scene.
In order to benefit from this live DR preview, it’s important not to set the camera to DR-Auto. Instead, manually pick one of three DR settings: DR100% is the standard setting without DR expansion, DR200% expands the highlight dynamic range of the shot by one stop, and DR400% expands it by two stops.
Here’s an example of how the DR function works. The portrait shown below contains extreme contrast, as the main subjects are posing in the shadows while the house, sky and clouds are brightly illuminated by the afternoon sun. In order to capture the dynamic range of this scene in the RAW file (and in a JPEG derived from it), one would expose the image to the highlights and consequently accept underexposing the main subjects and darker parts. Later, one would boost the shadows and midtones during RAW conversion while protecting the highlights. This procedure of selectively changing the tonality of an image is called tone-mapping, and the DR function of the X100T’s JPEG engine does this automatically for you.
Let’s have a look at how the scene turns out with the X100T’s three different DR settings. Here’s the DR100% version:

X100T – SOOC JPEG, DR100% (Pro Neg. Hi).
Click on the image for larger sizes and additional information.
Quite a mess! While our main subjects are correctly exposed with nice shadow tonality, the clouds, sky and wall are overexposed and blown, clipping all three color channels (RGB) and also leading to false color gradients in the blue sky, which turns greenish in the brighter parts where the blue channel starts to saturate. From a technical standpoint, this JPEG is a failure, as it couldn’t capture the dynamic range of the scene.
Let’s now look at the DR200% version of the shot:

X100T – SOOC JPEG, DR200% (Pro Neg. Hi).
Click on the image for larger sizes and additional information.
With DR200%, things already look much better. The clouds have magically reappeared with texture, and the false colors in the blue sky are almost gone. However, the bright parts of the house are still blown.
Now for the DR400% version:

X100T – SOOC JPEG, DR400% (Pro Neg. Hi).
Click on the image for larger sizes and additional information.
Here we go! Clouds, sky and the wall are now textured, while the shadow parts remain unchanged. How did the camera do it? It’s quite simple: With the DR400% setting, the RAW file is underexposed two stops by applying less ISO amplification. For example, when using ISO 800 (the minimum ISO for DR400%), the camera is actually writing a RAW file with an ISO 200 exposure. This generates two extra stops of highlight headroom. Then, during RAW conversion, the JPEG engine pushes the shadows and darker midtones of the exposure back up to ISO 800, but leaves the brightest highlights untouched at ISO 200. Voilà: a tone-mapped JPEG with two stops of additional highlight dynamic range.
Click here to comfortably cycle through the three DR versions of this example.
RAW Facts
The X100T and X100S apparently share the same 14-Bit RAW file format, which means that you can trick most RAW converters into accepting X100T RAWs as long as they support the X100S. All you have to do is change the camera model field in the EXIF data from X100T to X100S. This can be easily accomplished with an EXIF editor. On my Mac, I simply bought one from the App Store. That way, I was able to process my X100T files in Lightroom 5.6.
X100T – Lightroom 5.6.
Click on the image for larger sizes and additional information.
A few third-party converters such as Iridient Developer and Photo Ninja already officially support the X100T.
X100T – Iridient Developer 3 beta 2 (Pro Neg. Hi).
Click on the image for larger sizes and additional information.
Conversion Lenses
You can turn your X100T into a mini system by affixing a converter to its 23 mm lens, either the 19 mm WCL-X100 wide-angle or the 33 mm TCL-X100 tele conversion lens. Both converters deliver excellent quality, and they are compatible with all three generations of X100 cameras.

X100T with WCL-X100 (19 mm) – SOOC JPEG (Velvia).
Click on the image for larger sizes and additional information.
X100T with TCL-X100 (33 mm) – SOOC JPEG (Provia).
Click on the image for larger sizes and additional information.
The Gist
Even though they look very similar and share the same sensor, lens and processor, the X100T is a departure from the X100S with respect to performance and usability—it’s Fuji’s best camera to date. The X100T is a joy to work with, as it simply doesn’t get in the way of the photographer.
Here’s a summary of some of the X100T’s improvements over the X100S:
- A clean user interface on the inside and outside that doesn’t interfere with your composition, yet displays a plethora of information
- EVF info display adapts to horizontal or upright camera holding position (sadly, the LCD interface doesn’t change)
- Quick and easy image review using the focus ring as a control ring to browse through images when zoomed in
- Aperture ring with 1/3 stop clicks
- Larger ± 3 EV exposure compensation (EC) dial with more torque
- Exposure compensation works in manual exposure mode (when Auto-ISO is active)
- 3 different configurable Auto-ISO settings to choose from
- “Thumb-wheel”-style command dial à la X-E2
- Direct AF frame positioning option using the 4 selector buttons
- 7 customizable Fn buttons, with many functions now working as quick toggles
- Customizable Quick menu with 16 slots
- 7 custom user settings (X100 & X100S offer only 3)
- Face detection with auto fall-back to any user-selected AF frame
- Option to link the spot metering area to the active AF frame (position and size)
- Seamlessly integrated electronic shutter with 1/32000s maximum shutter speed
- Larger 3:2 LCD display with improved resolution (sadly, it’s not tiltable)
- Improved EVF with minimized display lag (realtime view) and much better low light performance (frame rate)
- Almost perfect WYSIWYG, including auto brightness in the electronic viewfinder (EVF) and full dynamic range (DR) mode simulation in the live view and live histogram
- Natural Live View option drastically increases the dynamic range of the EVF or LCD screen and is quite helpful when composing a high-contrast scene in bright light
- Improved optical viewfinder (OVF) with innovative electronic range finder (ERF) feature and real-time parallax correction
- Good autofocus performance, including object tracking features à la X-T1
- Improved multi-point AF-S mode
- Instant-AF supports phase detection autofocus (PDAF)
- Classic Chrome rocks (and will hopefully come to several older X-series models, too)
- Much larger and hence more robust JPEGs
- Wifi with remote control for iOS and Android devices; direct Instax printing
- Electronic shutter release with RR-90 (micro USB) or the microphone input
- Built-in intervalometer
- Improved video mode with additional frame rates, full manual control (aperture, shutter speed, ISO) and film simulation support (sadly, no support for the DR function)
- In-camera USB charging
- More reliable battery level indicator
Back To the Future
So is the X100T a perfect camera? Of course not. There’s always room for improvement, even though most points on my wishlist now belong in the nice-to-have category. The must-haves have mostly been covered. Here’s what I’d like to see in future X camera models and firmware revisions:
- Regarding autofocus speed and performance, I’d welcome predictive multiframe PDAF over the entire sensor area, not just the nine central AF frames. This also means that the camera can automatically change the active AF frame to track a subject that is moving through the image frame.
- Fuji might consider adding DFD (Depth from Defocus) technology to its CDAF. This could offer PDAF-like AF performance without the need of dedicated PDAF pixels. The technology could also be applied to existing cameras via firmware.
- I would like to see an option to use different (less conservative) circles of confusion for the electronic depth-of-field (DOF) display, especially one that matches the engraved DOF scale on those 14 mm and 23 mm lenses. The electronic DOF scale should also be available in the EVF/LCD when the 14 mm and 23 mm lenses are operated in MF mode.
- When the live view is zoomed in (AF-S and MF modes), it would be beneficial if one could quickly change the AF/MF area with the four selector keys without first zooming out.
- Add all shutter speeds (30s to 1/32000, not just 30s to 1s) to the camera’s T setting. In this mode, shutter speed is set with the command dial in 1/3 EV clicks.
- Histograms (playback histogram and if possible also the live histogram) should not only display luminance but distinct RGB color channel information.
- Add Zebras for video and blinking overexposure warnings (“blinkies”) in the live view. This way, clipped (overexposed) areas could easily be spotted in the live view—no more guessing what parts of the scene are actually overexposed. There should also be an option to display clipped areas in all playback views, not just the one with the tiny image size.
- Allow focus peaking during video recording.
- I’d like to see a bulb and long time exposure live view build-up. This should be possible, because Olympus is already offering such a feature.
- Enhance the electronic level indicator to display an additional axis (pitch/roll display).
- Add more grid line options to the EVF/LCD.
- The Q menu and shooting menu should be transparent in shooting mode to immediately see the effect of changes in the underlying live view.
- Silent Mode should be available as a Fn button toggle option (strangely, it is available as a Q menu option).
- Add an option that makes face detection work as a focusing mode only (and not also as an exposure metering mode).
- Add more user-configurable focal lengths to the lens adapter menu.
- Exposure bracketing should not be limited to 3 frames and ± 1 EV.
- Exposure compensation could be expanded to ± 5 EV.
- Faster focal plane shutter for future system camera models, add HSS flash, wireless TTL to flash protocol (this should already be in the pipeline)
- Advanced Filters could be available as effect options in the internal RAW converter, and shots taken with Advanced Filters should also generate a RAW file.
- LMO data should be officially available in the EXIF metadata, so RAW processor developers can eventually use this information in Lightroom, Capture One, Iridient Developer etc.
- I’d welcome an option for the camera to save single RAW files in Film Simulation Bracketing and ISO Bracketing modes. Currently, these modes are JPEG only.
- Add a „Push with DR“ function to the RAW conversion menu that works like the normal Push function but boosts only the shadows and midtones while keeping the highlights at their original brightness levels. This is basically a reverse DR function that would allow us to boost shadows and midtones without clipping any highlights. It would be a great, quick way to turn dark shots that were exposed to the highlights into pleasing JPEGs.
- Remote Control should be enhanced to control the built-in RAW converter with an iOS or Android device and immediately send the results back to the tablet or smarthone. Basically, this would be a nice app-based interface for the camera’s built-in RAW converter.
- Add a realtime HDMI live view output for both the EVF and LCD, and add tethering with standard applications such as Lightroom or Capture One.
See, there’s still stuff to look forward to.
Flickr album with more than 125 of my X100T sample images: click here!
Fujifilm X100T: USA: BHphoto / AmazonUS / Adorama / EUROPE: WexUK / WexDE / PCHstore / AUSTRALIA: CameraPro
For your convenience, here’s a TOC with links to my previous X-PERT CORNER articles:
- First Look: Fujifilm X30
- First Look: XF18-135mmF3.5-5.6 R LM OIS WR
- X-E2: Behind Firmware 2.00
- First Look: Fujifilm TCL-X100 Teleconverter for X100(S) Cameras
- First Look: Fujinon XF10-24mmF4 R OIS
- First Look: Fujifilm X-T1
- First Look: Fujinon XF56mmF1.2 R
- Exposing Right
- Using Auto-ISO
- Using Face Detection
- First Look: Fujifilm XQ1
- PDAF & LMO Lens Firmware Updates Coming in November
- First Look: Fujifilm X-E2
- How Fuji could save the X-M1
- X-A1 vs. X-M1: Photo Ninja Edition
- X-A1 vs. X-M1: the Shootout
- Using the Fujifilm X-A1 [& X-M1]
- First Look: Fujinon XF23mmF1.4 R
- RAW Converter Shootout Results
- Ultimate RAW Converter Shootout
- First Look: X-M1 with New Kit Zoom and Pancake Lens
- Zeiss Touit vs. Fujinon XF
- Remote Shutter Control for X Series Cameras
- Apple Camera RAW, X-Trans and EXR
- First Look: XF55-200mmF3.5-4.8 R LM OIS
- Studio X
- Using the X100S
- Using the X20
- X100S vs. X100
- X20 vs. X10
- RAW, JPEG, Silkypix and “Fuji Colors”
- Adapting Third-Party Lenses (updated with Speed Booster)
- RAW for JPEG Shooters…
- Tips for Updating your Firmware
- How to Clean the X-Trans Sensor
- Using the XF14mmF2.8 R
- Decoding XF18-55mmF2.8-4 R LM OIS
- Comparing RAW converters: JPEG vs. Lightroom, Capture One, Silkypix & RPP
- XF14mmF2.8 R appears to be almost distortion free
- How to Expand Dynamic Range
- How to Use Extended ISO
- EXR, anyone?
- Capture One – When the Going Gets Tough…
- Using Shooting Profiles and the Quick Menu
Rico Pfirstinger studied communications and has been working as journalist, publicist, and photographer since the mid-80s. He has written a number of books on topics as diverse as Adobe PageMaker and sled dogs, and produced a beautiful book of photographs titled Huskies in Action (German version). He has spent time working as the head of a department with the German Burda-Publishing Company and served as chief editor for a winter sports website. After eight years as a freelance film critic and entertainment writer in Los Angeles, Rico now lives in Germany and devotes his time to digital photography and compact camera systems. His new ebook The Fujifilm X-E2: Beyond the Manual is available at Rocky Nook.