How to Expand Dynamic Range

X-T1 giveaway contest ends very soon (March 14th 2014 at 2PM NY-time). hurry up and join it here.
_ _ _
by Rico Pfirstinger
It appears like two thirds of our X-PERT CORNER readers wanted to know more about dynamic range (DR) expansion. So here we go! Does the following scenario sound familiar? You take a picture of a landscape that looks wonderfully beautiful to the naked eye, only to find out later that the blue sky no longer looks blue and the fascinating cloud formations are just white blobs. The reason for this and similar disappointments is that the scene captured in the image has a larger dynamic range than your camera.
Every camera sensor is capable of capturing only a certain range of luminance—that is, a limited range between the brightest and the darkest parts of an image. The X-Pro1/X-E1’s range covers about 9.5 f-stops or exposure values. In other words, there are 9.5 EV between the minimum amount of light required for the sensor to depict something more than black pixels and the maximum quantity of light beyond which the sensor registers white pixels. This is the dynamic range of the camera. Within this range, the X-Pro1 or X-E1 can depict levels of brightness between pure black and pure white.
“Hardware” solutions
Unfortunately the world doesn’t abide by these limits, and many subjects exhibit a larger dynamic range than the camera is capable of capturing. We see these limitations, for example, in backlit situations and when people are standing in the shadow of an entrance. Professional photographers (and film directors) reduce the dynamic range of their subjects by using additional light. That’s why you’ll see an entire arsenal of floodlights and reflectors on large film sets even on bright days.
Only the luckiest photographers have the luxury of elaborate lighting equipment. Most of us have to make do with natural lighting, which often produces contrast in our subjects that exceeds a range of 9.5 EV. When you try to photograph these subjects with your X-Pro1, your images will either have blown-out white areas or blocked-up shadows, regardless of the combination of aperture and shutter speed you use. They may even have both! Contrasts that the human eye (or more accurately, the human brain) seems to process without any trouble pose near-impossible challenges for even the best cameras.
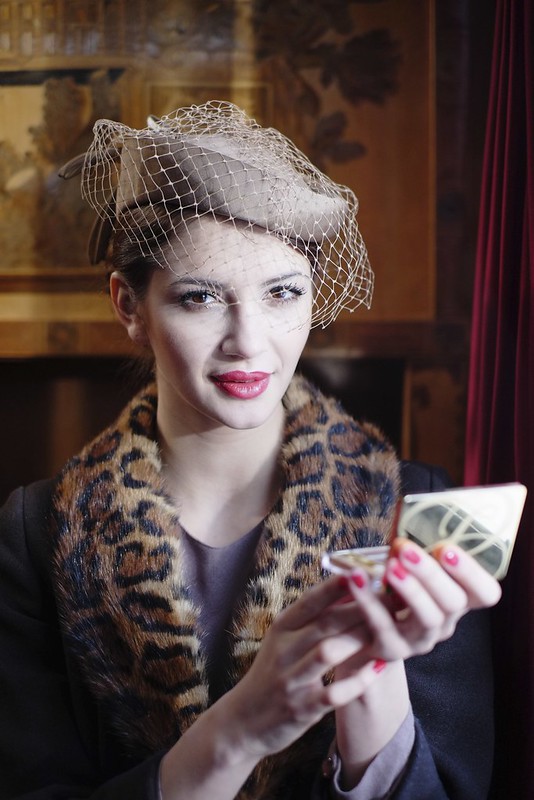
Then again, even a setup with studio lighting can involve plenty of dynamic range, that’s why I shot the following SOOC (= straight out of camera w/o further post-processing) JPEG in February 2012 in Warsaw using the DR Auto function of my pre-production X-Pro1. The camera chose DR400% and preserved the highlights of the skin (which was illuminated by daylight coming through a train window on the right). Click on the image for a high-res version:
But let’s get back to hardware: You can also use a graduated neutral density (ND) filter to decrease the dynamic range of a scene, typically a landscape. The top half of such a filter is dark and the bottom half is clear. The dark area is placed over a scene’s high-intensity region, such as the sky. Though this doesn’t increase the fixed dynamic range available in the sensor, it stretches usable dynamic range in practice.
Or you could use a camera with an EXR sensor, like the X10 or the X-S1. Then again, interest in getting to know more about EXR appears to be lackluster, as the number of votes for an “EXR Special” of this column is still ranking below 1000. Maybe this will change over the weekend? Here’s the poll, again:
The following SOOC JPEGs from my X10 were taken in South Africa and show how EXR cameras can handle subjects with plenty of DR (click on the images for high-res versions):
The digital realm also offers several software solutions to this common problem. One with a particularly resounding name is…
High Dynamic Range (HDR)
With High Dynamic Range (HDR) you take several shots of the same subject at different exposure settings. Then you (or your camera) can work to merge this series of exposures into a composite image, taking the dark areas (shadows) from the overexposed images and the bright areas (highlights) from the underexposed ones.
Fuji’s X-series cameras unfortunately do not offer a dedicated HDR mode (in contrast to many other cameras and even cell phones), so you will need to patch together your images on your computer using a software designed for this purpose, such as NIK HDR Efex Pro or Photomatix Pro. My book “Mastering the Fujifilm X-Pro1” includes a sub-chapter with tips that will help you create a series of 3, 5 or 7 differently exposed (but matching) images that you can merge together in post-processing.
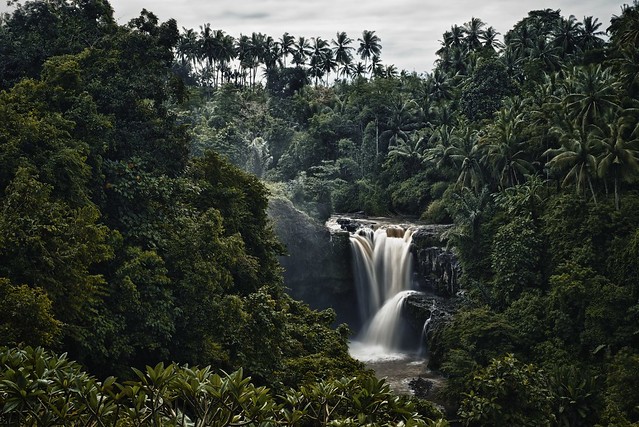
Here’s an example of an HDR composite I shot with my first pre-production X-Pro1 in early 2012 in Bali (click on it for high-res, EXIF data and a more thorough description):
Expose to preserve relevant highlights
HDR technology doesn’t lend itself to all high-contrast subjects, though. You can certainly shoot still objects or landscapes with this method, but shooting moving subjects is a different beast due to annoying ghosting artifacts. For this reason, many photographers instead opt for a compromise: they base the exposure on the brightest relevant element in their frame and accept the ensuing underexposure in darker areas. While it’s impossible to restore information to completely blown-out highlights, effective post-processing can generally rescue blocked-up shadows.
This method is called tone mapping, and it consists of reassigning brightness values. Tone mapping is the same function as the “fill-light” slider in some modern image-editing programs for external RAW development: it brightens the shadows and dark midtones of images that we consciously exposed too conservatively until the relative levels of brightness throughout the image appear balanced. The drawback of this method is increased image noise in the shadows as well as a reduction of brightness levels in these darker areas. But generally this cost is well worth the gain: you can retain detail in the bright areas of your image that otherwise would be lost.
Extending the dynamic range is actually a method of “dynamic range compression”: by intentionally underexposing an image (i.e., basing the exposure settings on the brightest relevant part of the frame), the middle and dark tones in the image are shifted further to the left and piled up there on the histogram. The “decompression” happens later when you map the tones in your images, bringing the dark and middle tones to lighter and more appropriate levels of brightness. The results suggest that you extended your camera’s dynamic range. And technically that’s exactly what happened—admittedly at the expense of a bit more noise and less nuance in the dark areas you (or your camera) brightened during post-processing.
In Silkypix 5, you can use the HDR or Dodging sliders, in Lightroom 4 the Tone (Shadows, Blacks) sliders, in Capture One 7 the Shadows slider and in RPP the Compressed Exposure boxes to remap shadows and dark midtones. Or you can even draw your own tone curves.
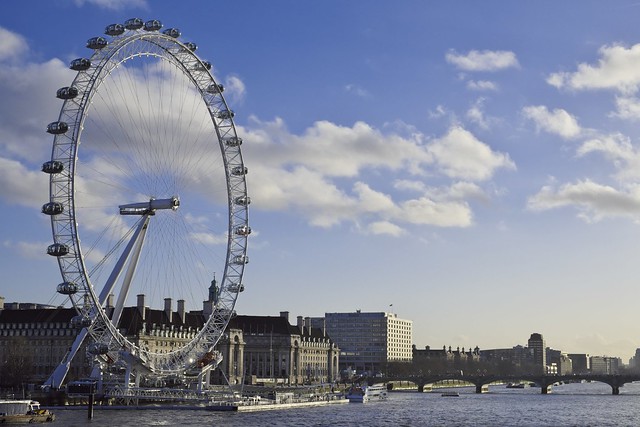
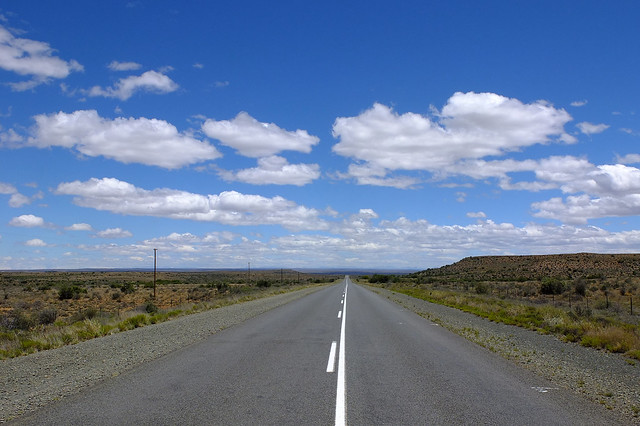
The London image above (click on it for high-res) was exposed for the highlights using an X-E1 with a kit zoom lens, retaining color of the sky and structure of the cloud. Processing the RAW in Silkypix 5, dark shadows were adjusted with the Dodging, Gamma and Contrast Center sliders in order to reveal more shadow detail. To successfully expose for the highlights, you should carefully monitor the live histogram.
Let your camera do all the work for you
If you go to SHOOTING MENU > DYNAMIC RANGE and select AUTO to switch on the automatic DR function, the camera takes care of this process for you with the following steps:
- It analyzes the subject and determines if its range of contrast exceeds the sensor’s dynamic range.
- If it does, the camera exposes the image one (DR200%) or two (DR400%) f-stops (exposure values) more conservatively than normal in order to retain detail in the bright areas of the image (highlights). This is why it is necessary to have an ISO setting of at least 400 for DR200% and an ISO setting of at least 800 for DR400%.
- The camera processes the JPEG by remapping the tones in the RAW image (that was intentionally exposed too conservatively) to bring the shadows and middle tones back to “normal.” In turn, the amplification of the sensor signal is reduced by one (DR200%) or two (DR400%) exposure values.
The camera’s DR function is practical and easy to use. It automatically handles nontrivial work that photographers would otherwise have to do themselves in order to prevent the loss of detail in bright areas.
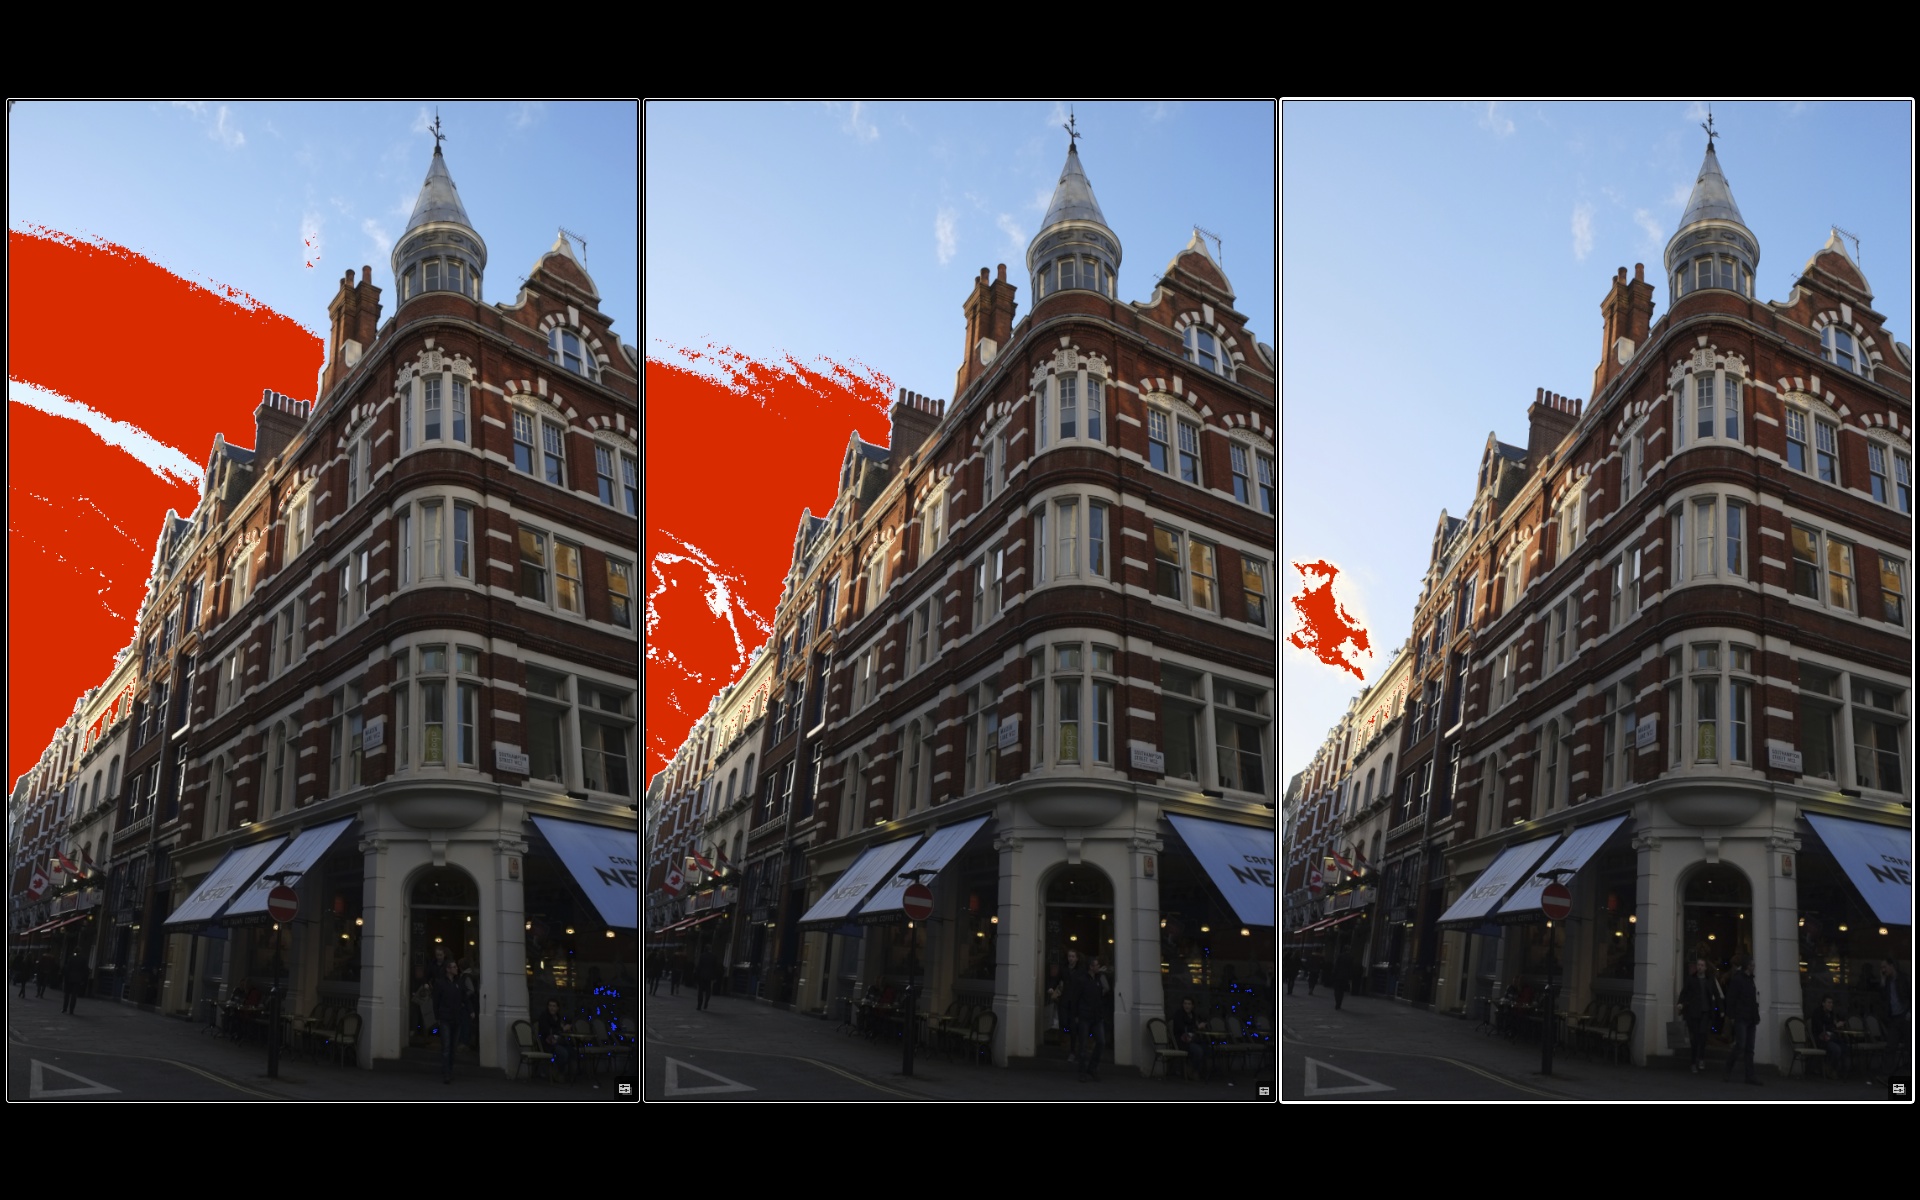
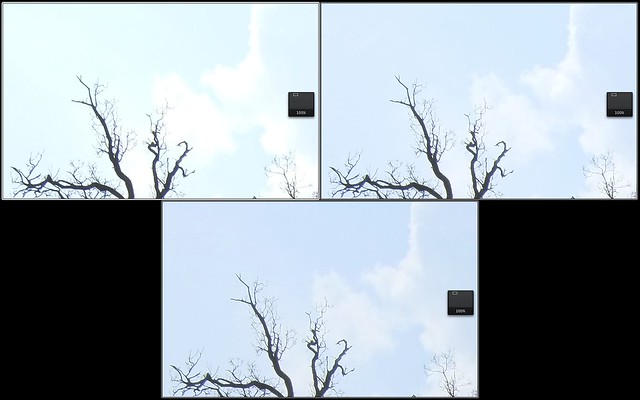
Let’s have a look at some examples. The following illustrations shows a sample shot in DR100% (left), DR200% (middle) and DR400% (right). You can click on the image to get to a full-size view of this Aperture screenshot.

While DR100% only shows a bright sky with a gradient from blue to green to white on the left, the DR400% version on the right reveals blue skies and a single white cloud. If you look at these examples with Aperture’s highlight clipping warning turned on, the differences are becoming even clearer:
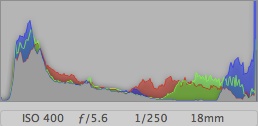
Let’s have a look at the associated histograms to see how the DR function performs and what it does.
Here’s the Aperture histogram of the DR100% version of the image:

Here’s DR200%:
And DR400%:
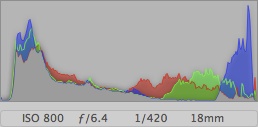
As you can see, expanding dynamic range (by definition) is about getting more highlight detail while leaving the shadows and midtones untouched. It’s a bit ironic that in order to achieve this goal, the camera (or the user) have to underexpose the image and then tonemap its shadow areas to restore them, making them look like the shadows in the same image taken without dynamic range expansion.
Here’s another example showing magnifications of sky/cloud details and colors that got lost in DR100% (left) but were retained in DR200% (right) and DR400% (below):
For photographers who don’t process their RAW files manually and instead want their camera to produce finished JPEGs, the DR function is essential. While the camera can capture images with 12 bits or 4,096 brightness levels (the new X100S and X20 cameras are even better and record 14-bit images), a finished JPEG is in 8-bit format with only 256 brightness levels. An intentionally underexposed JPEG (i.e., an exposure based on relevant highlights) is much more difficult to correct with tone mapping than a RAW file that was exposed in the same manner. In particular, JPEGs may only have a handful of brightness levels available in the darker regions of an image, meaning the tone mapping process of raising and spreading out these levels can lead to undesirable results with visible gaps between adjoining brightness values.
For JPEG photographers, the DR function has the advantage that the camera conducts the dynamic compression and decompression by itself, and it works with the RAW data captured by the sensor—all 4,096 (or 16,384 with the X100S and X20) brightness levels. Only after the camera maps the tones does it convert the image to 8-bit format and produce a JPEG with 256 brightness levels.
What if you also like to shoot RAW?
It should be clear by now that the DR function can help produce attractive JPEGs for high-contrast subjects. But what about RAW files? The image data in these files are underexposed by one exposure value with DR200% and two exposure values with DR400%. If you develop your RAW files with your camera, the X-Pro1/X-E1 will compensate for this condition automatically. If you use external RAW converters, it depends on the specific program: Silkypix (including the free Raw File Converter EX that came with your camera) as well as Lightroom and Adobe Camera RAW (ACR) automatically detect the DR function of a X-Pro1/X-E1 and adjust the exposure settings accordingly. The results will vary from those produced by the camera, which isn’t to say that one is better than the other. With external RAW converters, you also have the opportunity to tackle the task yourself and manage the editing based on your specific preferences.
Practical tips for using the DR function
For a camera with base ISO 200 to “underexpose” the RAW file by 1 EV (DR200%) or 2 EV (DR400%), it must use ISO settings of at least 400 or 800, respectively. Normally when these ISO settings are used, the camera amplifies the sensor signal. This boost is left out, however, when the DR function is enabled. In its place, the process of tone mapping must be used in the development of the RAW file. So make sure you set your camera to at least ISO 400 or 800—or better yet, to AUTO (800) or higher if you want to use the DR function.
If you manually set an ISO value that won’t work with the selected DR setting, the camera will automatically bring the DR setting down. If you have set the dynamic range to DR400% and the ISO to 400, for example, the camera will adjust the dynamic range setting down to DR200%. If you were to set ISO 200, it would go to DR100%. When this happens, the DR setting appears yellow in the display and remains so until you bump up the ISO to an operative level. In other words, your manually selected ISO value has priority over the DR setting. But the DR settings do have priority over automatically selected ISO values. This is why I recommend that you use the DR function in tandem with an ISO setting of AUTO (800) or higher.
When NOT to use DR expansion
Expanding the dynamic range makes sense when you want to preserve relevant highlights in your shot. But what’s relevant and what’s not? That’s for you (the creative photographer in charge) to decide, so don’t rely too heavily on DR Auto. Your camera ain’t smart enough to be creative, it only analyzes luminance. If, for example, highlights are positioned in the blurry background of an image, it often pays off to concentrate on the tonality of the actual subject sitting in the darker foreground.
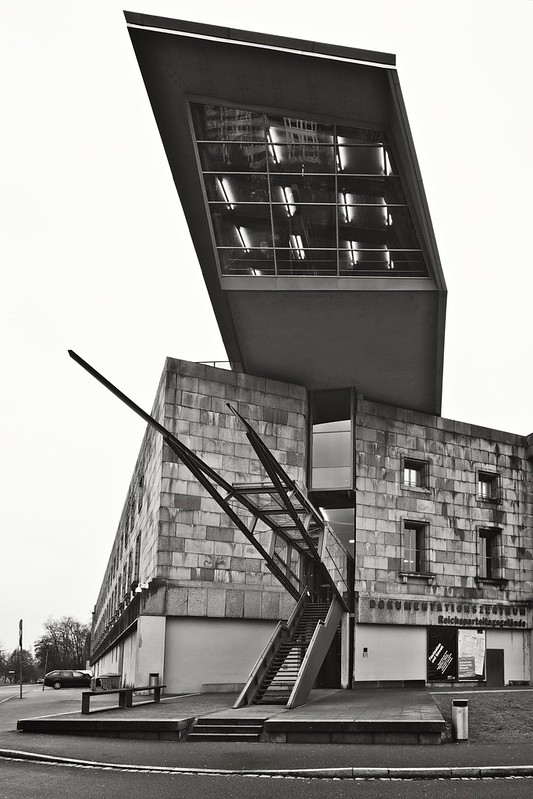
Here’s an example where blowing highlights (and shooting DR100%) was perfectly acceptable, even though the camera’s DR Auto setting would most likely have chosen DR200% or DR400% for this subject (click on the image for high-res):

Trying to “save” bright reflections or specular highlights isn’t usually worth the effort, either (click on the image for high-res):

Finally, it’s pretty futile trying to preserve a bright white sky that shows no structures, anyway, so don’t bother (click image for high-res):
In case you have missed it: This last shot is from a little series I shot yesterday test-driving a pre-production sample of Fuji’s new XF14mmF2.8 R prime lens. Click here to look at the full set.
You can also shoot in DR100%, expose for the highlights and set the shadow contrast of your Fuji X camera to “soft” (-1 or -2). This is kind of a “poor man’s” tone mapping for all those who like the Fuji colors of the internal RAW/JPEG engine. Here’s a fresh SOOC example (with no further post-processing) I shot just a few hours ago with my X-E1 and the 14mm pre-production lens (click on image for high-res):
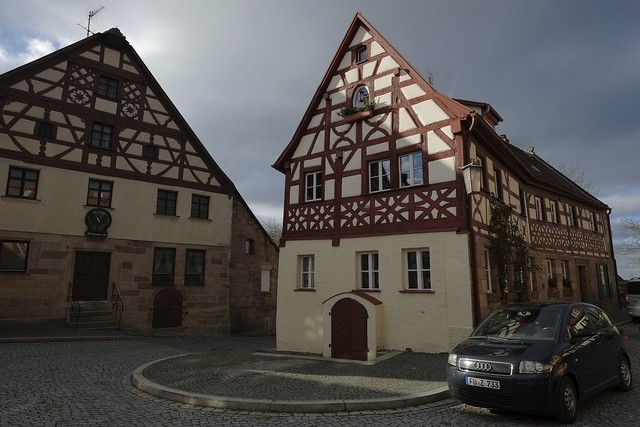
This example was shot in Pro Neg. Hi and Shadow Tone -2.
This is it—for now. In my book “Mastering the Fujifilm X-Pro1”, you will find a more elaborate discussion of the X-Pro1/X-E1’s DR function along with an FAQ and additional practical tips. Here’s one of them: The live histogram in the camera will always show a DR100% histogram, even if you (or your camera) select DR200% or DR400% for a shot.
Next Friday, I’d like to cover one of the topics that didn’t win in our recent polls as a little gift to those readers who kept voting for these topics but didn’t succeed.
Rico Pfirstinger studied communications and has been working as journalist, publicist, and photographer since the mid-80s. He has written a number of books on topics as diverse as Adobe PageMaker and sled dogs, and produced a beautiful book of photographs titled Huskies in Action (German version). He has spent time working as the head of a department with the German Burda-Publishing Company and served as chief editor for a winter sports website. After eight years as a freelance film critic and entertainment writer in Los Angeles, Rico now lives in Germany and devotes his time to digital photography and compact camera systems. His book “Mastering the FUJIFILM X-Pro1” (Kindle Edition) (Apple iBook Store) (German version) is available on Amazon and offers a plethora of tips, secrets and background information on successfully using Fuji’s X-Pro1 and X-E1 system cameras, lenses and key accessories.
PS: VSCO Film 02 goes Aperture!
As a Fuji X-series user you know that your camera is capable of producing very rich JPEGs that are quite usable for further post-processing. Using Apple Aperture as my basic processing software, I’m happy to note that VSCO has just released an Aperture version of their film simulation preset package FILM 02 (which is, of course, also available for Lightroom and ACR/Photoshop). Along with FILM 01, these sets of color and black&white film presets offer quite impressive starting points to enhance X-series JPEGs and TIFFs alike. I have uploaded a series of samples to Flickr that illustrate the impact of these presets on two SOOC JPEGs from a tiny Fuji XF1 taken at ISO 500, one Astia and one Provia version.
Here’s the SOOC (straight out of camera) Astia file:
And here’s the SOOC Provia file:
If you want to see what VSCO’s presets do to these JPEGs (including original scanned analog film grain), click here for my FILM 01 set (20 pics) and here for my FILM 02 set (22 pics) on Flickr.