Using the Fujifilm X-A1 [& X-M1]

Talk to Rico (open forum for questions & feedback) – Rico’s Flickr sets – X-A1 sample images set – Mastering the Fujifilm X-Pro1 reading samples (65 free pages) – Pre-order the new book: Mastering the Fujifilm X-E1 and X-Pro1
Update [17/9/13]: Added several Lightroom 5.2 RAW samples to the image set.

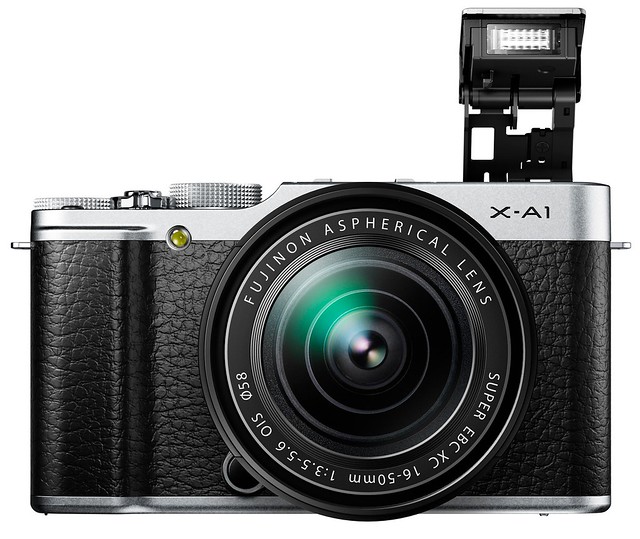
It took a while, but Fujifilm finally decided to officially announce the X-A1, the long-planned sister model of the X-M1. Let’s cut right to the chase: There’s little difference between these cameras. They look very much the same, they offer the same buttons and controls, the same processor, the same operating speed/performance, the same features, the same menus, the same build, material and size, even the same 16 MP Sony sensor. Of course, there’s one minor but important difference to mention in the sensor department: The X-M1 features an X-Trans color filter array (CFA) without an anti-aliasing (AA) filter, while the X-A1 uses a conventional Bayer CFA with an AA filter (to reduce/eliminate unwanted moiré). You can have a look at the full specs by clicking here.
So what’s the deal? Well, the X-A1 is by quite a margin more affordable than the X-M1, and it comes with a different set of color options: red/silver, black, blue, black/silver and brown/silver. However, not all color options will be available in all markets. For example, customers here in Germany can only expect to be offered the X-A1 in black, blue and red/silver.
It has also been mentioned that the X-A1 will be distributed mostly online and through large outlets like Walmart or MediaMarkt instead of specialized camera stores. With the X-A1, Fuji is targeting price-sensitive value customers who are interested in upgrading to a compact camera with a larger DSLR-quality sensor. But that’s just the marketing. For many real-world uses, the differences in image quality between the X-A1 and X-M1 will be perfectly acceptable. If they weren’t, Nikon, Canon, Sony, Olympus and the rest wouldn’t be able to sell any Bayer cameras to anybody. Let’s be smart: X-Trans is great, and it certainly has its advantages, but it’s not a requirement for taking great-looking images.

So if you aren’t married to X-Trans, the X-A1 is a viable and quite attractive option with an interesting value proposition. It’s also an affordable way to expand your existing X-series investment with a compact second generation option. It’s small and lightweight, it features a tiltable high-resolution LCD, it’s faster and more advanced (regarding both hardware and firmware) than the X-E1 or X-Pro1, and its Bayer sensor is comparable to current offerings from Nikon ([shoplink 13071 ebay]Nikon A[/shoplink]) and Ricoh ([shoplink 13349 ebay]Ricoh GR[/shoplink]). Please note that the pros and cons I mentioned in my X-M1 First Look article also apply to the X-A1, so instead of repeating myself all over again, I’d rather move along with new material.

I have been using an X-A1 pre-production sample with early pre-production firmware in the past six weeks along with an X-M1, and I have since silently updated the aforementioned X-M1 First Look article with additional findings regarding the pros and cons against the X-E1. So if you haven’t done so very recently, please consider checking out this article again.

Since both cameras share a common feature set and the same capabilities, I want to fill this column sharing my experiences with the X-A1 and X-M1. I have also prepared an X-A1 sample set with 75 images, and I have expanded my X-M1 sample set to more than 160 pictures, including several external RAW conversions. Unfortunately, there was no external RAW support for the X-A1 available at the time of this writing, but I’m confident this will change soon.
Once external RAW support and production samples of both the X-M1 and X-A1 become equally available, I will revisit the topic with a “shootout” between these sibling cameras, so there will eventually be a third part to this story.
Ready, Set, Go!
Most of my sample images were taken with pre-production copies of the XC16-50mm kit zoom and the XF27mm pancake lens, as these compact offerings are the most likely lenses to be used in concert with the X-A1 (or X-M1 for that matter). With the cameras set to multi-metering, the X-A1 and X-M1 can master many light situations without turning the exposure compensation dial.
SOOC JPEG (Astia) ISO 200
Even without engaging the camera’s DR expansion mode, dynamic range in JPEGs is pretty impressive and can be further enhanced by setting Shadow Tone and/or Highlight tone to -1 or even -2. I also like the improved color grading of the cameras’ second generation JPEG engine, especially since it adds more punch to the standard Provia film simulation mode. With the X-M1 and X-A1, I’m shooting most of my JPEGs in Provia, so the Astia sample shown above constitutes an exception. Here’s another DR100% SOOC JPEG, this time shot in Provia:

SOOC JPEG (Provia) ISO 640
At ISO 640, the Bayer CFA exhibits a minimal amount of noise, but that’s perfectly acceptable for me, since it looks very much like analog film grain in my eyes. I generally set the Noise Reduction of both cameras to -1 as a default, because I like the enhanced detail of this JPEG setting.
Even at ISO 6400, noise isn’t a deal breaker, although both luminance and especially chroma noise are more pronounced in the X-A1 than in the X-M1. Have a look at this X-A1 SOOC Velvia sample, shot handheld at 1/9s using the optical image stabilizer (OIS) of the 16-50mm kit zoom lens:
SOOC JPEG (Velvia) ISO 6400
The X-A1 and X-M1 are lacking the additional “Pro Neg.” color film simulations of the X-E1 and X-Pro1, and they also lack the color-filtered black-and-white modes. Instead, there’s only a generic monochrome mode. That said, it’s still possible to get attractive black-and-whites out of the X-A1 and X-M1:
SOOC JPEG (b&w)
To enhance the look of my black-and-white JPEGs, I often increase the shadow and the highlight tone contrast in the camera to +1 or even +2 and take the noise reduction back to -2. I feel that grainy higher-ISO noise is mostly an improvement for these kind if images, giving them a more organic look.
SOOC JPEG (b&w)
Don’t worry when your initial JPEG results from the camera don’t look perfectly exposed, or when the contrast settings seem too strong or flat. You can always use the built-in RAW converter of the X-A1 and X-M1 to push or pull a JPEG to your liking, change the contrast settings, the film simulation and many other parameters.
SOOC JPEG (b&w)
Working in color, things can become a little trickier, especially indoors with mixed light. White balance can be an issue, as the X-A1 and X-M1 (unlike their older siblings X-E1 and X-Pro1) lack subtle Kelvin settings in their built-in RAW converters.
Of course, those of you using an external RAW converter like Lightroom will just laugh at this, but JPEG shooters should be aware of this potential limitation. As a JPEG shooter, you are limited to white balance presets such as Fine, Shade, Fluorescent or Incandescent. However, you can manually set the proper white balance (WB) in advance by pointing the camera at a white or neutral gray wall/object before you start shooting a scene.
SOOC JPEG with a slight WB post correction in Apple Aperture
On the other hand, most users of the X-A1 will probably just stick to Auto-WB, so that is what I used shooting my samples. Even under tricky mixed light, the camera often got it right, but when it failed, I either redeveloped the JPEG in-camera with a different WB preset or I adjusted the resulting JPEG in Apple Aperture. Or both. Even though correcting the white balance of compressed 8-bit JPEGs isn’t really recommended, the method worked much better than expected.
SOOC JPEG with WB correction (slightly coolish look) in Apple Aperture
SOOC JPEG with WB correction in Apple Aperture
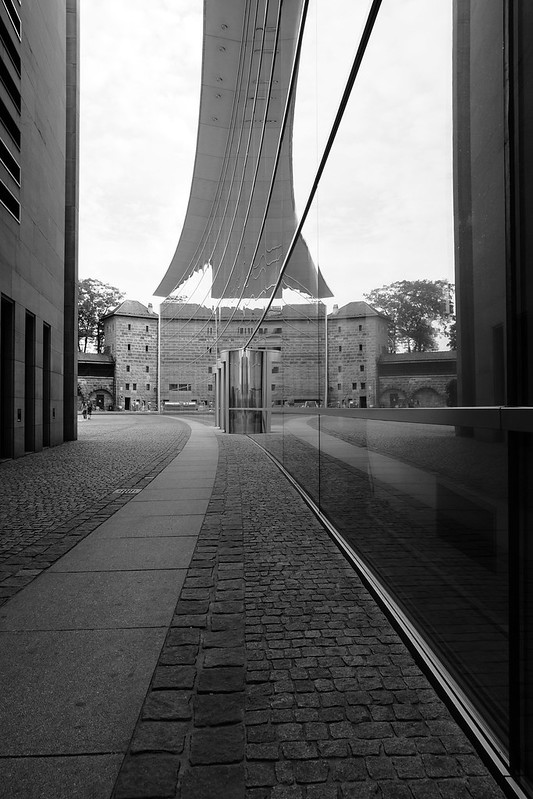
You can find more indoor color samples in my X-A1 Samples set, and before you ask: They were shot at the Neue Museum for contemporary art in Nuremberg, a place with stunning architecture and inspiring exhibits that welcomes photography in all of its rooms and exhibitions.
Let’s now move on to…
The Great Outdoors
SOOC JPEG (Velvia) ISO 400/DR200%
Capturing the dynamic range (DR) of strong outdoor contrasts poses a challenge to even the most advanced cameras. Larger sensors perform better in this department, not just due to their higher native dynamic range, but also thanks to reduced noise and artifacts when dynamic range is compressed and later re-expanded by the camera (or with an external RAW converter).
As you know, Fuji cameras offer a DR function that allows for an increase of actual JPEG dynamic range by either 1 or 2 aperture stops or EV values. These options are named DR200% (1 stop) and DR400% (2 stops), and you can learn more about them in my books or in this older column. Practically, most JPEG shooters will set their camera to DR Auto and Auto-ISO. They let the camera decide about which DR mode to choose, which isn’t such a bad idea, because the camera will usually make the right decision.
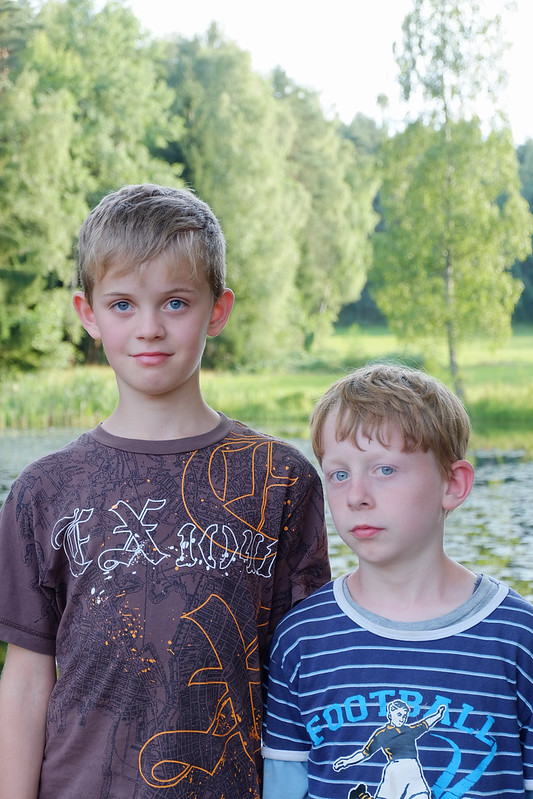
SOOC JPEG (Astia) ISO 400/DR200%
For this quick portrait of two boys against a background lit up by the setting sun, my X-A1 pre-production camera chose DR200%. This way, the camera preserved 1 EV of additional highlight headroom, pretty much the same amount I sacrificed by manually correcting the camera’s multi-metered exposure by +1 EV. Of course, shooting with ISO 200 and DR100% without applying any exposure compensation would have resulted in exactly the same RAW file, but the resulting JPEG would have looked quite different.
I shot the boys in Astia for smoother skin tones and a warmer background, and I also used the camera’s face detection feature. Face detection is a great improvement even for advanced photographers, mainly because it can be a genuine timesaver. Face detection helps me (being much less advanced) capturing the decisive moment without sacrificing AF accuracy, because I don’t have to spend time positioning a small AF frame over an eye of my subject. In the X-A1 and X-M1, face detection usually does a quite accurate job, that’s why I use this feature frequently with people. In my experience, it often even recognizes subjects that only reveal their profile to the camera.
Applying the right amount of exposure compensation to correctly illuminate your main subject (aka what’s important in your image) is a necessary evil for every photographer who desires to escape from the dungeons of fully automated shooting. Doing so can lead to other parts of the image being over- or underexposed. Sometimes, this isn’t a problem or fully intentional (like with the high-key portraits in my recent 23mm sample set), but there are also situations where you want to avoid blocked shadows and/or burned highlights. This is particularly true for many landscape shots.
In order to mitigate blocked shadows, you can set the Shadow Tone in the shooting menu (or in the internal RAW converter) to -1 or -2. This will lift the shadows and reveal more details in the dark parts of your JPEG image. As for burned highlights, merely setting the Highlight Tone to -1 or -2 is frequently of little use, because the highlights simply aren’t there: What’s not in the RAW file cannot be recovered. That’s why it’s smarter to increase an image’s upper dynamic range by choosing DR200% or DR400%. Look at this:
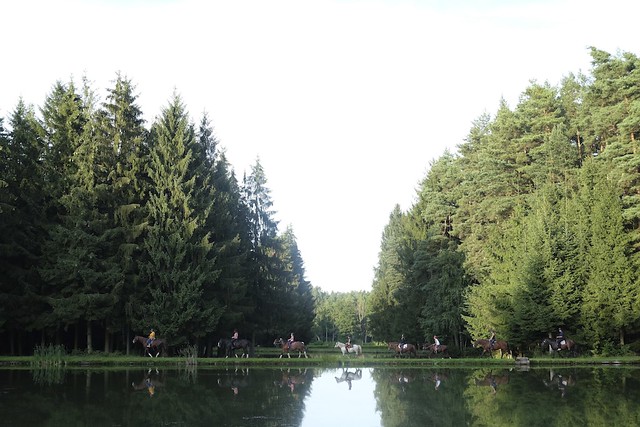
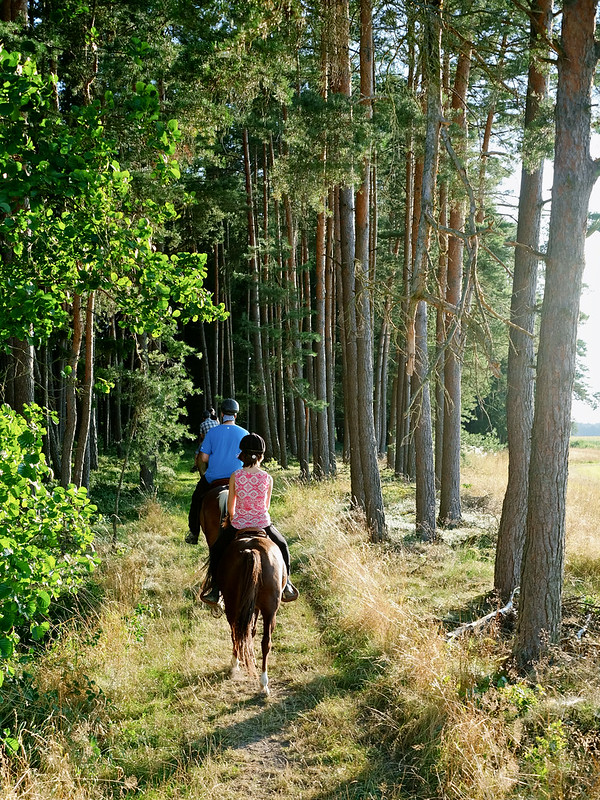
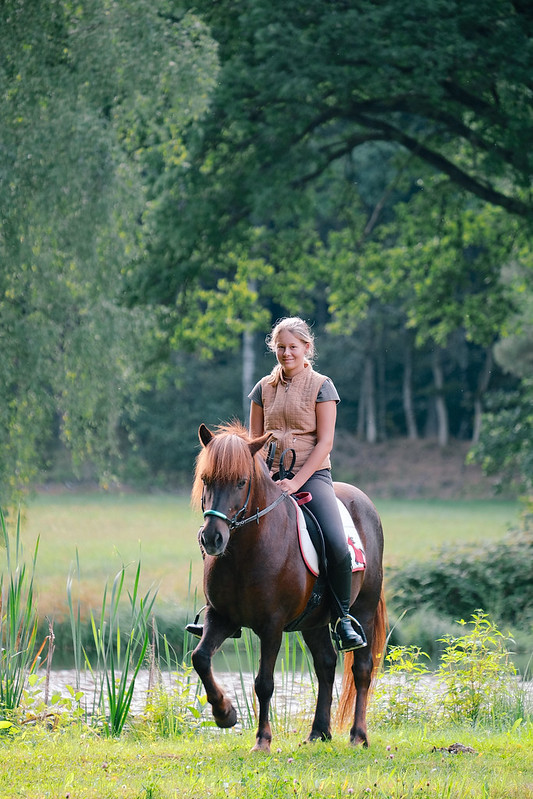
For this DR100% JPEG sample, I corrected the exposure of the X-A1 by + 1 2/3 EV (1.67 EV) in order to make sure that the horses and riders in the shadow are correctly exposed. After all, they are what this shot is all about. However, doing so removed the sky and replaced it with a large, white area.
The very same shot with DR400% doesn’t change the exposure of the riders in the shadow part, but it brings back the sky with clouds and all. I am retrieving what was lost by lifting up the overall exposure. You can still combine the DR function with a flatter Highlight Tone setting to retrieve even more color and detail from the highlight sections:
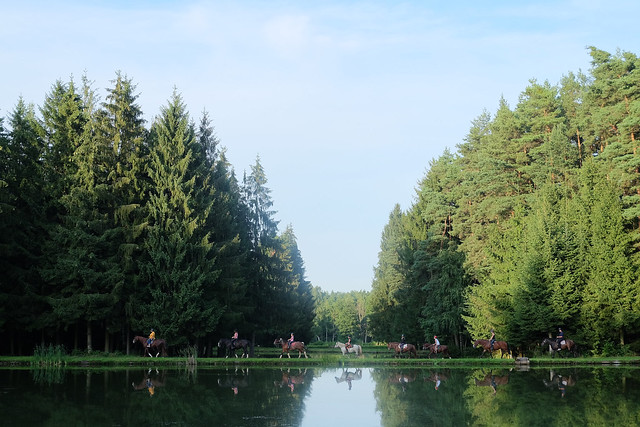
SOOC JPEG (Provia) ISO 800/DR400%, Highlight Tone -2
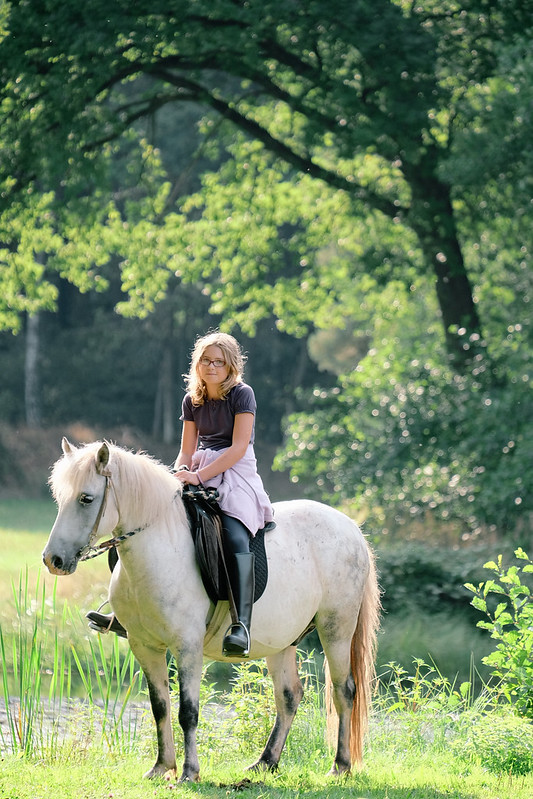
One of the most intriguing advantages of the X-A1 and X-M1 are their small size and little weight. In concert with the tiny 27mm pancake lens, the camera is almost pocketable, so I decided to hang it around my neck and take pictures while I was riding on my horse.
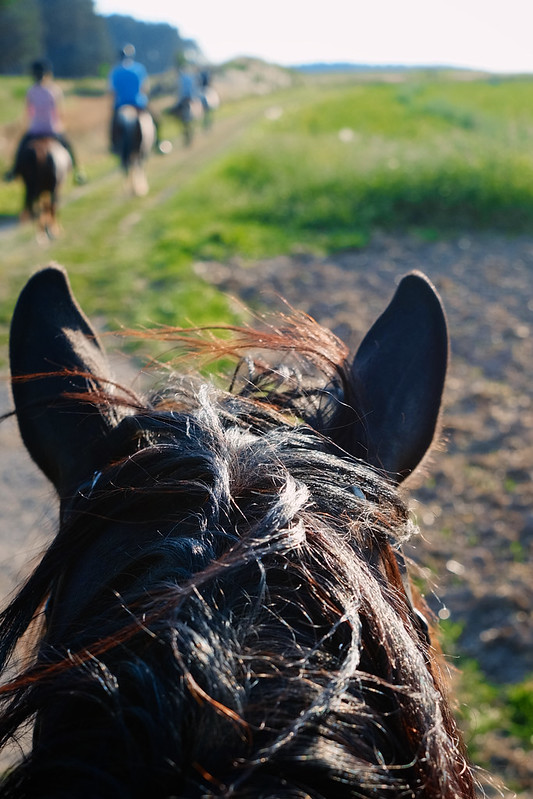
JPEG (crop)
Since we didn’t stop for pictures, I took the shots while we were on the move. Since riding is a rather shaky affair, fast shutter speeds were paramount to avoid unwanted motion blur.
JPEG (crop)
Of course, when the light starts to fade, fast shutter speeds quickly lead to higher ISO values. But that’s exactly where a large sensor (in a small camera) can be of utmost benefit:
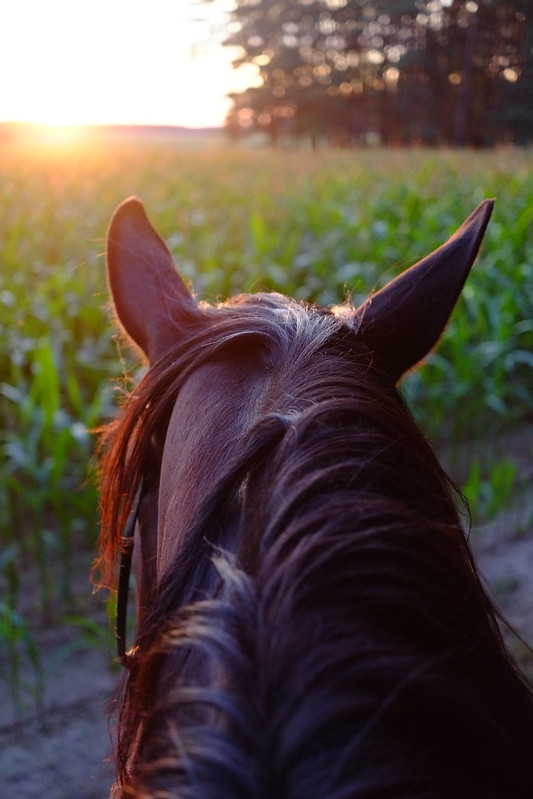
SOOC JPEG (Velvia) ISO 2000
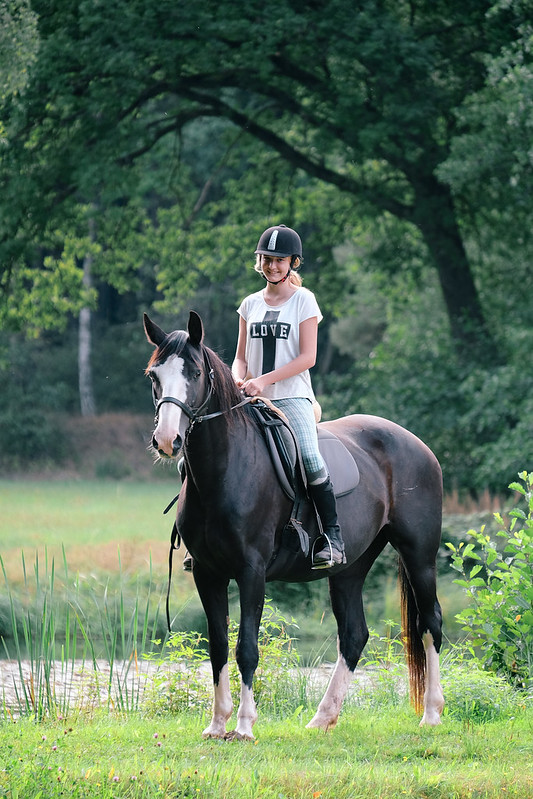
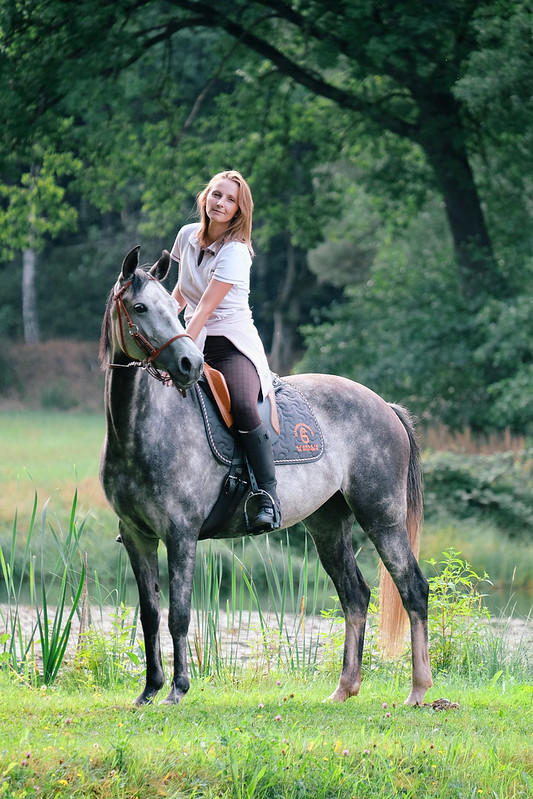
Back on the ground, I took some portrait shots of a group of visiting kids sitting on our horses. Since the attention span of kids and horses is quite limited, you have to work fast, especially when you have to take pictures of ten different kids in sequence.
This was a great opportunity to pull out Fuji’s 55-200mm tele zoom. Since this lens is rather large, I attached the optional HG-XM1 handgrip to the X-A1. For me, this really improves things with larger lenses. In order to catch as much of the evening light as possible and to isolate my subjects from the background, I used the lens wide open (f/4.8) at 200mm in Aperture Priority mode. I also set the camera to Auto-ISO 6400 and DR Auto, and I set a minimum shutter speed of 1/125s, letting the OIS in this lens perform its miracles:
JPEG, 1/125s, ISO 320
Nice going, but look what happened right before this shot:
JPEG, 1/500s, ISO 1600
Why did the X-A1 expose this shot at 1/500s and push the ISO to 1600? It’s because the X-A1 and X-M1 are smarter than the X-E1 and X-Pro1. They offer an OIS+MOTION mode. This mode detects subject motion after you half-press the shutter. Depending on how much motion is detected, ISO and shutter speed are then increased by 1 or 2 EV to avoid motion blur when you fully depress the shutter button. The truth is: The horse didn’t hold still when I took this shot, it was in the process of moving her head. The X-A1 detected this and made instant shutter speed and ISO corrections to rescue the shot and avoid motion blur. With the X-E1 or X-Pro1, I would have lost this shot, or I’d have to shoot everything at ISO 1600 just to be on the “safe” side, including all the shots where everyone was holding still. Personally, I prefer a camera that allows me to shoot on the “wild” side instead of forcing me to either play it safe (and sacrifice image quality) or lose attractive shots, because unlike the X-A1 and X-M1, I can’t change settings manually in a millisecond.
Here’s another example demonstrating this technology:
JPEG, 1/250s, ISO 640
Here, the last-second movement wasn’t as pronounced, as the Iceland pony was just raising one of her legs. The camera recognized this and instantaneously increased the minimum shutter speed by 1 EV from 1/125s to 1/125s.
Here’s another example:
JPEG, 1/250s, ISO 400/DR200%
What exactly happened here? The camera chose 1/250s and ISO 400, and yet the pony doesn’t look like there was any movement. Indeed, there wasn’t (atta boy!), but the sun was coming up behind a cloud, increasing the dynamic range of the entire scene. Since the X-A1 was set to DR Auto, it automatically switched from DR100% to DR200% for this shot, increasing the ISO value from 200 to 400 in the process. As a reader of my books you know that in reality, the RAW was still recorded at ISO 200 with an underexposure of 1 EV, and then tone-mapped in the camera during JPEG development. After all, that’s how in-camera highlight DR expansion works.
A word about AF during this session: I’d have loved to use the camera’s face detection feature, but the faces were too far away (aka too small) for this feature to work. So I chose the smallest available AF frame size and positioned the frame right over the face of each rider. With the fast linear motor of the tele zoom, everything went pretty snappy. Let’s remember that I was shooting ten different rider/horse combos in 15 minutes, and each combo had to be positioned. I effectively had between 5 and 15 usable seconds with each combo, that’s all the attention span you get with kids and horses. There’s simply no room for technical errors under such conditions, and the X-A1 delivered.
After Dark
SOOC JPEG (Provia) ISO 1600
Shooting at low light is one particular strength of X-Trans sensors, so how did the X-A1 with its conventional Bayer CFA perform? Just like any other Bayer camera, methinks. Yes, there is more noise, but I don’t think it’s a deal-breaker. I think results are pretty much on par with noise-levels of similar APS-C sensor cameras like the Nikon A or Ricoh GR. However, for the price of a Ricoh GR (749 EUR her in Germany) you’ll get the full X-A1 combo with a 16-50mm zoom and a 50-230mm zoom. That’s what I call a value proposition, and that’s why the X-A1 is currently my favorite X-series camera. It’s all about the value: It gets the job done, and it’s affordable.
SOOC JPEG (Provia) ISO 1250
JPEG (Provia with Aperture curves) ISO 5000

JPEG (Provia with Aperture curves) ISO 2500
What now?
Click here for a full set of (currently) 75 sample images. If you are interested in video performance, you may be pleased to hear that the X-A1 appears to deliver nicer results (smoother with less artifacts) than the X-M1, at least based on my experience with two pre-production units. So Bayer seems to have the edge at something, after all. Click here for a link to a Dropbox folder with two short sample videos, each in different versions I recorded with the X-A1 and X-M1.
With no X-A1 production camera or RAW support available at this time, we can’t go into pixel peeping. Yet. Update: Lightroom 5.2 (the final version released earlier today) already supports the X-A1. I know that comparing full-size samples at 400% magnification keeps you guys alive, so there will eventually be a third part of this X-M1/X-A1 epos, comparing the X-A1 and X-M1 under identical conditions, both RAW and JPEG.
As for the new XC50-230mm zoom lens that was officially announced today, there wasn’t a pre-production unit available (at least not for me here in Germany), but I’m confident I’ll get one for the third and final chapter of this great endeavor.

In case you live in or near Germany, Austria or the Netherlands, you may be interested to learn that Fuji’s “Film School” is about to kick-off an X-M1 roadshow with plenty of local workshops and a variety of pro photographers covering different genres. Click here for dates and information.
PRE-ORDERS
X-A1 with XC 16-50 ($599): AmazonUS black – blue /BHphoto black – blue / Adorama black – blue
XC 50-230 ($399): AmazonUS black – silver / BHphoto black – silver / Adorama black – silver
Fuji X-M1: [shopcountry 13828]
For your convenience, here’s a TOC with links to my previous X-PERT CORNER articles:
- First Look: Fujinon XF23mmF1.4 R
- RAW Converter Shootout Results
- Ultimate RAW Converter Shootout
- First Look: X-M1 with New Kit Zoom and Pancake Lens
- Zeiss Touit vs. Fujinon XF
- Remote Shutter Control for X Series Cameras
- Apple Camera RAW, X-Trans and EXR
- First Look: XF55-200mmF3.5-4.8 R LM OIS
- Studio X
- Using the X100S
- Using the X20
- X100S vs. X100
- X20 vs. X10
- RAW, JPEG, Silkypix and “Fuji Colors”
- Adapting Third-Party Lenses (updated with Speed Booster)
- RAW for JPEG Shooters…
- Tips for Updating your Firmware
- How to Clean the X-Trans Sensor
- Using the XF14mmF2.8 R
- Decoding XF18-55mmF2.8-4 R LM OIS
- Comparing RAW converters: JPEG vs. Lightroom, Capture One, Silkypix & RPP
- XF14mmF2.8 R appears to be almost distortion free
- How to Expand Dynamic Range
- How to Use Extended ISO
- EXR, anyone?
- Capture One – When the Going Gets Tough…
- Using Shooting Profiles and the Quick Menu
Rico Pfirstinger studied communications and has been working as journalist, publicist, and photographer since the mid-80s. He has written a number of books on topics as diverse as Adobe PageMaker and sled dogs, and produced a beautiful book of photographs titled Huskies in Action (German version). He has spent time working as the head of a department with the German Burda-Publishing Company and served as chief editor for a winter sports website. After eight years as a freelance film critic and entertainment writer in Los Angeles, Rico now lives in Germany and devotes his time to digital photography and compact camera systems. His book “Mastering the FUJIFILM X-Pro1” (Kindle Edition) (Apple iBook Store) (German version) is available on Amazon and offers a plethora of tips, secrets and background information on successfully using Fuji’s X-Pro1 and X-E1 system cameras, lenses and key accessories.