Ultimate RAW Converter Shootout

Talk to Rico (open forum for questions & feedback) – Rico’s Flickr sets – RAW converter comparison Flickr set (private set, must use this link) – Mastering the Fujifilm X-Pro1 reading samples (65 free pages)
Hello, again! Remember me?
It’s been a while, but to my defense, I have been busy finishing my new book Mastering the Fujifilm X-E1 and X-Pro1. It went to the printer yesterday (it will be printed in the U.S.A), and it’s expected to hit the stores by the end of October. You can preorder it by clicking here (currently with a 30% discount).
Of course, there’ll also be an eBook version for Kindle, iBooks and the likes. I’ll try to prepare a new set of reading samples for one of the next editions of this column. One will feature a first look at Fuji’s new X-A1 entry-level system camera (I have been testing a pre-production camera for several weeks), another one a look at the XF23mmF1.4 R lens that has just been officially announced (I am currently testing a pre-production sample).
As for this X-Pert Corner edition, it appears like I am promising you an “ultimate” RAW converter shootout, but of course, that’s just stupid marketing blah to lure you in. I was told that this kind of language attracts readers (hey, it worked on you, didn’t it?), and by the way, did I mention that the DSLR is dead and that Fuji is the new Leica?
Relax! Just kidding! ;)
What I am really going to do in this column is offering you a humble comparison of eight different X-Trans compatible RAW converters with respect to critical detail rendering at higher sharpening levels. My goal was to use AccuRaw 1.1.1, Aperture 3.4.5 with Apple Camera Raw 4.0.8, Capture One Pro 7.1.3, Iridient Developer 2.2, Lightroom 5.2RC, RPP 64 4.7.1, Silkypix 5.0.45 and the internal RAW converter of an X-Pro1 to extract as much detail as possible from two proven RAW sample files, then presenting the results without telling you which sample was made with which converter. This means that you’ll have to drop your preconceptions. Just look at the files without a safety net of hearsay! Spooky, huh?
Let flowers speak!
Enough introductory talk, let’s have a look at the first demo file:
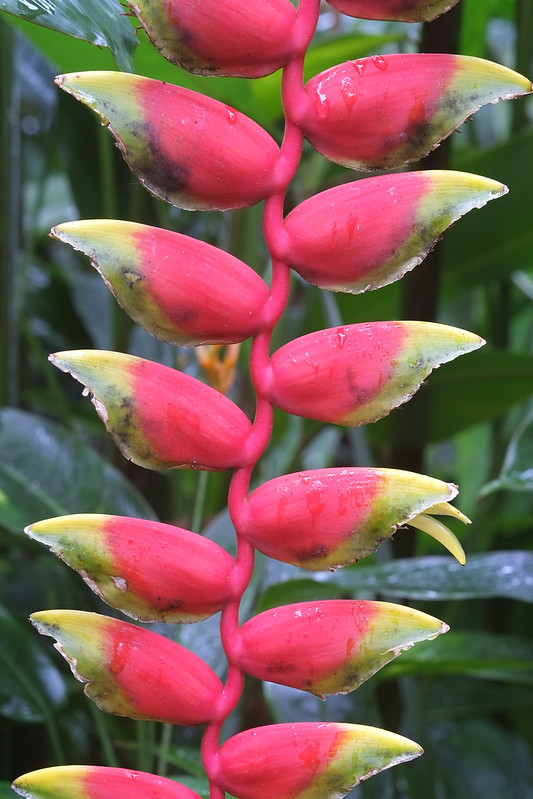
By clicking here, you will get to a private Flickr set showing you eight different renderings of this image, labeled DSCF0544-1 to DSCF0544-8, displaying the results from RAW converters 1 to 8, respectively. I didn’t care about matching colors, contrast and the likes (you can change those anytime and anywhere to your personal taste). Instead, I focused on revealing as much sharp detail as possible, so for some of you, the results may look a tad too sharp. That’s intentional, as weaknesses tend to reveal themselves at critical sharpening levels (think “watercolor effect”).
Here’s how it goes: Look at the samples 1 to 8, then vote in the poll below for the one you like the most. I did my best to set each RAW converter to maximum effect with respect to revealing as much detail as possible, but hey, I’m only human (aka not Ken Rockwell). That’s why you’ll also find links to the original RAW files in Flickr’s image descriptions. Go ahead, knock yourselves out and do a better job with the RAW converter of your choosing!
Poll for DSCF0544-1 to DSCF0544-8:
Personally, I think it’s interesting to not only see how differently the RAW converters are rendering the overall image, but also how different parts of the image reveal quite different levels of fine detail depending on which converter the file was processed with. If you click on the “original size” versions of the samples in Flickr, you will get 100% magnification views in lossless JPEG format, so prepare yourself for extended loading times. Many files are 20 MB+ in size. Yay!
Green is mean!
Our second sample is a particularly tough one, as it contains foliage and grass in all shapes and sizes. It’s a genuine X-Trans nightmare. I love it!
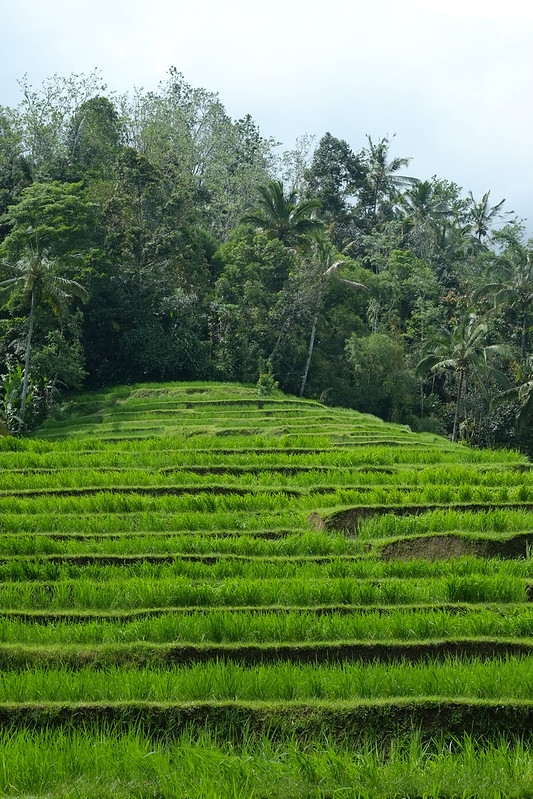
Click here to go to Flickr for eight different versions of the file, this time named DSCF0998-A to DSCF0998-H. Of course, the sequence for this sample is different from the previous example, so don’t even think about crossmatching sample 3 to sample C, etc. ;) That, my dear friends, won’t work.
Are you done pixel-peeping? Then let’s poll for DSCF0998-A to DSCF0998-H:
Again, don’t try to judge colors, contrast and the likes, just focus at the rendering of fine details and the artifacts that come along with it at critical sharpness levels. Of course, you can download the RAW file and work on it with the RAW converter of your choice.
Just to be clear: This isn’t another (yawn!) comparison of “default sharpening settings” (which, in my maybe not so humble opinion, is useless), but of settings I found optimal (as in “the sweet spot”) for each converter and each sample file. It’s simply the best I could come up with, based on my poor eyesight, my poor taste, my poor skills, my crappy computer screen and my limited time. I am convinced that 95% of you can do a much better job, so please try to keep the flaming in the comment section below 50 posts per minute. Thanks! :)
The polls will close shortly before next week’s X-Pert Corner edition, when I will reveal the names of the converters behind the samples 1-8 and A-H.
Lightroom vs. Fujifilm
To conclude this not-so-ultimate shootout, I have set-up a comparison between the internal RAW converter (which, according to Internet gossip, is supposed to be sooo goood) and Adobe Lightroom 5.2RC (which is supposed to be sooo baaad). For the internal RAW converter, I used Sharpening +2 and Noise Reduction -2 in my X-Pro1. Then, I loaded the RAW file into Lightroom and set the sharpening parameters to closely match the result from the internal converter.
Here’s one of four screenshots, each with a direct comparison of the same image parts at 100%. Click on the image below or click here to go to the Flickr set and view all four screenshots in full-size:
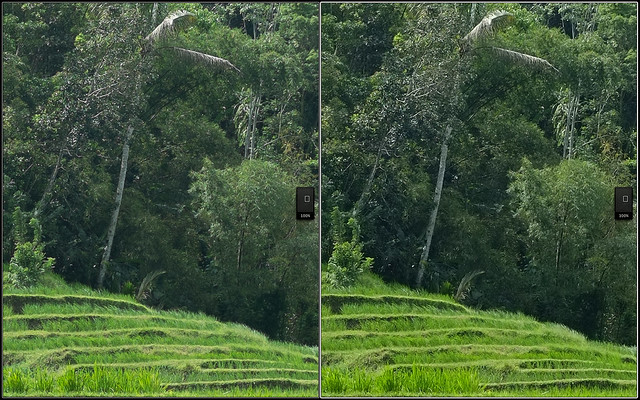
Can you really tell which parts (left/right) are from Lightroom and which are from the internal RAW converter? Personally, I couldn’t, at least not by merely looking at the details. For me, the detail rendering is pretty much identical. The so-called watercolor effect shows in both versions, so if you ask me, Adobe is already using the same demosaicing algorithm as Fujifilm’s internal JPEG engine. Fuji is just smart enough to keep the sharpening at lower levels and to apply a large enough radius (I did the same in Lightroom), so even at Sharpening +2, the effect isn’t pronounced enough to create the usual Internet shitstorm. If there’s a giveaway as to which version is which, it would rather be the different color renderings.
As promised before, I will give you the resolution in next week’s X-Pert Corner. See ya!
For your convenience, here’s a TOC with links to my previous X-PERT CORNER articles:
- First Look: X-M1 with New Kit Zoom and Pancake Lens
- Zeiss Touit vs. Fujinon XF
- Remote Shutter Control for X Series Cameras
- Apple Camera RAW, X-Trans and EXR
- First Look: XF55-200mmF3.5-4.8 R LM OIS
- Studio X
- Using the X100S
- Using the X20
- X100S vs. X100
- X20 vs. X10
- RAW, JPEG, Silkypix and “Fuji Colors”
- Adapting Third-Party Lenses (updated with Speed Booster)
- RAW for JPEG Shooters…
- Tips for Updating your Firmware
- How to Clean the X-Trans Sensor
- Using the XF14mmF2.8 R
- Decoding XF18-55mmF2.8-4 R LM OIS
- Comparing RAW converters: JPEG vs. Lightroom, Capture One, Silkypix & RPP
- XF14mmF2.8 R appears to be almost distortion free
- How to Expand Dynamic Range
- How to Use Extended ISO
- EXR, anyone?
- Capture One – When the Going Gets Tough…
- Using Shooting Profiles and the Quick Menu
Rico Pfirstinger studied communications and has been working as journalist, publicist, and photographer since the mid-80s. He has written a number of books on topics as diverse as Adobe PageMaker and sled dogs, and produced a beautiful book of photographs titled Huskies in Action (German version). He has spent time working as the head of a department with the German Burda-Publishing Company and served as chief editor for a winter sports website. After eight years as a freelance film critic and entertainment writer in Los Angeles, Rico now lives in Germany and devotes his time to digital photography and compact camera systems. His book “Mastering the FUJIFILM X-Pro1” (Kindle Edition) (Apple iBook Store) (German version) is available on Amazon and offers a plethora of tips, secrets and background information on successfully using Fuji’s X-Pro1 and X-E1 system cameras, lenses and key accessories.