Using Shooting Profiles and the Quick Menu

by Rico Pfirstinger
An “expert” column about the X-Pro1, the X-E1 and other Fujifilm X-series cameras? Isn’t it okay if we just read the owner’s manual? After all, it briefly documents all of the camera’s functions – including features that I (and probably most of you) won’t ever use. There’s something missing, though: background information and practical tips based on experience. What’s the best way to activate a function? Which setting should you use in different circumstances? Why is the camera exhibiting a certain behavior? And what functions don’t work the way you would expect them to and how you should handle them?
So yes, you should definitely read the owner’s manual. But you may also find this column somewhat useful, because (like my book “Mastering the Fujifilm X-Pro1” which it is based on to a large extent) it picks up where the manual leaves off. I’ll try to include personal experiences, tips, and background information – not only from me, but from other photographers as well. After all, the Internet is full of knowledgeable people and valuable advice. It would be unwise to ignore this wealth of information.
Using the Quick Menu
Let’s get started with something so basic that’s it is mostly ignored: using shooting profiles and the Quick menu. As you will probably know, the Quick menu (aka the Q button) are part of Fujifilm’s efforts to enhance the (not so perfect) electronic user interface of their X-series cameras. You can currently find different iterations of the Quick menu in the X-Pro1, the X-E1 and the X10.
Let’s be clear: The Quick menu isn’t yet another menu to expand the contents of the Shooting, Playback and Setup menus. Instead, it’s here to make frequently used functions (that are buried in those other menus) more accessible. It’s just a shortcut, nothing else.
While your camera is in shooting mode, you can open the Quick menu by pressing the Q button. This allows you direct access to 16 of the most commonly used camera features: select custom settings (aka shooting profiles), change ISO settings, dynamic range settings, select a white balance setting, set noise reduction, image size, image quality, film simulation, highlight tone, shadow tone, color, sharpness, the self-timer, AF mode, flash mode, and change the viewfinder/LCD brightness.
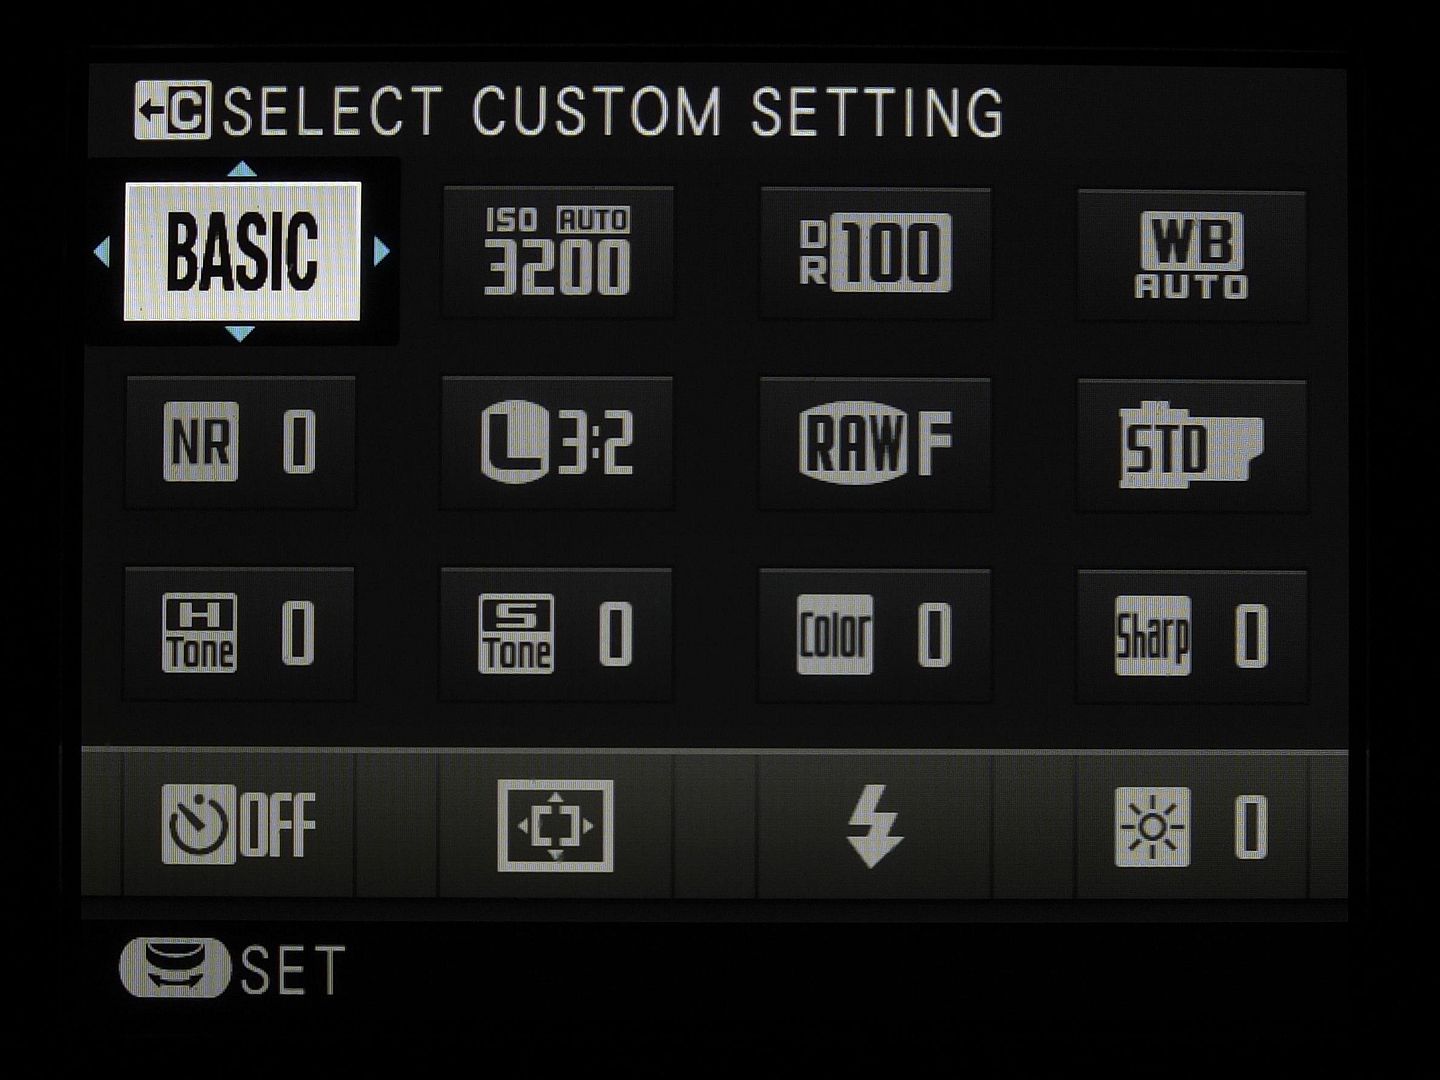
Use the four selector (arrow) keys to navigate to any of the 16 functions and then use the command dial to change the settings for the function of your choice. You can apply any changes you make in the Quick menu using one of three buttons: you can press the Q button once again, you can press the MENU/OK button, or you can depress the shutter button halfway.
The X-Pro1 and X-E1 allow you to create up to seven custom settings or shooting profiles, which you can bring up and select in no time with the help of the Quick menu. To create a new shooting profile or change the settings of an existing one, hold down the Q button for a few seconds. This will bring you directly to the menu option EDIT/SAVE CUSTOM SETTING in the shooting menu, where you can either save your current camera settings as one of the seven profiles (SAVE CURRENT SETTINGS) or manually set and save values for ISO, dynamic range, film simulation, white balance, color, sharpness, highlights, shadows, and noise reduction for each profile.
While in the Quick menu, you can use the command dial to shuffle rapidly through the seven shooting profiles. As you do this, you will be able to see a live image on the camera’s display depicting the settings of each profile. In other words, you not only see which one of your up to seven profiles is currently selected, you also see all of the actual camera settings that are associated with that profile. You can of course use these predefined profiles as a starting point and then use the Quick menu to make further adjustments to the settings. Any changes you make to each profile’s baseline settings will be indicated with a red dot.
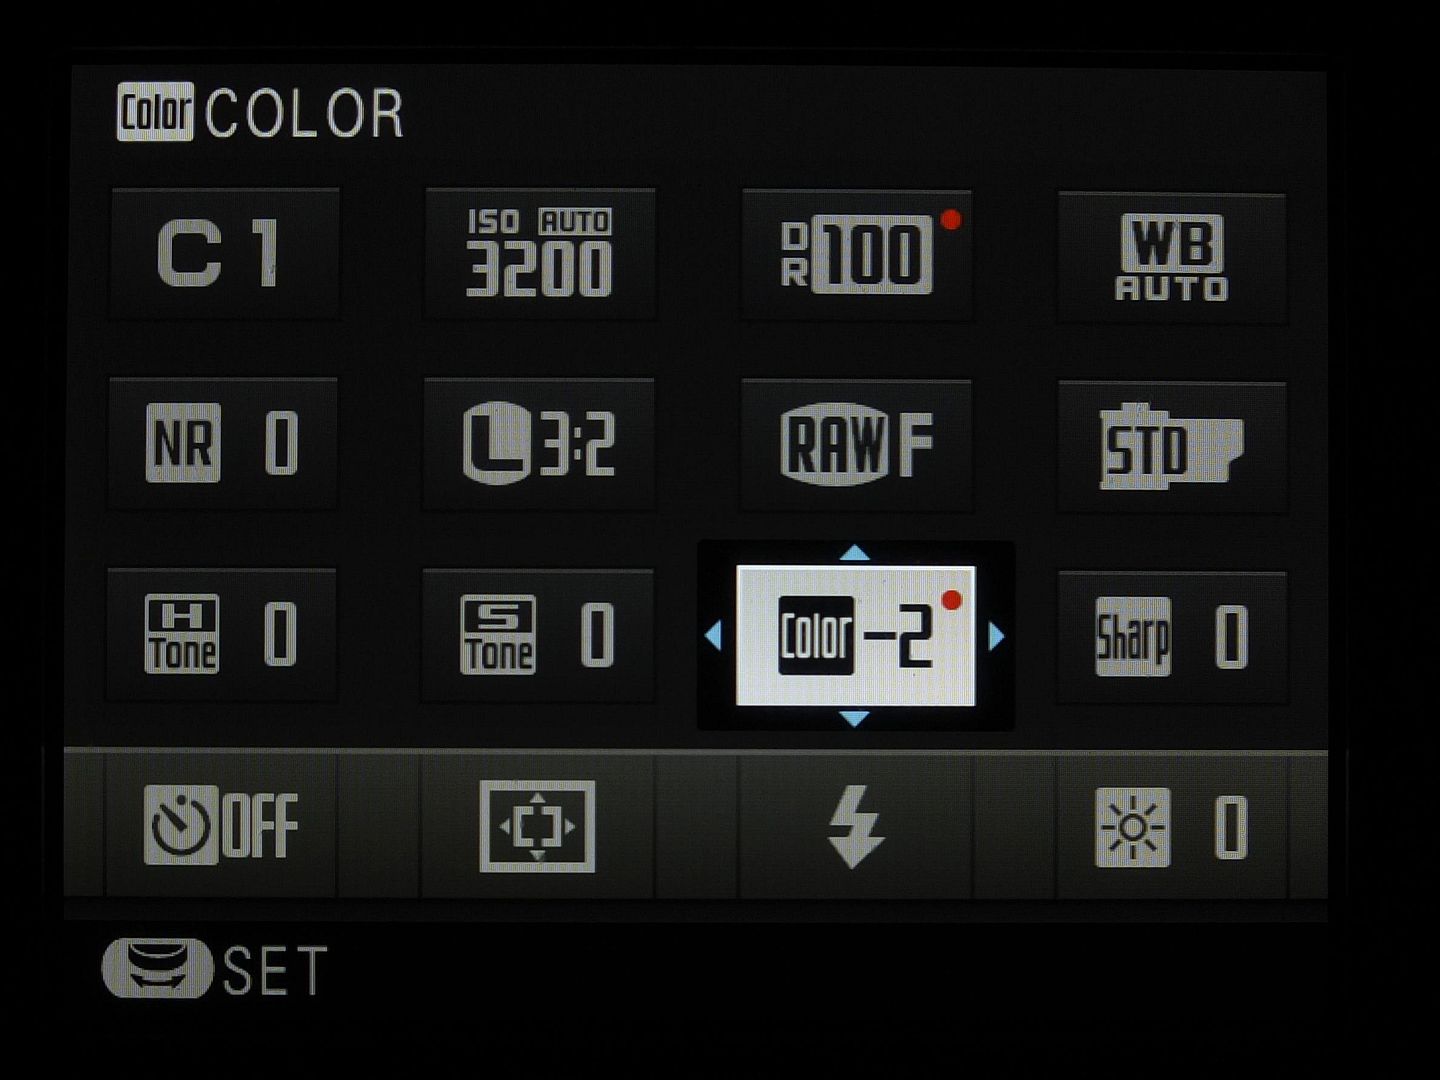
In this illustration the first shooting profile is selected (C1), but the values for the dynamic range (DR100) and color (–2) have been manually adjusted. The camera indicates these changes with a red dot. These changes won’t be saved with the shooting profile; they are only active until you overwrite (change) them again or select another shooting profile. To make permanent changes to a shooting profile, hold down the Q button for a few seconds or select EDIT/SAVE CUSTOM SETTING from the shooting menu.
What about the BASIC setting in the upper left of the Quick menu? I have seen some confusion about in a few photography forums, so here’s the deal: While it’s clear that C1 to C7 are labels for the camera’s custom shooting profiles 1 to 7, BASIC simply means your current, active settings. So once you select one of the seven shooting profiles and then confirm your selection (with or without making any changes), those settings immediately become the camera’s new (= current) BASIC setup and there won’t be any more red dots indicating any changes you made to a previously selected shooting profile. In other words, BASIC simply shows the settings that you and your camera are currently working with. Whatever you do in the Quick Menu – once you close it (by pressing the Q button once again, by pressing the MENU/OK button, or by halfway depressing the shutter button), the settings you left it with become the BASIC settings.
Using Custom Shooting Profiles
The X-Pro1 and X-E1 have a plethora of settings options: ISO, DR function, white balance selection, film simulation, color, contrast (highlights and shadows), sharpness, noise reduction. Excluding ISO and DR, the remaining settings are also referred to as “JPEG settings”, as they do not affect what’s in the RAW file.
You may be wondering, “How am I supposed to define all of these settings quickly when I’m ready to snap an image? I want to take pictures; I don’t want to stand around fumbling with my camera!”
Here is where the seven custom shooting profiles come into play. They allow you to program each variable independently and then save them together in a bundle. Then you can switch back and forth quickly among your predefined profiles.
Examples of Custom Profiles
Which profiles should you save? Only you can answer this question for yourself – photographers not only have individual requirements and aims, but they also have their own stylistic preferences. This is exactly why the X-Pro1 and X-E1 feature so many different programming possibilities. If there were one “optimal” universal setting, Fuji could have done away with many options. Nevertheless, here are a few recommendations for potentially useful custom shooting profiles:
- General profile: In this profile, I save the settings that generally apply to everyday situations and quick snapshots. My typical settings for my all-around profile are automatic white balance, auto ISO, auto DR, ASTIA or PROVIA, and occasionally a decreased noise reduction set at medium low.
- DR100% profile: This is a variation of the general profile with the dynamic range setting fixed at DR100%. This profile allows me to use the live histogram for correcting the exposure and target the brighter areas of my image more accurately when defining the exposure settings.
- Black-and-white profile: Any time I imagine an image would look good in black-and-white, I use this profile, which includes the black-and-white film simulation and increased contrast settings. The electronic viewfinder gives me a practical (black-and-white) preview of my subject.
- Special profile: I generally reserve one profile for special situations, such as shooting in a studio or taking infrared images, when it is practical to shoot with a color temperature setting predefined in Kelvin.
- “RAW shooter” profile: I use this profile when I know in advance that I will probably want to expose the image very carefully so that I can develop and edit it with an external RAW converter.
A JPEG Profile for RAW Shooters
Yep, no kidding: a JPEG shooting profile for RAW shooters. While JPEG settings have no effect on RAW files, they do affect the image you can see in the electronic viewfinder (EVF) and on the LCD display. Moreover, the data for the live histogram is derived from the image that appears in the live view – in other words, it too is affected by your current JPEG settings.
What does this practically mean? If you select VELVIA as your film simulation, for example, not only will you have a brightly colored JPEG; you’ll also have a brightly colored live view preview with pronounced contrast. This image preview is reflected in the live histogram as well, and the Velvia simulation will cause the peaks of exposure to shift to either the left or the right limits quicker than if Provia were used instead.
The same goes for the contrast settings (HIGHLIGHT TONE and SHADOW TONE): if both parameters are set to HARD then the highlights and shadows will shift beyond the right and left limits of the histogram faster than they would if both were set to SOFT.
As I’ve already said, the RAW file itself isn’t affected by any of this – it collects all of the image information that the sensor is capable of capturing. Conversely, JPEGs rely on only a portion of the RAW data. The objective here is setting the JPEG parameters in a way that allows you to see the largest possible portion of the RAW data – because this is the information that interests us as RAW shooters. We want to squeeze everything possible out of our camera and its sensor – to get the absolute maximum and to leave nothing behind. We want to explore the limits of the dynamic range and expose as close as possible to its borders. And we want the live histogram to inform us of where these limits are as precisely as possible.
The JPEG settings influence how we expose and adjust our images because we make our decisions about exposure using the information we can gather from the histogram and the live image. As a RAW-only photographer, you will be typically shooting with ETTR (Expose To The Right). We are therefore looking for JPEG settings that produce the softest contrast in order to obtain a histogram that reveals the most useful information about dynamic range for RAW files. Here are my recommendations for this profile:
- DYNAMIC RANGEDR100%. The live histogram supplies meaningful information only with this DR setting.
- FILM SIMULATIONPROVIA. This is the most neutral film simulation and also has the softest contrast. This setting will prevent highlights and shadows from unnecessarily being cropped at either end of the histogram.
- HIGHLIGHT TONE(–2) SOFT. The RAW format of the sensor has an exposure reserve of approximately 0.4 EV in comparison to the processed JPEG format. You can access this reserve with an external RAW converter. The live histogram should be set to SOFT at its edges to prevent RAW shooters from exposing their images too conservatively.
- SHADOW TONE (–2) SOFT. When you use DR100% with high-contrast subjects (in order to use the live histogram to base your exposure on the bright areas of your image), the dark areas often end up appearing as blocked-up black areas. This SHADOW TONE setting of (–2) SOFT counteracts this problem, since it brightens the dark tonal values in the viewfinder (and in the live histogram).
What’s next? Obviously, there’s much more to say about using the live histogram, the camera’s exposure modes or about how to use ETTR. In fact, one could easily fill a book with all this stuff, so that’s exactly what I did. It took me about a year to finish it, and you can have a look at 65 pages of reading samples by clicking this link for the German and this link for the English version of “Mastering the Fujifilm X-Pro1”. Or you can actually buy the book at Amazon by clicking here for the German or here for the English version.
As X-PERT CORNER is supposed to become a weekly column here on FUJIRUMORS, I have already identified over 20 topics I could write about. Here’s a pretty random pick of three of them:
So what’s it going to be next week? You decide by answering the poll! Till then, I wish you a happy New Year – and have fun with your Fuji X-series camera.
Rico Pfirstinger studied communications and has been working as journalist, publicist, and photographer since the mid-80s. He has written a number of books on topics as diverse as Adobe PageMaker and sled dogs, and produced a beautiful book of photographs titled Huskies in Action (german version). He has spent time working as the head of a department with the German Burda-Publishing Company and served as chief editor for a winter sports website. After eight years as a freelance film critic and entertainment writer in Los Angeles, Rico now lives in Germany and devotes his time to digital photography and compact camera systems.