How to Use Extended ISO

by Rico Pfirstinger
The X-Pro1 and X-E1 offer a so-called Expanded or Extended ISO range with values of ISO 12800 and ISO 25600, but there’s a catch: These ISO settings are only available in JPEG mode, so you won’t be able to save these images as RAW files. So these options are only available when the RAW shooting is disabled and your camera is set to JPEG Only mode. As you may expect, the results of these very high ISO settings are typically accompanied by visible image noise and some loss of detail.
What’s hiding behind the Extended ISO range? At these two ISO settings, the X-Pro1 and X-E1 record RAW images at ISO 6400, hence underexposing them by one or two exposure values (EV) and then boost up the exposure again when the image data is converted to a JPEG. This means that you can achieve the same results by setting your camera to ISO 6400 (with RAW mode enabled) while turning the compensation dial to –1 EV or –2 EV, and then using the internal or an external RAW converter to push the image one or two exposure values in order to compensate for this underexposure.
Employing these Extended ISO values results in an unavoidable loss of quality, so you should only use them in emergencies. You actually retain more flexibility if you underexpose your image while shooting with ISO 6400 in FINE+RAW (or RAW Only) and then plan on adjusting the exposure manually during the RAW conversion.
Here’s how it looks (click on the images for high-res versions):


These two examples illustrate shooting in Extended ISO 12800 (above) and 25600 (below). When you click on these images to open them in Flickr for a full-size view, you will find visible noise and loss of detail, which is owed to a large amount of analog and digital image data amplification.
Let’s add another example: One of the following images was shot with Extended ISO 12800, the other with ISO 6400 RAW and then pushed 1 EV in the internal RAW converter of my X-E1. Both images were shot at f5.6 and 1/30s in manual mode.


It’s hard to tell which one is which, isn’t it? With higher magnification levels or in a 100% view, you would see differences related to noise reduction. The camera is of course optimizing its noise reduction for its Extended ISO settings 12800 and 25600. On the other hand, pushing an ISO 6400 image in the internal converter will leave you with NR processing optimized for ISO 6400.
By the way, here’s the ISO 6400 RAW developed and pushed by 1 EV with Silkypix 5:

Why ISO 100 is not good for you
The Extended ISO range also includes the option of shooting at ISO 100, which is again only available if you are shooting exclusively in JPEGs. Here the process is inverted: the camera captures an image at its native ISO 200 and overexposes the RAW data by one exposure value (1 EV) in the process. Then, during the RAW conversion, it brings the exposure down again by 1 EV. This process—the counterpart of “pushing” an exposure—is called pull development.
This method produces images with good contrast, very little noise and a high degree of detail, particularly in the shadow areas, which comes at the expense of the high end of the dynamic range. The highlights, or bright tones, suffer dramatically, making ISO 100 also an “emergency setting” for images that don’t feature high contrast or important highlight details.
Again, you can manually simulate Extended ISO 100 by enabling RAW, shooting in native ISO 200 and overexposing your image by 1 EV while doing so. When you process this image in the camera’s internal or with an external RAW converter, you have to correct for this by using the Pull option or the exposure slider.
Does this process sound familiar? It’s indeed pretty much the same as using classical ETTR aka classical Expose To The Right. In Extended ISO 100, the camera works the entire process (shooting the image overexposed and developing it underexposed) automatically. However, Extended ISO 100 will only get you JPEGs, no RAW files. And it only makes sense with subjects that exhibit low dynamic range, as this method tends to blow the highlights of your subject.
Have a look at this example (click on the images for high-res versions):

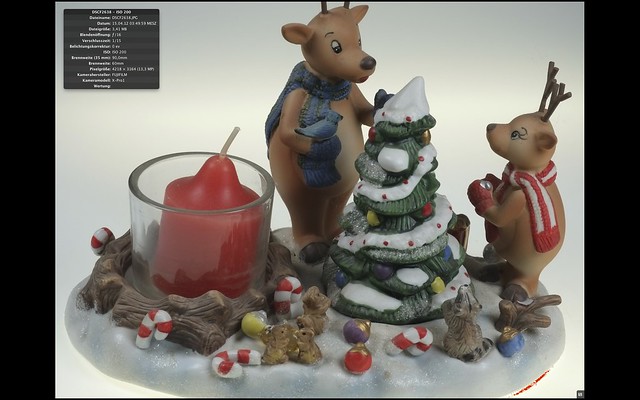
The image above shows our test subject in standard ISO 200. The full dynamic range is preserved.

This example shows the same image in Extended ISO 100. As you can see, it shows more contrast and highlights are blown.
To illustrate the difference more clearly, here are both images in Apple Aperture. The red areas show exposure warnings indicating blown (missing) highlights:
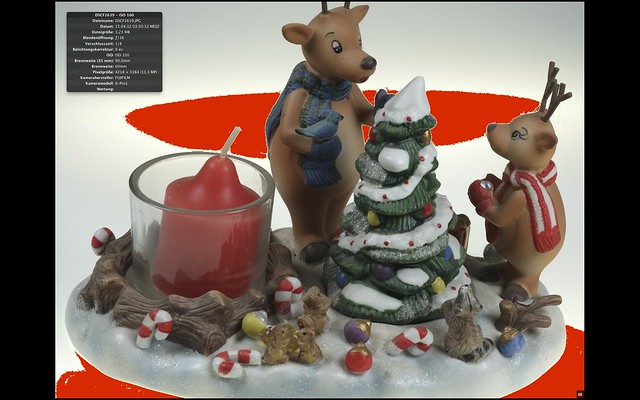
As you can see, there’s a very visible difference between ISO 200 (above) and Extended ISO 100 (below).
Let’s summarize: We should only stray beyond the standard range of ISO 200-6400 when there’s no other option. Extended ISO 100 results in a reduced dynamic range for highlights, whereas ISO 12800 and ISO 25600 lead to very visible interference and a loss of detail. Moreover, these three “extended ISO range” settings are available only when your camera is set to save JPEGs only—writing RAW files with these settings is not an option.
Here’s the poll for next week’s column. With Extended ISO gone and little interest in tips for updating the camera and lens firmware, let’s add two new options:
Till next week!
Rico Pfirstinger studied communications and has been working as journalist, publicist, and photographer since the mid-80s. He has written a number of books on topics as diverse as Adobe PageMaker and sled dogs, and produced a beautiful book of photographs titled Huskies in Action (German version). He has spent time working as the head of a department with the German Burda-Publishing Company and served as chief editor for a winter sports website. After eight years as a freelance film critic and entertainment writer in Los Angeles, Rico now lives in Germany and devotes his time to digital photography and compact camera systems. His book “Mastering the FUJIFILM X-Pro1” (Kindle Edition) (Apple iBook Store) (German version) is available on Amazon.