New Firmware Features (2): Using Camera Remote

_ _ _
New Firmware Features (2): Using Camera Remote
Talk to Rico (open forum for questions & feedback)
Fuji X Secrets Workshops – Rico’s Flickr Sets
The Fujifilm X-E2: Beyond the Manual (use coupon XPERT40 for a 40% discount)
—
This Thursday (18 DEC 2014), Fuji is releasing new firmware for the X-Pro1, X-E1, X-E2 and X-T1. This is the second of three articles explaining the changes and enhancements brought to you by these updates. In this edition, I am going to cover the main feature of firmware 3.00 for the X-E2: Camera Remote control via wifi. This article also applies to users of the X-T1, X30 and X100T, as these cameras offer pretty much the same remote control functionality.
What is Camera Remote?
Camera Remote allows you to control the camera from a smartphone or tablet running Android or iOS and Fuji’s Cam Remote app. The connection is based on the camera’s and smartphone’s wifi function.

How to use Camera Remote
In order to use Camera Remote, you have to download and install the free Cam Remote app on your smartphone or tablet. You can find download links and additional information here. Of course, your X-E2 needs to run firmware 3.00 or newer.
Make sure that you use the Cam Remote app and not the older Camera App.
Here’s how Camera Remote works with iOS devices (and it shouldn’t be much different for Android users):
- Select SHOOTING MENU > WIRELESS COMMUNICATION on your camera. The X-E2 (or X-T1, X30, X100T) now enters wireless mode.
- Hook up your smartphone’s or tablet’s wifi with the camera. Each camera has its own network name. For example, my X-E2 is named FUJIFILM-X-E2-0371, so that’s the wifi network I am selecting in my iPhone or iPad.
- Open the Cam Remote app and select Remote Control. The mobile device will now assume control over the camera and display a live view image along with menus to adjust shutter speed, aperture or exposure compensation. There’s also a virtual shutter button and a shooting menu that allows you to adjust parameters like ISO, film simulation, white balance, macro, flash mode or self-timer.
- In order to focus on a specific part of the live view image, double-tap with your finger on it. Focus will be confirmed with a green rectangle, and the camera will issue a confirmation beep. If no focus lock can be established, the rectangle will appear in red.
- Adjust your exposure parameters as required. The brightness of the live view will change accordingly. Please note that there’s no live histogram.
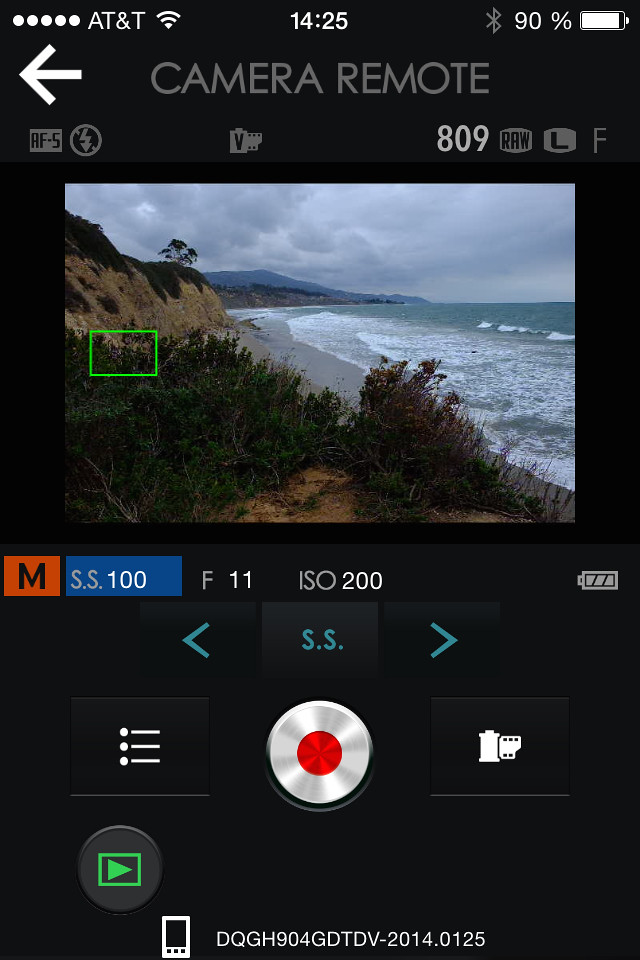
Camera Remote offers a simple interface to control your camera with a smartphone or tablet. To autofocus, double-tap on a specific part of the WYSIWYG live view and wait for the green confirmation rectangle to appear. Sadly, there is no live histogram, and you can’t magnify the live view. There is a rudimentary shooting menu, a virtual shutter button and a playback button that allows you to review images and transfer JPEGs to your mobile device.
Things you should know about Camera Remote
- Fuji’s Camera Remote allows you to adjust exposure parameters (aperture, shutter speed, ISO, exposure compensation), but you can’t remotely change the camera’s exposure mode. This means that you have to manually set the camera to either P, A, S or M mode before you select WIRELESS COMMUNICATION in the shooting menu. In order to change the exposure mode during remote shooting, you have to first disconnect Camera Remote, make the desired changes in the camera and then start over as directed in How to use Camera Remote.
- There’s no electronic level indicator and no live histogram in the Camera Remote live view on your mobile device.
- While you can change several shooting parameters from within the Camera Remote app (ISO, film simulation, white balance preset, macro, flash mode, self-timer), other parameters (such as dynamic range or Auto-ISO minimum shutter speed) have to be preset in the camera before entering wireless communication mode.
- There is no bulb functionality in Camera Remote, so your maximum exposure time is 30 seconds. If you need more, better use a conventional (tethered or wireless) remote control.
- The X-T1 also allows you to shoot video with Camera Remote.
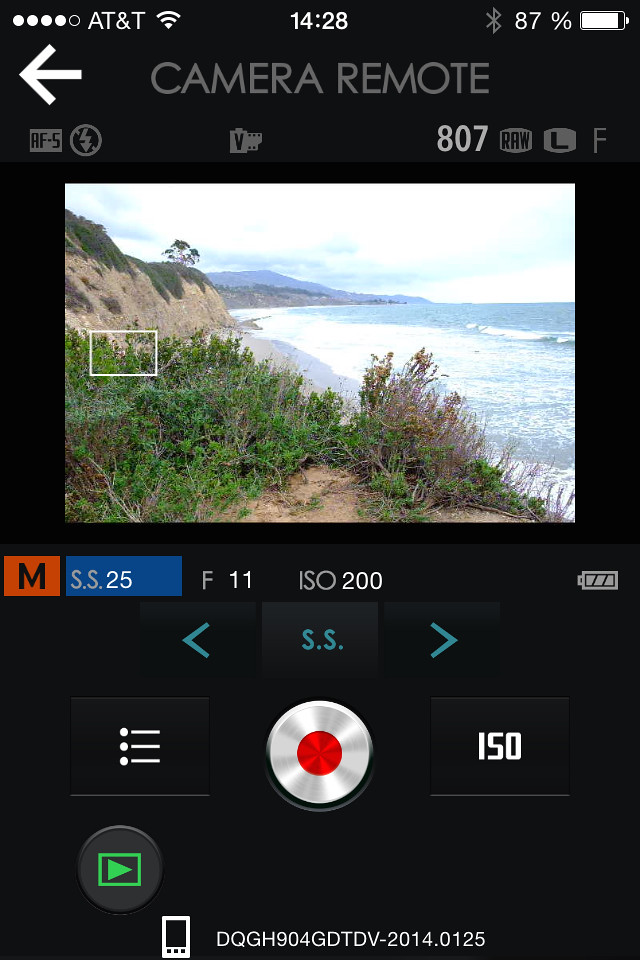
Changing exposure parameters affects the WYSIWYG live view. In the above case, I changed the shutter speed to 1/25s, and the resulting overexposure is quite visible in the iPhone’s display. The live view always reflects the currently selected film simulation and JPEG parameters. There is no preview of the DR function when using an X-E2 or X-T1. However, when you are using an X30 or X100T, manual DR settings of DR200% or DR400% will be reflected in the live view of the mobile device.
Tips and hints
- I am using Camera Remote in manual exposure mode M, as I feel that this is the most convenient and efficient way to adjust shooting parameters. Changing a parameter (shutter speed, aperture, ISO) immediately adjusts the live view brightness.
- iOS users may be annoyed by the need to frequently manually reconnect the smartphone to the camera’s wifi network, as the connection has to be dropped for each mode or parameter change made in the camera. This can be particularly cumbersome at home, where the iOS device is automatically reconnecting with your home network once as soon as the camera has been disconnected.
- Android users (particularly Sony users) may suffer from connection losses caused by interfering networks that are transmitting on the same wifi channel as the camera. Sadly, there is currently no way to change the camera’s transmission channel. As an iOS user, I haven’t experienced any such difficulties, yet.
- In order to transfer JPEGs from the camera to your mobile device in full 16 MP resolution, make sure to select MAIN MENU > WIRELESS SETTINGS > RESIZE IMAGE FOR SMARTPHONE > OFF. Otherwise, the image will be downsized to 3 megapixels.
- Manual DR extension settings (DR200%, DR400%) are not reflected in the Camera Remote live views of the X-E2 and X-T1 with firmware 3.00. However, they are reflected in the remote live views of the X30 and X100T. Setting the X-T1, X30 or X100T to Natural Live View (PREVIEW PIC. EFFECT OFF) is not reflected in the Camera Remote live view. JPEG parameters such as contrast (HIGHLIGHT TONE, SHADOW TONE) or white balance settings are fully reflected, though.
- Wifi drains the battery, so you better pack spare batteries or use Fuji’s CP-W126 DC power adapter to connect the X-E2 or X-T1 (requires optional battery grip VG-XT1) to an external power source.

What’s next?
The third and final edition of this “firmware trilogy” will explain the remaining goodies that are part of the comprehensive X-T1 firmware v. 3.00 update, including an as of yet undocumented enhancement regarding the camera’s face detection feature.
Click here to read about the new AF+MF feature of the X-Pro1, X-E1, X-E2 and X-T1.
For your convenience, here’s a TOC with links to my previous X-PERT CORNER articles:
- New Firmware Features (1): Using AF+MF
- First Look: Fujinon XF 50-140mm F2.8 R LM OIS WR
- Using the Fujifilm X100T
- First Look: Fujifilm X30
- First Look: XF18-135mmF3.5-5.6 R LM OIS WR
- X-E2: Behind Firmware 2.00
- First Look: Fujifilm TCL-X100 Teleconverter for X100(S) Cameras
- First Look: Fujinon XF10-24mmF4 R OIS
- First Look: Fujifilm X-T1
- First Look: Fujinon XF56mmF1.2 R
- Exposing Right
- Using Auto-ISO
- Using Face Detection
- First Look: Fujifilm XQ1
- PDAF & LMO Lens Firmware Updates Coming in November
- First Look: Fujifilm X-E2
- How Fuji could save the X-M1
- X-A1 vs. X-M1: Photo Ninja Edition
- X-A1 vs. X-M1: the Shootout
- Using the Fujifilm X-A1 [& X-M1]
- First Look: Fujinon XF23mmF1.4 R
- RAW Converter Shootout Results
- Ultimate RAW Converter Shootout
- First Look: X-M1 with New Kit Zoom and Pancake Lens
- Zeiss Touit vs. Fujinon XF
- Remote Shutter Control for X Series Cameras
- Apple Camera RAW, X-Trans and EXR
- First Look: XF55-200mmF3.5-4.8 R LM OIS
- Studio X
- Using the X100S
- Using the X20
- X100S vs. X100
- X20 vs. X10
- RAW, JPEG, Silkypix and “Fuji Colors”
- Adapting Third-Party Lenses (updated with Speed Booster)
- RAW for JPEG Shooters…
- Tips for Updating your Firmware
- How to Clean the X-Trans Sensor
- Using the XF14mmF2.8 R
- Decoding XF18-55mmF2.8-4 R LM OIS
- Comparing RAW converters: JPEG vs. Lightroom, Capture One, Silkypix & RPP
- XF14mmF2.8 R appears to be almost distortion free
- How to Expand Dynamic Range
- How to Use Extended ISO
- EXR, anyone?
- Capture One – When the Going Gets Tough…
- Using Shooting Profiles and the Quick Menu
Rico Pfirstinger studied communications and has been working as journalist, publicist, and photographer since the mid-80s. He has written a number of books on topics as diverse as Adobe PageMaker and sled dogs, and produced a beautiful book of photographs titled Huskies in Action (German version). He has spent time working as the head of a department with the German Burda-Publishing Company and served as chief editor for a winter sports website. After eight years as a freelance film critic and entertainment writer in Los Angeles, Rico now lives in Germany and devotes his time to digital photography and compact camera systems. His new ebook The Fujifilm X-E2: Beyond the Manual is available at Rocky Nook.