Using the X100S

by Rico Pfirstinger

Talk to Rico (questions & feedback)X100S sample images set X100S/X100 comparison images set

The X100S has hit the shelves, and it appears to be quite popular. It’s an evolutionary camera, improving the very successful “classic” X100 in many fields and aspects. Following the lead of last week’s “Using the X20” article, here’s a compilation of tips and tricks to get you started with the new “S”. This article is partly building on my earlier “X100S vs. X100” text, so it assumes that you have read it. Let’s once again begin with…

Auto-ISO

The X100S features an improved Auto-ISO function that is based on the classic X100. In Auto-ISO, you can set the ISO base (minimum ISO / default sensitivity), the ISO limit (maximum ISO sensitivity) and the minimum shutter speed. Different Auto-ISO settings can be saved in each of the camera’s three custom shooting profiles (C1 – C3). For more information on shooting profiles and how to use them, access them and configure them, please have a look at my very first X-Pert Corner article. Like with the X-E1 and X-Pro1, you can change settings and select shooting profiles in the Quick Menu by pressing the Q button. Remember that BASIC is just a funny acronym for the camera’s currently selected/active settings. BASIC is neither a preset nor some default profile. Sadly and contrary to statements in the owner’s manual, the X100S features not seven, but only three custom shooting profiles.

If you plan to use the DR (dynamic range) function (DR Auto, DR200% or DR400%) you should set the camera to Auto-ISO. You may also want to consider reading this X-Pert Corner article to learn more about how to expand dynamic range. In order to work with DR200%, the X100S needs an ISO setting of at least 400. For DR400%, it needs an ISO setting of at least 800.

Auto-ISO is now also a part of the ISO menu when you use the Fn button to change ISO settings. This is quite useful and an improvement over the X100, where you had to dive into the shooting menu to (re-)configure Auto-ISO settings.

Autofocus

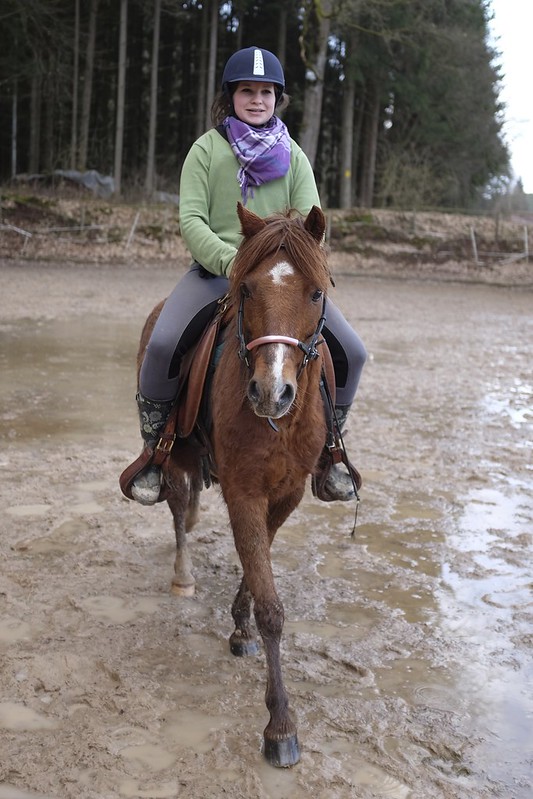
The X100S offers the same AF modes as the X100: AF-C and AF-S, with two AF-S submodes:Area and Multi. AF-C is basically behaving like AF-S and known to be very effective in low light situations with bad contrast. This also means that AF-C is no real object tracking mode (unlike the Hybrid-AF systems in the Nikon 1 or Sony NEX 6). So when you are shooting objects that quickly move towards the camera, better use the famous “Autofocus Trick”, also known as “shutter mash technique”: Set the camera to AF-S or AF-C (use AF-S if you want to assign a particular AF field, use AF-C if you are okay with the center spot or area) and press the shutter all the way through in one quick, swift motion (no half-pressing!) while keeping the AF field trained over  the area of your subject that you want to be in focus. Since the X100S operates with Autofocus Priority, it won’t take the shot until it has actually locked focus (or until it gave up, in which case the shot will probably be wasted). This cropped example of a horse trotting directly towards the camera was shot at open aperture (f/2) using the Autofocus Trick, with the AF frame trained on the pony’s head:

DSCF0037 - X100S "AF trick"

Please remember that the X100S features a new hybrid autofocus system: a mix of CDAF (contrast detection autofocus) and on-sensor PDAF (phase detection autofocus). PDAF is quicker, but only works in good light, such as 5 EV or better. More importantly, PDAF is only available in about 40% of the sensor area, covering the center 9 (3 x 3) AF fields. So for best (fastest) AF results, shoot in good light and use the center 9 AF fields. You don’t have to worry about which of the two AF methods to use. The camera will take care of that for you.

Shutter Lag

While the Autofocus Trick will obviously introduce some shutter lag (defined as the time between you pressing the shutter and the camera taking the shot) due to the camera’s AF Priority operation, you can significantly reduce this time period by priming the camera during normal shooting (= shooting without tricks). All you need to do is half-press the shutter while anticipating the actual shot.

Mirrorless cameras like the X series have a distinct way of operation: During Live View, they are constantly adapting the lens aperture to the brightness of the ambient light that’s entering the lens. However, for exposure measurement and focusing purposes, the camera has to fully open up the aperture. Then, right before actually taking the shot, the aperture has to be closed again to reflect the chosen “working aperture” settings. Half-pressing the shutter button performs this sequence and primes the camera to minimize any shutter lag. If you don’t half-press the shutter button before actually taking the shot, shutter lag will increase even if you are using manual focus and manual exposure. When the camera isn’t primed before taking the shot, smaller apertures will also induce a longer shutter lag than wide-open settings, as the aperture blades have to travel a longer way from their wide open measuring position to their final working aperture position.

Shortcuts

The X100S features an impressive list of shortcuts that can make your life much easier:

  • Press and hold the Q button for a few seconds to clearly increase the brightness of the LCD. This can be quite helpful when operating the camera in bright light, like on a sunny day.
  • Press and hold the MENU/OK button down to lock or unlock the arrow keys and the Q button.
  • A long press of the Fn button will bring up the Fn button’s configuration menu, where you can assign one of several functions. I typically assign ISO to this button, because I like to be able to quickly change my Auto-ISO configuration (minimum shutter speed). Another popular option for this button is enabling the camera’s built-in ND filter.
  • Press and hold DISP/BACK button to activate (or deactivate) the camera’s Silent Mode. When this mode is turned on, the X100S functions quietly and inconspicuously. It won’t make any artificial noises and it abstains from using both the flash and the AF-assist lamp.
  • Pressing the DISP/BACK button while selecting an AF field in AF-S Area mode will immediately select the central AF field.
  • Press DISP/BACK in shooting or playback mode to change the view of the currently active display. This means that in order to change the view of either the OVF, the EVF or the LCD, either the OVF, EVF or LCD must be active when you press the button. You can select the display you want to change with the VIEW MODE button. Alternatively, use the eye-sensor to activate a display by looking through it, then change its view with the DISP/BACK button. The X100S can’t read your mind, you need to tell it which display’s view you want to change. ;)
  • Finally, to check (or upgrade) the firmware version of the camera, press and hold the DISP/BACK button while switching on the camera.
  • In manual focus mode, press the AE-L/AF-L button to initiate an autofocus run.
  • Also in manual focus mode, press and hold the command dial to cycle through the camera’s different MF aids: standard, digital split image and focus peaking.
  • Press (but do not hold) the command dial to enlarge the current image to inspect its sharpness. This works in both MF and AF modes.
  • Rather than selecting a function in the shooting menu by pressing the OK button, you can press the shutter button halfway down. Pressing the shutter button halfway down while in playback mode switches the camera directly into shooting mode. You can wake the camera by pressing the shutter button halfway down as well.
  • Double-tap the macro button to switch between normal and macro modes.
Hybrid Viewfinder

Like every non-TTL (mirrorless) optical viewfinder camera, the X100S is prone to parallax error. This means that the image you see in the optical viewfinder doesn’t always reflect the image that is actually recorded by the camera. Even worse, the focus field you have selected may not point to the area of the frame that the camera is actually focusing on. This is unavoidable, as the lens/sensor and the OVF are located on different optical axes and see things from slightly different angles. Parallax error is negligible for objects that are far away, but it can be quite strong when shooting (and focusing on) things that sit close to the camera.

Luckily, the X100S is trying to compensate parallax error in the OVF by illuminating parallax-corrected AF frames once focus has been locked and the X100S “knows” the camera-object distance. In order activate this function, make sure that CORRECTED AF FRAME is set to ON in the shooting menu.

How does it work? The X100S displays two AF boxes in the OVF, a solid one, and a second box with dotted lines. The solid box represents AF at infinity, the dotted box represents the AF target at the camera’s OVF minimum focus distance (MFD). Once the X100S locks focus, a third (green) box)will appear in the OVF, showing you the actual parallax-corrected AF field position based on the calculated distance between the camera and the in-focus subject. If this green box covers the part of the image you intended to be in focus, all is good. If not, you should reframe and try again. Alternatively, you can quickly switch from the OVF to the EVF using the viewfinder selector at the front of the camera. This convenient lever is there for a reason, please use it to quickly switch between the OVF and EVF to get the best of both worlds. In the EVF, there is no parallax or framing error, so even hardcore OVF shooter can temporarily use the EVF to perfectly frame and focus a shot. Before switching back to the OVF, you may want to lock focus with an appropriately configured AF-L button.

Try to avoid the “focus and reframe” method known from DSLR cameras. In order to minimize focus plane shift, it’s better to select one of the camera’s 49 AF fields. While adjusting/selecting AF fields, you can reset their size by pressing the command dial and jump to the center frame by pressing the DISP/BACK button (see shortcuts).

Happy Easter, everybody!

X100S: BHphoto / AdoramaAmazonUS / AmazonDEAmazonUK / AmazonITA / DigitalRev / your ebay / your Amazon
X20:  BHphoto (blacksilver) / Adorama (blacksilver) / AmazonUS (blacksilver) / AmazonUK (blacksilver) / AmazonDE / AmazonITA / DigitalRev / your ebay / your Amazon

For your convenience, here’s a TOC with links to my previous X-PERT CORNER articles:

Rico Pfirstinger studied communications and has been working as journalist, publicist, and photographer since the mid-80s. He has written a number of books on topics as diverse as Adobe PageMaker and sled dogs, and produced a beautiful book of photographs titled Huskies in Action (German version). He has spent time working as the head of a department with the German Burda-Publishing Company and served as chief editor for a winter sports website. After eight years as a freelance film critic and entertainment writer in Los Angeles, Rico now lives in Germany and devotes his time to digital photography and compact camera systems. His book “Mastering the FUJIFILM X-Pro1” (Kindle Edition) (Apple iBook Store) (German version) is available on Amazon and offers a plethora of tips, secrets and background information on successfully using Fuji’s X-Pro1 and X-E1 system cameras, lenses and key accessories.

© 2013 Rico Pfirstinger, all rights reserved.

Using the X20

by Rico Pfirstinger

Talk to Rico (questions & feedback) – X20 sample images set X20/X10 comparison images set

So you have pulled the trigger on a new X20? Let’s compile a few tips and tricks to get you started!

Auto-ISO

The X20 has a new Auto-ISO function that is based on the classic X100 and mimics the functionality of the new X100S. In Auto-ISO, you can set the ISO base (minimum ISO / default sensitivity), the ISO limit (maximum ISO sensitivity) and the minimum shutter speed. These settings can also be saved in different customer profiles (C1 and C2).

If you plan to use the DR (dynamic range) function (DR Auto, DR200% or DR400%) you should set the camera to Auto-ISO. Unlike the X10 with its EXR sensor, the X20 needs to raise the ISO sensitivity to a minimum of ISO 200 for DR200% and ISO 400 for DR400%. You can read this X-Pert Corner article to learn more about how to expand dynamic range.

Auto-ISO’s minimum shutter speed can be augmented by the optical image stabilizer (OIS) of the X20 when you set the OIS to one of its two “motion” modes. In these modes, the camera will scan the scene for motion and crank up the shutter speed (and along with it the ISO setting) accordingly. Of course, the camera can only do this when Auto-ISO is active. For example, my X20 chose ISO 400 and 1/320s (instead of ISO 100 and a slower shutter speed) when I shot these horses trotting directly towards the camera:

DSCF0307

Once the horses had come to a stop, I took another pic, but this time, the camera reverted back to ISO 100 and a more moderate shutter speed of 1/150s:

DSCF0308

Aperture was kept at f/5.0. Both shots were taken in Aperture priority (A) mode.

** CLICK HERE to Read the Rest of the Article **

X100S vs. X100

by Rico Pfirstinger

Talk to Rico (questions & feedback)Sample images setComparison images set

The X100S is an evolutionary camera, improving the classic X100 without taking away what most users valued in the first place. Sales of the original X100 (about 130,000 units globally) did beat expectations. The camera also inspired competing manufacturers to enter the mirrorless fixed-lens compact market, and it served as a blueprint for Fuji’s own line of mirrorless system cameras. Without the X100 and its (then revolutionary) hybrid viewfinder technology, there wouldn’t be an X-Pro1. Make no mistake: The X100 is the foundation of Fuji’s X series.

DSCF0136 - Lightroom 4.4RC / Aperture

Alas, it’s foundation with some flaws—many of which have been addressed with numerous firmware updates. However, firmware can’t fix everything, especially not hardware oversights, and even though the X100S very much looks like an “old” X100 at first and second glance, it is a different and better camera thanks to extensive user feedback.

DSCF0139 - f16, Silkypix 5 & Aperture

Let’s have a look at some of the changes and improvements that have been made regarding operation, features and design of the new X100S vs. the classic X100.

Speed

The X100S is not only faster, it’s also more responsive. Startup time and writing speed to SD cards have been accelerated. Of course, you need to use the fastest SD cards available (such as SanDisk Extreme Pro UHS-1 95 MB/s) cards to fully take advantage of this feature. The X100S shoots a maximum of 6 frames per second (vs. the X100’s 5 fps) in FINE+RAW, with no actual limit in the number of frames that can be continuously recorded. The X100S never locks up in burst mode, it just slows down. Unlike the X100S, the classic X100 needs an actual break after 8 frames and locks up until all 8 images have been transferred to the card.

With the X100S, the shooting interval in single frame (still image) mode has been reduced from 0.9 to 0.5 seconds, and you can immediately playback an image directly from the buffer, even while the camera is still saving shots to the SD card in the background. Image display (preview) options have been changed from 1.5 and 3 seconds to a more suitable 0.5 and 1.5 seconds. Of course, “off” and “continuous” preview modes are still available. Oh, and the eye sensor now also works when image preview is engaged.

Autofocus is has become more responsive, too, both in the classic contrast detection (CDAF) and even more so the new phase detection (PDAF) mode. On-sensor PDAF is now available in an focusing area roughly as large as the center 9 AF fields, and it will automatically engage at suitable light levels of about 5 EV or higher.  PDAF is also available in Movie mode (which now offers Full HD at up to 60 fps), as are all three focusing modes (AF-S, AF-C and MF). In manual focus (MF) mode, the MF ring is more responsive and actually quite usable. The AF distance range for the EVF and LCD has been improved  from 40cm-∞ (X100) to 21cm-∞ (X100S), and the shooting range in the OVF has been expanded from 80cm-∞ to 50cm-∞, so you will have to switch to macro mode less often.

Like the X20 and X100 (and X-Pro1 and X-E1 with current firmware), the X100S operates with AF priority: When you fully depress the shutter button in one swift motion (vs. first half-pressing it to lock focus and exposure), the camera will take the picture immediately after it has acquired focus. This “trick” can be used to catch moving subjects, like this pony trotting towards the camera:

DSCF0037 - X100S "AF trick"

Focus was directed at the horse’s head, with open aperture (f/2) to minimize the depth-of-field (DOF). As you can see in the cropped image above, the pony’s head is perfectly in focus. Click on the image for larger viewing options.

Split Image

Another notable improvement are the camera’s new manual focus aids: Digital Split Image and Focus Peaking. The former uses PDAF pixels on the sensor to simulate split image focusing as you may know it from older MF SLRs. Click here for a demo: http://youtu.be/_fJDX1hzUIg. The latter, called “Focus Peak Highlight”, delivers classic focus peaking over the entire image frame by outlining/highlighting those areas of the image that are currently in focus. This is a software feature, so I’m confident we will also see it in future firmware releases for the X-Pro1 and X-E1. Click here for a demo: http://youtu.be/PMdQpgOzd4o. By pressing the command dial for about a second, you can easily rotate between the different manual focusing aids.

DSCF0140 - f16, Silkypix 5 & Aperture

** CLICK HERE to Read the Rest of the Article **

X20 vs. X10

by Rico Pfirstinger

Talk to Rico (questions & feedback)Sample images set Comparison images set

Same, same, but different! That’s what Fujifilm’s new X20 compact camera is for those who know its predecessor, the X10. From the looks of it, the X20 and X10 are quite the same, so X10 users will immediately feel at home. However, it’s a new and different home, one with a more conventional X-Trans sensor. Yep, compared to EXR even an X-Trans sensor is pretty old-fashioned. So in order to get the best results from an X20, you might want to shoot it less like an X10 and more like a X100(S), X-E1 or X-Pro1.

In order to compare the image quality of the X10 and the X20, we have to shoot with image resolution M, aka 6 megapixels. That’s because the X10 is an EXR camera with a split-sensor of 2 x 6 MP. Sure, you can also use it in HR mode to get full-size 12 MP output, but why would you buy an EXR camera in the first place if you weren’t interested in its unique features, such as hardware-based DR expansion, or pixel binning to reduce noise and artifacts under low light?

So I took both cameras and shot a series of samples. Click here to open the X20 vs. X10 shootout set on Flickr. While you are at it, you might also want to take a look at my ever growing X20 samples set.

In order to get comparable results, I put both cameras in 6 MP (size M) mode, set DR to Auto (or DR100% for some shots) and also used matching film simulation modes (Astia, Provia and Velvia). Noise reduction was set to -1, the rest was all default settings. After completing the series, I redeveloped each X20 image in 12 MP resolution using the camera’s internal RAW converter. This way we got two versions of each shot from the X20, one with 6 and one with 12 MP.

Looking at the full-size samples, you will recognize that even at 6 MP, the X20 is able to resolve better midtone and highlight detail while keeping noise levels lower and the image cleaner. Have a look at this example:

X10:
DSCF6416 - X10, DR200%, M

X20:
DSCF0139 - X20, DR200%, M

However, it’s a different situation when you look at dark shadow details in images that were shot with DR200% and, even more so, DR400% dynamic range expansion modes:

X10:
DSCF6415 - X10, DR400%, M

X20:
DSCF0137 - X20, DR400%, M

** CLICK HERE to Read the Rest of the Article **

RAW, JPEG, Silkypix and “Fuji Colors”

by Rico Pfirstinger

Since pretty much everybody wrote about Lightroom 4.4RC in the past few days, I won’t. After all, what’s the big story? It took Adobe a full year to get their paying customers what the free RAW File Converter EX software and Fuji’s internal JPEG engine delivered from day one: decent X-Trans demosaicing quality. Big deal! But for those who are still interested in LR4.4RC, I have updated my RAW converter comparison set on Flickr with several new renderings.

Let’s take a look at colors, so-called “Fuji Colors” in particular. It’s often noted that Fujifilm’s built-in JPEG engine is one of the best in the entire industry. Obviously, people either love it, hate it or are just plain ignorant about it, but if you belong to the “I love it” crowd, there’s a good chance that “Fuji Colors” have played a role when you made your decision to buy an X-series camera.

The heart of these colors are the different film simulations Fuji’s cameras are offering in either the shooting menu or in the camera’s internal RAW converter. X-Trans sensor cameras feature five different color film modes, named after famous analog slide and negative FUJIFILM brands: Provia, Astia, Velvia, Pro Neg. Std and Pro Neg. Hi. Make no mistake: These aren’t accurate recreations of analog films. Instead, you get modern, state-of-the art color gradations that feature key qualities of their vintage role models: Provia is a more-or-less neutral all-purpose film mode, Astia delivers more distinct “Fuji Colors” with added pop in the shadows and smooth highlights, while Velvia offers high-contrast JPEGs with strong, saturated colors. Pro Neg. Std and Hi deliver accurate and pleasant skin tones, with “Std” acting as the neutral option and “Hi” as the one giving additional pop and contrast.

Here’s a practical example illustrating the five different film simulation modes:

This example was shot with an X-Pro1 and the Fujinon XF 60mm Macro prime lens at f/4.0, 1/480s and ISO 200. The top row is showing Provia, Astia and Velvia, the bottom row shows Pro Neg. Std, Pro Neg. Hi and a Lightroom development that looks like something in-between Provia and Pro Neg. Std. You can click on the image for a hi-res view, but even if you don’t, you can clearly see that Fuji’s different film modes can deliver quite distinct results. Remember, this is all the same shot, just developed with different film simulation modes in the camera’s internal RAW converter (aka JPEG engine).

Let’s decide for Astia at this time, as it offers a very distinct purple-red rendering of the flower, with smooth highlights and nice contrast in the darker shadows. A typical problem of mono-colored subjects like this one are overflowing RGB color channels, in this case the red color channel. Here’s a magnified view of our Astia shot, showing three different color saturation level settings that can be applied either in the shooting menu or when (re-)developing the RAW file in-camera:

The color settings used here were -2 (left), 0 (center) and +2 (right). Clearly, too much color saturation in the reds goes at the cost of image detail, so we are better off using a saturation setting of -2 (aka “low” when you are using the internal RAW converter). Here’s the less color saturated Astia JPEG of this shot, straight from the camera’s built-in RAW converter:

As usual, click on the image for a full-size view. This was a hand-held macro shot, so I used the smallest available AF field size and moved it precisely over the area I wanted to be in-focus.

So far, so good. We now have an image with quite distinct “Fuji Colors”. Some people may like it, some may not, it doesn’t matter. What matters is that many of those who like their own JPEGs with Fuji colors would often also like to achieve similar looking results with external third-party RAW converters like Silkypix or the free RAW File Converter EX (which is an older version 3 of Silkypix).

How can we do it? Let’s play it through! Here’s the RAW file as it looks in Silkypix 5 with the software’s default settings:

Uh-oh! While this default rendering proves that claims about X-Trans sensors being incapable of delivering saturated reds are wrong, this is obviously not the result that we had in mind. In order to emulate the Astia rendering of the in-camera JPEG engine, we need to make some changes. But there’s more! If you click on this image for a full-size view, you will see ugly artifacts in the deep reds, almost like dirt soiling the colors of the flower. Here’s a zoomed-in view of this phenomenon, just click on it to see it in full size:

This doesn’t look nice, not to mention that the red is somewhat over-saturated and obscuring image details. So let’s correct this, shall we? After a few modifications in Silkypix, the image looks like this:

To make the comparison a little easier for you, here’s the original Astia JPEG again:

It’s not exactly the same, but it’s close enough for me. Of course, you could achieve a perfect match with a few further adjustments in Photoshop, Lightroom, Aperture or any other powerful image editor, but maybe an exact match wouldn’t really improve the image, anyway? Also note that the “dirt” and other color artifacts in the red flower are now gone.

So what exactly did I do to make it work?
Well, buy my next book to find out.
Good night, and good luck!

** CLICK HERE to Read the Rest of the Article **