XF 56mm APD vs. XF 56mm

XF 56mm APD vs. XF 56mm

by Rico Pfirstinger

Talk to Rico (open forum for questions & feedback)

Fuji X Secrets Workshops – Rico’s Flickr Sets

The Fujifilm X-E2: Beyond the Manual (use coupon XPERT40 for a 40% discount)

Istanbul Calling – XF 56mm vs. XF 56mm APD Sample Images

^ Istanbul (X-E2 with 18-55mm kit zoom, SOOC JPEG Velvia)

Happy New Year everybody!

I hope you’ve successfully navigated through the sometimes stressful holiday season. I certainly did, and now we don’t have time to waste, as new Fuji product announcements are just around the corner. Not to mention that I’m supposed to submit the English and German manuscripts of my book on the X-T1 in less than two weeks. The book (which will be available as an ebook and eventually also in print) will incorporate all changes and new features of the big firmware 3.00 update from 18DEC.

^ Istanbul (X-T1 with 18-135mm kit zoom, Lightroom)

But wait, there’s more: Fuji X Secrets is going to Istanbul, a marvelous city for photographers of all genres. From 30APR to 5MAY, an exclusive group of only 5 to 7 Fuji X series fans will be able to explore this mesmerizing city along with Fuji X-Photographer Mehrdad Abedi and myself. Mehrdad’s stunning work as a travel photographer earned him the title story in a recent Fuji X Magazine edition, so check-out his portfolio here, and also have a closer look at what’s in store for you during this one-time event, which will be conducted in German language. As of today, three spots have already been taken.

^ Fuji X Secrets Workshop in Schwabach, 3OCT14 (X-T1 & XF56mmF1.2 R, Lightroom)

For those of you who want to stay closer to my current home in Germany, I am also offering a new Fuji X Secrets weekend workshop here in Nuremberg/Schwabach on 11 and 12APR. Two of only four available spots are currently available.

^ Santa Barbara (X-T1 with 18-135mm kit zoom, Lightroom)

If you are interested in an English language Fuji X Secrets workshop this summer (July) in Southern California (Santa Barbara area), please drop me a note at info@fuji-x-secrets.com, so I can keep you informed.

^ XF 56mm F1.2 R APD

Since Fuji is about to officially announce another high-end lens tomorrow, let’s use the build-up for a comparative look at Fuji’s new XF56mmF1.2 R APD lens. As many of you will remember, this lens was on display in September at the Photokina show in Cologne, and it appears that its announcement led to a few misunderstandings.

** CLICK HERE to Read the Rest of the Article **

New Firmware Features (3): X-T1 Firmware Version 3.00

_ _ _

New Firmware Features (3): X-T1 Firmware Version 3.00

by Rico Pfirstinger

Talk to Rico (open forum for questions & feedback)

Fuji X Secrets Workshops – Rico’s Flickr Sets

The Fujifilm X-E2: Beyond the Manual (use coupon XPERT40 for a 40% discount)

This Thursday (18 DEC 2014), Fuji is releasing new firmware for the X-Pro1, X-E1, X-E2 and X-T1. This is the third and final article explaining the changes and enhancements brought to you by these updates. In this edition, I am going to cover features and enhancements of firmware 3.00 for the Fujifilm X-T1.

This update also includes the AF+MF feature that I have already covered here.
Please click here to learn more about the remote control feature of the X-T1, X-E2, X30 and X100T.

I have sorted the X-T1 firmware enhancements into 18 categories, starting with the…

** CLICK HERE to Read the Rest of the Article **

Apple Camera RAW, X-Trans and EXR

by Rico Pfirstinger

Talk to Rico (questions & feedback)Rico’s Flickr photosteam

Considering the lively discussion that is going on about Apple Camera Raw and Aperture finally supporting Fujifilm cameras with X-Trans sensors, earlier reports about Aperture’s death appear to be a bit premature. As was to be expected, most of the discussion focuses on heavy pixel peeping, so this is what I am not going to talk about in this edition of my X-Pert Corner column. That’s because with all the pixel peeping, it’s easy to lose sight of the big picture. There’s more to processing a RAW file than looking at perceived artifacts in 100%-400% magnification modes. Let’s instead focus on the following:

  • How usable is Apple Camera Raw for highlight recovery?
  • How is Apple Camera Raw dealing with digital lens correction and RAW metadata?
  • How is it handling RAW files that were taken in extended dynamic range modes, like DR200% and DR400%?

If you open a “standard” (that is DR100%) X-Trans RAW file in Apple Aperture using the latest Apple Camera Raw, chances are it won’t look that much different from a standard Provia SOOC JPEG file. Why bother, then? We could just use the JPEGs from the camera (maybe with additional tweaking in its internal RAW converter) and carry on with our lives, right? Yes, we could, at least in many instances. However, there are situations that the camera’s built-in JPEG engine cannot handle. This is where external RAW processing options shine—at least some of them, because not all external RAW processors are equally well-suited for specific tasks, such as highlight recovery.

Let’s have a look at a practical example. This is a (cropped to taste) SOOC JPEG image I recently recorded with a XF55-200mmF3.5-4.8 R LM OIS prototype lens:

You can immediately see that the dynamic range of this subject grossly exceeds the range of the JPEG: shadows are blocked, highlights (clouds and sky) are blown-out. No matter how you deal with this RAW file in the camera’s internal converter, you won’t get a balanced result showing the full tonal range of the scene. For example, redeveloping the JPEG in-camera with soft (-2) shadow and highlight tone settings won’t rescue the clouds:

Neither will “pulling” the image -1/3 or -2/3 EV using the built-in converter’s push/pull function:


-1/3 EV


-2/3 EV

It is important to note that both -1/3 EV and -2/3 EV versions shown here don’t induce any any clipped highlight warnings, neither in the camera’s “info display” view nor in Apple Aperture. This means that no matter how much further I might pull the RAW in-camera, the texture in the clouds won’t magically re-appear. The internal RAW converter simply cannot rescue this shot. However, a state-of-the-art external converter can.

I shot this sample using the basic “ETTR exposure technique for RAW shooters” that I am recommending in my book. This means setting the camera to DR100% and using the live histogram to set the “right” exposure, clipping the relevant highlights in the histogram just so much that they can still be recovered in Lightroom/ACR or, in this case, Apple Camera Raw and Aperture.

Here’s what the standard import of the RAW file looks like in Apple Aperture:

** CLICK HERE to Read the Rest of the Article **

Studio X

by Rico Pfirstinger

Talk to Rico (questions & feedback)Rico’s studio samples set

Taking your X-series camera to a studio is easy. All you need is a well-equipped location, a stunning model, great make-up, amazing dresses, beautiful lighting and the talent to put it all together.

Obviously, I’ve got none of that.

That’s why I turned to Damien Lovegrove, who’s not only a master of the trade, but also a keen and experienced X-series user. When others shoot with bulky Canikons, Damien will use his classic (black) X100 or his X-Pro1. Many of his images are nothing short of spectacular and can be admired on his blog, and unlike other well-known pros, he’s not paid by Fujifilm for using and endorsing their products. Shooting the little Fujis is his choice. Here’s Damien with one of his beloved Lupolights, posing as a stand-in model:

Once I learned that Damien was coming to Munich for a lighting workshop at Radmila Kerl’s studio on April 3rd, I quickly secured myself a spot. After all, it’s just a 90 minutes drive from where I live. I brought my X-Pro1, X-E1 and X100S cameras along with a full set of lenses, eventually using Fuji’s trusted kit zoom (which Damien uses a lot), the F1.4/35mm and a classic Voigtländer Heliar F1.8/75mm with Leica M mount, which has become one of my favorite portrait lenses. Damien quickly fell in love with it, as well, but he was struggling with the manual focus of the lens. So let’s begin with a 75mm high-key shot of our stunning model Wlada Schüler from Berlin:

DSCF7393

Lit with a single Profoto flashlight from above/behind, I used ISO 1250, f/2.8 and 1/125s flash sync on my X-E1 along with some heavy overexposure that is required for this look. Here’s another example, this time with Fuji’s kit zoom lens at 55mm and f/4.5, dialing up the X-Pro1’s ISO to 1600:

DSCF3895

Apart from the initial Voigtländer image, all samples in this article are based on factory-setting OOC JPEGs (Provia), although I dialed down the highlight tone to -2 for several shots. The JPEGs were swiftly processed in Apple Aperture (no fancy stuff or layer work) and uploaded to Flickr.

** CLICK HERE to Read the Rest of the Article **

[UPDATE: with Speed Booster] Adapting Third-Party Lenses

by Rico Pfirstinger

Talk to Rico (questions & feedback)X-E1 sample images set X-Pro1 sample images set

Last week, we had a very interesting article by Jan Vogelaar about the performance of Carl Zeiss and Leica M lenses on a X-Pro1. So I guess it makes sense to cover some practical aspects of adapting vintage lenses to your X-Mount camera in today’s X-PERT CORNER column.

One highlight of the X-Pro1 and X-E1 is undoubtedly the small flange-back distance of the X-Mount lens connector at only 17.7mm. This means you can attach practically any third-party lens from other camera systems—with the appropriate adapters—to your X-Mount camera. Manufacturers like Kipon have already announced X-Mount-compatible adapters for more than 40 third-party systems, and the high-quality German manufacturer Novoflex has also dutifully added X-Mount adapters for some 13 established third-party mounts.

The X-Pro1 is not a rangefinder camera. It’s a pure-bred autofocus camera and as such—despite its hybrid viewfinder—it is only marginally equipped to work in combination with manual focus lenses. Currently, the only tool that the X-Pro1 and X-E1 feature to assist with manual focusing is a magnified digital viewfinder. The camera also offers some kind of focus peaking when you magnify the viewfinder image: It will enhance contrasty edges, indicating that they are in-focus.

Unfortunately, there are a few further aspects that render the X-Pro1 and X-E1 not yet perfectly equipped for working with third-party lenses: When a lens is attached to the X-Pro1 via an adapter, Auto-ISO operates with a minimum shutter speed of 1/30 second—independently of the actual focal length that was set in the adapter menu. 1/30s may be too fast for many wide-angle lenses and too slow for most standard and telephoto lenses. The cameras also set the minimum flash sync speed at a fixed 1/15 second when a third-party lens is attached, which is largely useless for lenses with larger focal lengths. In other words, the cameras “know” exactly what the current focal length is, but doesn’t use this information to the benefit of the photographer.

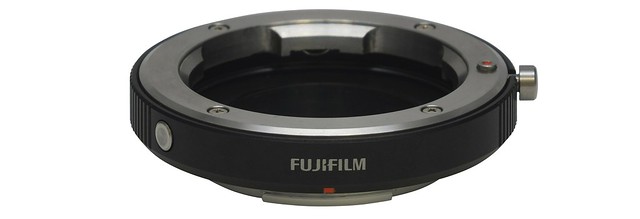
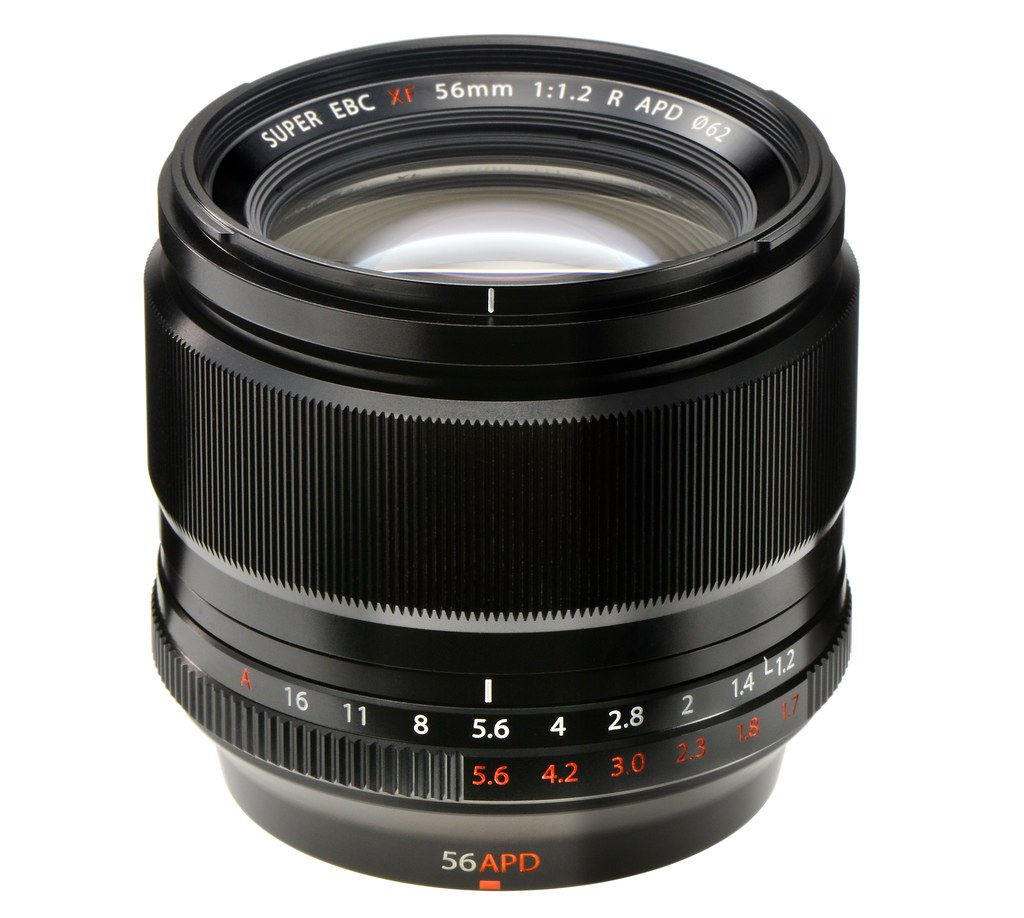
Fuji’s own Leica M mount adapter (pictured above) includes X-Mount signal contacts as well as a function button on the adapter ring that brings up the adapter menu on the monitor or in the viewfinder. Furthermore, this adapter unlocks extra camera functions that allow you to correct several optical errors such as vignetting, distortions, or color shifts at the borders of an image. However, due to these extra contacts occupying extra space, Fuji’s own adapter is not compatible with all M lenses. Fuji maintains a compatibility chart showing which lens will fit and which will not. The adapter also comes with a gauge that will tell you if a particular lens that’s not on the chart will fit.

In the X-Pro1, the display frame for the OVF uses the selected focal length setting from the adapter menu (SHOOTING MENU > MOUNT ADAPTER SETTINGS), as long as it’s between 18 and 60 millimeters. Focal lengths less than 18mm are indicated in the optical viewfinder with yellow arrows in the corners, and focal lengths of greater than 60mm, with a red frame calibrated to 60mm.

Within the acceptable range of focal lengths for the OVF—18mm to 60mm—two frame indicators will appear in the viewfinder: one white, one blue. The white frame is corrected for parallax for objects at infinity and the blue frame, for objects at a distance of about two yards.

Third-party lenses that are attached to the X-Pro1 or X-E1 over an adapter can only be focused manually. The only exposure modes that are available are the aperture-priority (A) and manual exposure (M) modes. Other functions such as auto ISO, TTL flash, and DR extension, however, are still available.

Connecting and Recognizing Third-Party Lenses

After you have mechanically attached a third-party lens to your camera via an adapter, you should first make sure that SHOOTING MENU > SHOOT WITHOUT LENS > ON is selected—otherwise your X-Pro1 won’t take any pictures. Using Fuji’s own M adapter will automatically enable and grey-out this option for you.

Next go to SHOOTING MENU > MOUNT ADAPTER SETTINGS. Here you will have six lens settings to choose from: four focal length presets (21mm, 24mm, 28mm, and 35mm) as well as LENS 5 and LENS 6—two focal lengths that you can set manually.

If you happen to be using an M-adapter from FUJIFILM, you will also have a number of correction settings available, which I’ll cover in part two of this article.

Focusing with Third-Party Lenses

The only way to focus precisely when using a third-party lens is to use the magnified display of the electronic viewfinder (EVF) or the LCD monitor. Your camera will need to be in manual focus (MF) mode, so turn the focus mode selector on the front of the camera to M. As usual, you can magnify the digital displays by pressing the command dial.

DSCF6899

The sample shot above was taken with a (probably) at least 20 years old Carl Zeiss Sonnar T* 180mmF2.8 MM-G C/Y lens and a no-name C/Y > XF adapter. It’s an OOC JPEG shot with an X-E1 (using the internal RAW converter as described here) and post-processed with Apple Aperture. To preserve and enhance the pleasing vintage look, colors and gradation of such “analog” lenses, I often use film simulations from VSCO (available for Lightroom, Photoshop and Aperture) as starting points. I took the picture at open (or almost open) aperture and focused with the 3x magnifier tool. Click on the image for a higher-res view and more exposure parameters.

To focus as exactly as possible, you’ll want to open the aperture as wide as possible. The reduced depth of field will help you to find the correct focus point. After you’ve found it, you can then close the aperture to your desired setting. The focus point should not move, but the depth of field should become larger. You can observe this effect in the EVF. The viewfinder’s distance and depth of field indicators will be nonfunctional. Of course, you need be careful with this method when using a lens that shifts its focus plane on changing the aperture. This often occurs in spherically under-corrected lenses that feature nice background bokeh (and harsh/swirling foreground bokeh). With such lenses, you may be better off focusing with the actual working aperture of your shot.

To refine your focus at any time you can always reactivate the magnified digital display. Well, almost at any time: the magnified display will not be available while the camera is transferring data from the buffer memory to the memory card. As soon as that finishes, you can activate it again. Let’s hope that Fuji takes care of this annoying quirk in future firmware updates. In the meantime you can make do with a bit of patience and a super-fast memory card.

DSCF3268

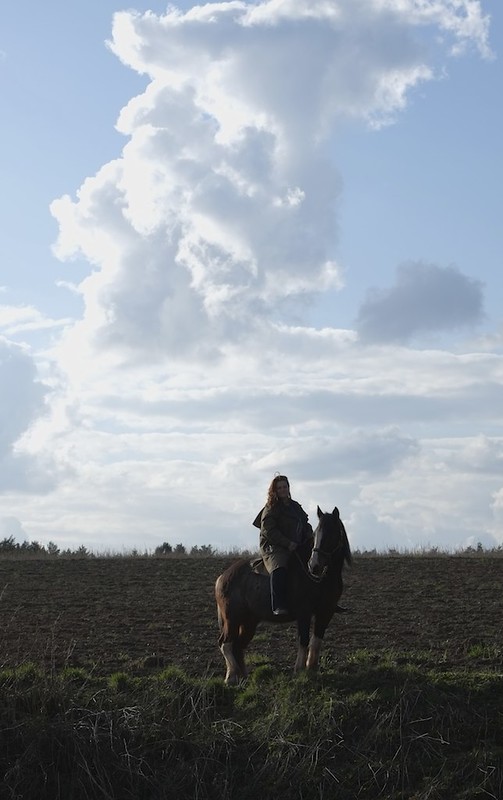
The image above is a sample shot with a [shoplink 8026 ebay]Voigtländer Heliar F1.8/75mm[/shoplink] with M Adapter. It was shot with a Kipon M adapter and developed from the RAW in Silkypix 5, no further post-processing and no VSCO Film. Click on the image for larger views and more exposure parameters. Here’s another sample with the Voigtländer, shot at f/2.8 with a single studio flash from above:

DSCF7393

Exposing Correctly with Third-Party Lenses

** CLICK HERE to Read the Rest of the Article **