Featured posts

The Architectural Charm of Porto

NEW GUEST POST FEATURE
Write Your Articles Directly On FujiRumors!

_ _ _

guest post by Adam – adambonn.com website

Hello Fujirumours readers!

I was recently incredibly flattered by Patrick kindly publishing my (shot entirely with the X-Pro1 and X-T1) story about the stray cats of Porto, which you can read here

Someone in the comments section did lament that there were no actual scenes of Porto in that post.

It’s a fair comment, (because there weren’t) but the story was about stray cats!

However I fully understand, Porto is a charming city, and in my opinion a photographer’s delight.

Not only are there all the ‘street’ opportunities offered by a major city, but the very fabric of the city itself is a interwoven juxtaposition of old and new, shiny and faded.

So, as a follow up here’s a post about Porto itself.

Now I’ve got to warn you… this won’t be some postcard series where we just stand on the banks of the Douro and take some snaps of the Ribeira shoreline, nor we will we hang around the Dom Luís I bridge and shoot the Metro.

Today I’ll take you, ever so slightly off the well trodden track.

So sit back, get comfy and pour a moderate glass of Sandeman and we’ll begin!

After several visits to Porto, we decided to make it our home, can I offer any further proof of my love for this city?

Street photography may very well live and die by the people in the shot, or the humanistic nature of the image captured, but in a wider sense street photography often requires the context of the background.

But equally, some times the background is the shot!

Porto is no modern spring chicken, much of it is very, very old and parts of it have, well frankly, seen better days.

It’s this combination of people and scenery that will capture your eye when you’re here, so let’s take a look at the architectural charm of Porto.

All are shot on the Fujifilm X-Pro1. A camera that I love dearly, and a body that I find for me; ideally suited for the street/documentary/reportage subjects I like to shoot.

Old and New
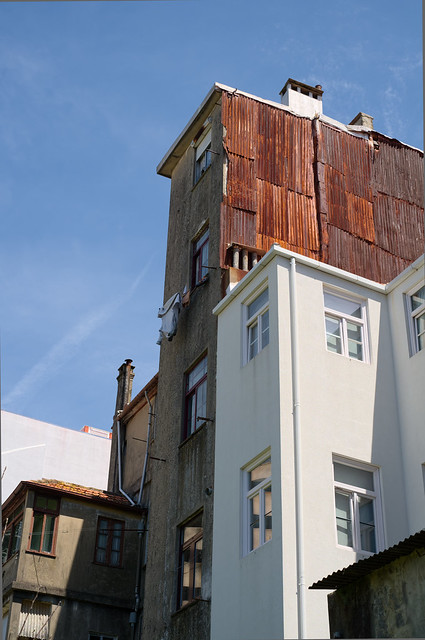
Old and new, this side-by-side nature is so often seen here. I shot this with the XF35/1.5 @ F5.6. This was taken from the garden of Casa Branca, which is a healthy eating Café within Porto’s cultural space. (I don’t love salads… But I really enjoyed theirs!)

The Story Continues: Push READ MORE

** CLICK HERE to Read the Rest of the Article **

Fuji X-T1, X-T2 – A New Way of Seeing!

NEW GUEST POST FEATURE
Write Your Articles Directly On FujiRumors!

guest post by Philip Sutton: philipsuttonphotography website + Instagram @finartfoto

Before I get to the point of this posting, I will give a little bit of background to add some perspective to my thoughts. I started my photographic journey way back in the film days. I shot for many years for a Stock Library in Sydney Australia. You know the deal – the generic girl with glossy white teeth eating a red shiney apple, or the squeaky clean couple with their 2.2 kids having a picnic under the perfect umbrella-shaped tree. All fairly boring stuff, bit it kept my artistic flair alive and helped to pay the bills. I still worked as a teacher (my main source of income), but I was able to make a healthy supplement to my earnings by selling ‘stock’. Back in those days the Nikon F3, then the F4 were the weapons of choice. Due to family reasons, I had a break from photography for about 10 years, and of course when I returned everything had gone digital.

DSCF8064

For the last 6 years now I have travelled Asia extensively (usually for 3 months of the year), shooting Fine Art images for my website. My recent weapons of choice were the Nikon D700 and D3X. After thinking long and hard how I could lighten my burden from dragging these huge DSLR’s around in the tropical heat of Asia, I eventually threw caution to the wind and in 2012/13 I sold all of my Nikons and lenses and bought a Fuji X100, X-Pro1 and some lenses. On a good day, the X100 was just OK, but the X-Pro1 experiment was an unmitigated disaster. That trip to Asia in 2012 was highlighted with mutterings and expletives all aimed at the Version 1 Firmware of my X-Pro1 and its lack of focusing ability. I returned back home with not many useable photos and immediately (at great expense), sold all of the Fuji gear and bought another D3X with a selection of lenses.

Push READ MORE

** CLICK HERE to Read the Rest of the Article **

TTL Flash groups on the Fuji X series

NEW GUEST POST FEATURE
Write Your Articles Directly On FujiRumors!

NOTE: FujiRumors is in no way Affilitated with Serene Automation. I don’t get any money from them.

Often I’ve been asked about TTL flash groups, why they are needed and how they work. Of course, you might ask yourself if this is something that applies to Fujifilm cameras – it does, and we will concentrate exactly on that.  Flash groups are an extension beyond off-camera flash. Simply taking the flash off-camera usually improves the quality of the shot immensely. Enhanced vibrancy, depth, and wonderful shadows are a few benefits.  But sometimes it would be nice to add light in more places and direct it where you want, maybe even with some color. For example, I may want to illuminate the background to resemble a cool green jungle and illuminate the subject with a more warm light. When we do that, things get a little more complex. For one thing, you need a flash trigger with multiple receivers.  But, more importantly how do you balance the light and exposure? After all when you shot TTL the camera sets the exposure – blindly. The answer, of course, is flash groups. With flash groups you can add as many speedlights as you wish, assign them to one of several groups, and set the group exposure and even flash head zoom independently.

Foreground - two groups on speedlight each, one using yellow gel. Background one group with green gel on two speedlights.
Foreground – two groups on speedlight each, one using yellow gel. Background one group with green gel on two speedlights.

In the above example I may place a couple speedlights with green gels to illuminate the background and a couple on the subject to provide warmth and depth, maybe from different angles. In this case, if I apply the background to one group and each subject light to their own group, I can control the lighting as I please. And because we use TTL, the overall result will be exposed correctly – always. But, what if I want to decrease the background? Simple, just reduce the background group’s exposure. Since it is still TTL, the camera will compensate and maintain a good exposure, but with the background a little lower.

The RoboSHOOT© TTL radio triggers from Serene Automation LLC do just this and much more.  In this article we will cover only the flash group capabilities of the product. Flash groups can be individually controlled to affect all speedlights assigned to that group – they can be enabled or disabled, exposure set and configured as TTL or manual (for those situations where manual exposure is preferred), zoom head can be set directly or configured to follow the camera zoom. In addition, the overall TTL exposure can be adjusted up or down, all flashes can be enabled or disabled, and the flash exposure can be locked for subsequent shots. So, whatever you want the speedlight to do, RoboSHOOT© provides it. Plus, if you want to use a powerful Nikon speedlight with your Fuji Camera you can do it, and with the same capabilities – yes! Nikon iTTL is supported on Fujifilm cameras.

The RoboSHOOT© product supports four flash groups. There are two ways to control them: using an Android or iPhone App or using profiles. The App can be used with the RoboSHOOT© MX-20 product – the app image below shows a basic example. As mentioned before, flash groups on RoboSHOOT© are full TTL. So, the camera will compensate when you adjust TTL levels of the group. So, the settings are relative, meaning if one group is +1 and the other is +1/3, the result is the same as +2/3 and 0 – in both cases the groups are 2/3 ev apart. To give more or less flash power then the camera asks for, a TTL offset value is used. This gives you predictable yet complete control over the results. Profiles, the other method of controlling groups, are simply stored flash group settings. You can set up four individual profiles and select the one you want or even bracket over all four with or without using the app! This is great for repeatable portraits or taking a variety of macro shots, as below, with different lighting profiles, for example.

Flash group control view including overall offset, enable, and exposure lock

Taking your flash off-camera opens an entire new range of possibilities – akin to owning a new camera. Adding the limitless configurations of RoboSHOOT© flash groups completely frees the imagination. More information about RoboSHOOT© is available on the Serene Automation Website. They are also distributed by OmegaBrandess and can be purchased at Adorama, B&H Photo, and other select photo retailers in the US.

Each image has identical flash / camera position. Profiles were used for flash settings.

John Poremba
Serene Automation LLC

The Sporty X-Pro2

NEW GUEST POST FEATURE
Write Your Articles Directly On FujiRumors!

guest post by James Conley: f-eleven.com + Instagram @philatawgrapher

When most photographers think of shooting sports, they think of 400mm glass on the 50 yard line. When I think of sports, I think about ultra-wide, ultra close. That said, any sporting event involves fast moving action and the need for equipment that can both quickly respond, and take a bit of abuse. These things were on my mind when I covered The Race of Gentlemen this year.

XPRO7720

Once a year, tattooed and heavily bearded men (and a few women) gather in Wildwood, New Jersey, and take over a section of the beach. With beer on tap, loud music, and louder motorcycles and cars, this motley crew waits for the tide to recede and then grinds up the sand racing antique vehicles down a quarter-mile. Known as The Race of Gentlemen, the event is a celebration of a time long passed.

Push READ MORE to Continue

** CLICK HERE to Read the Rest of the Article **

Skin Tones – Fuji 56/1.2 vs Sony 85mm GM, Canon 85/1.2 L, Zeiss Batis 85, & Panasonic Leica 42.5/1.2

NEW GUEST POST FEATURE
Write Your Articles Directly On FujiRumors!

By Rick Birt of Romeo Bravo Photo

Like most serious photographers, I mostly shoot RAW.  However, both my wife and I have clients that just want jpgs straight out of the camera.  This wasn’t a problem with my wife’s old Canon 1Ds mkII that I first started with, but it was with my Sony a7R II.  The out-of-camera (OOC) jpg files produce less than desirable skin tones. I know about the glorious Fuji colors, and I use Fuji simulations in some of my post-processing.  After reading numerous glowing reports about Fuji OOC jpg colors, I decided to rent a Fujifilm X-Pro2 with a 56/1.2.  I’ve also read great things about Olympus jpg colors so I added an Olympus Pen-F with a Panasonic Leica Nocticron 42.5/1.2.

I wanted to judge skin tones in both OOC jps, and after processing RAW files in Lightroom (my version of Capture One doesn’t recognize the new Fuji RAW).

So, I grabbed my wife, and fellow photographer, Kelly Williams and we shot all Saturday afternoon.

So lets look at the OOC jpgs…

Fuji X-Pro2 with Fujifilm 56mm f1.2:

OOC Fuji Provia
OOC Fuji Provia

Push the READ MORE Button to See the Full Skin Tones Comparison

** CLICK HERE to Read the Rest of the Article **