Featured posts

The Perfect Exposure

Exposing and Editing RAW Files the Right Way

The path to technically optimal images leads through two stages: the best possible RAW exposure and competent post-processing. That’s why my Fuji X Secrets RAW workshops deal with both aspects equally.

by Rico Pfirstinger

Note: This is the English version of my German blog entry on Fuji X Secrets. Click here to read the original article in German.

From time to time, participants submit images to my RAW workshops that have been exposed incorrectly. Usually, this is because they want to compensate for their exposure error by processing the RAW image and “salvage” it somehow. This is based on a misunderstanding: RAW processing is not primarily intended as a rescue expedition to improve the technical (and sometimes also creative) mishaps of photos that have turned out badly. Although this may well be possible in individual cases, our goal should be to deliver RAW files that are as technically well exposed as possible. Then we can process them with all the skill at our disposal to make the most out of them.

Garbage In, Garbage Out

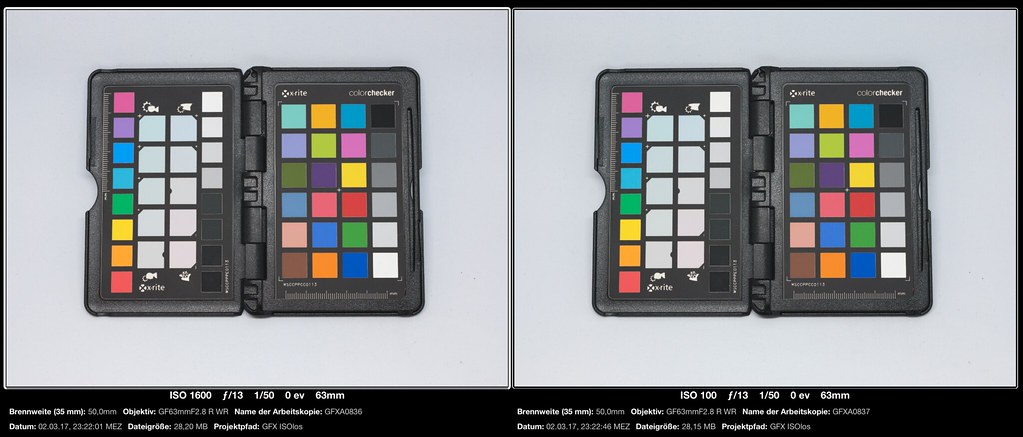
The quality of the captured RAW data determines what you can achieve with them in the RAW converter. A simple rule applies: The more light the camera can capture in a shot, the technically superior the image will be. So, do you overexpose vigorously? Of course not! A shot with blown-out highlights that cannot be recovered in the RAW converter is not attractive.

The principle of letting as much light hit the sensor as possible is thus limited by the fact that image-critical highlights in the scene should not be destroyed by the exposure. The photographer decides what is image-critical, not the camera. For a technically pristine image, it is always better to control the camera – rather than being controlled by it.

The Correct Exposure

To set the optimal exposure for a scene, we need some help. Fujifilm’s mirrorless X and GFX Series cameras have several things going for them in this respect:

  • The live view usually (not always!) displays a WYSIWYG preview of the JPEG shot – and thus also serves as an exposure preview.
  • Respectively, the RGB histogram shows the brightness distribution of the JPEG for each individual color channel.
  • A blinking overexposure warning indicates overexposed (blown-out) areas in the live view.
  • Spot metering allows pinpoint brightness measurements for isolated areas in manual exposure mode (M).

Since the live view, the histogram and the blinking overexposure alerts always refer to the JPEG to be generated by the camera (and not to the RAW data), they are based on the JPEG settings that apply at the time. So, it does make a difference which film simulation, contrast or white balance setting is currently in effect. This allows us to specifically find in-camera JPEG settings that are closest to the potential of the RAW data – let’s call them “JPEG settings for RAW shooters”.

Live view, histogram and overexposure warnings depend on the currently selected JPEG settings of the camera. The image above shows the factory settings of an X-H1, the one below our custom “JPEG settings for RAW shooters”. For the live view and the histogram to correspond as closely as possible to the exposure of the RAW file, I recommend low-contrast JPEG settings with reduced color saturation. 

** CLICK HERE to Read the Rest of the Article **

The GFX 50 Series is an ISO-less Classic

The sensor in the GFX 50 series is certainly not the fastest. Nevertheless, you should not underestimate this ISO-invariant classic with its 50 megapixels. In terms of sharpness and dynamic range, it can still hold a candle to newer developments.

by Rico Pfirstinger

Virtually all cameras of the Fujifilm X series are ISO-less (also known as ISO-invariant). This refers to cameras with sensors for which the ISO setting doesn’t matter in terms of image quality. Only the set aperture and exposure time (shutter speed) are decisive. It’s all about the actual amount of light that reaches the sensor. I have written about this before (German version, English version).

Is My Camera ISO-less?

You can find out yourself to what extent the sensor in your camera is ISO-less. Here’s an example with a GFX 50S: I first shot a consistently lit test subject at f/13, 1/50 sec. and ISO 1600. The result was a correctly exposed image. I then shot the same subject again at aperture 13 and 1/50 sec., but this time I reset the ISO to ISO 100. This is the base ISO value of the GFX 50 series, i.e. its baseline sensitivity. Of course, the second image appears four stops darker. After all, it was taken at an ISO setting that was four stops lower than the first shot, with otherwise the same exposure. To make our second image (captured at ISO 100) appear as bright as the first, we need to boost it four stops in the RAW converter (in our case, that’s Adobe Lightroom). This we do by moving the converter’s exposure slider 4 EV to the right from its zero position.

The same subject shot twice with f/13 and 1/50 sec. – on the left with ISO 1600, on the right with ISO 100 and a subsequent brightening in the RAW converter by 4 EV.

Please click on the image for a larger version.

To better assess whether the GFX 50S used in this example really works ISO-less, let’s take a closer look at enlarged details of the two test shots:

** CLICK HERE to Read the Rest of the Article **

Sensor Cleaning and IBIS

For most users of X-Series cameras, do-it-yourself sensor cleaning with blowers, sticky sticks or swabs is a matter of course. However, things can get a little bit tricky if your camera has IBIS.

by Rico Pfirstinger

Sooner or later, cameras with interchangeable lenses get dust or dirt on the sensor. When the built-in sensor-cleaning function (SET UP > USER SETTING > SENSOR CLEANING > OK) doesn’t help, you can clean the sensor by yourself.

If you leave your camera’s sensor exposed, it will soon collect dust and spots from dried fluids.

Popular Sensor Cleaning Options

  • Touchless cleaning involves using a blower, like the Giottos Rocket Air Blaster, to rid the sensor of dust particles. A key feature of such devices is a filter in the intake valve that prevents contaminated (dusty) air from being blown against the sensor.
Caution! Don’t use compressed air from aerosol cans that contain propellants. Particles could hit the sensor like tiny projectiles and damage the protective surface!
  • Tough sensor dirt (like water or oil stains) requires wet cleaning with a sensor swab. They consist of wipers that are wetted with special cleaning fluids. Wipe one side of the swab from left to right over the full width of the sensor, and then from right to left with the other side of the swab. Your X-mount camera requires swabs that match APS-C-sized sensors.
** CLICK HERE to Read the Rest of the Article **

First Look Review: Fujinon GF250mmF4 R LM OIS WR

Reaching Out: GF250mmF4 R LM OIS WR

The new GF250mmF4 R LM OIS WR and the optional GF1.4x TC WR teleconverter lens bring genuine telephoto capability to the evolving Fujifilm GFX medium format system. Featuring impressive detail resolution and three-dimensional subject rendering, the rather moderately priced GF250mm equals a 198 mm lens in 35 mm “full-frame” terms, and its reach can be stretched to 350 mm by attaching the new 1.4x teleconverter. Fujifilm’s GF product introductions are completed by two macro expansion tubes that work with almost all existing GF lenses and can turn the GF120mmF4 into a true 1:1 macro lens.

So is it all worth it? You should be able to decide for yourself after reading this first-look review based on pre-production samples of the GF250mmF4 R LM OIS WR, GF1.4x TC WR, MCEX-18G WR and MCEX-45G WR.

_ _ _

Fujinon GF 250mm F4: BHphoto, Adorama, AmazonUS
Fujinon GF 1.4x Teleconverter: BHphoto, Adorama, AmazonUS
18mm Macro Extension Tube: BHphoto, Adorama, AmazonUS
45mm Macro Extension Tube: BHphoto, AdoramaAmazonUS

_ _ _

by Rico Pfirstinger

** CLICK HERE to Read the Rest of the Article **

New Steelsring Smart AF Adapters for C645 and Canon / Sigma EF lenses to Fujifilm GFX camera

The maker of the new Steelsring smart adapters for C645 and EF lenses adapter wrote a little guest article for FujiRumors, which I’m happy to share with all of you today.

Oh, and of course, Steel is also a member of our 15,000 strong GFX facebook group, and you can interact directly with him in this Steelsring smart adapter facebook post.

And for fast, reliable, and 100% GFX news and rumors follow the Fujifilm GFX facebook page.

Fujifilm GFX 50s: BHphoto, Adorama, AmazonUS

guest post by Steel

Dear folks,

I am happy to announce the success of development of Steelsring smart adapters for C645 and EF lenses to GFX camera body. It is in production now, and will be available for sales in September, it will be reasonably priced, to be announced later.

Demo videos on youtube here: https://youtu.be/MYIBBUlqH4o.

These two adapters feature:

  1. Automatic lenses identification, includes all C645 lens, and theoretically all EF lens (but only Canon and Sigma lens will be tested).
  2. Accurate lens params (Lens type, name, focal length, zooming info, aperture, etc ) passing to GFX and EXIF recording. So you can use the right info for exposure, and know pictures took by which lens and in what params.
  3. Fast/accurate AF, comparable to FUJI GF native lenses. AF faster than CDAF mode of Sony E cameras. AF is not possible for C645 120 f/4 MACRO and EF brand MF lenses.
  4. Aperture control through camera body, works with all C645 lenses ( Can switch to Lens Aperture Ring control too ) and EF lenses.
  5. Image stablization activation/deactivation for EF lenses with IS, controllable from GFX body.
  6. Plug and play. You just use it as usual, no extra equipment/setup are needed. Mount your lens on the adapter, put the adapter on the camera, turn the camera power on, then you are good to go.
  7. USB socket for self-firmware upgrade.

All above features were implemented and tested already. When sales begining, C645/GFX adapter will be tuned against all C645 lenses including Mutar 1.4x. Not all EF lenses will be tuned into the EF/GFX first firmware release, but it’s upgradable.

Currently tested EF lenses are quite limited,

EF 135 f/2L, EF 24-105 f/4 L I,EF 17-40 f/4 L, EF 35 f/1.4 L I, EF-S 18-55 II, Canon EF TS-E 17 f/4L, Canon EF TS-E 24 f/3.5 II, Canon EF 100 f/2.8 Macro IS II and Sigma 135 f/1.8 art, Sigma 35 f/1.4 ART, Sigma 50 f/1.4 ART .

Anyone who is interested in my adapters, could always get the latest status update from https://www.facebook.com/Steelsring/

Cheers,

Steel ( Steelchn@gmail.com )

Steelsring videos on youtube

C645 Tessar 350 f/4.0 AF demo with Steelsring C645/GX Smart Adapter