Nikon to Fujifilm X-T2 Switchers Guide

Introduction
GUEST POST FEATURE
Write Your Articles Directly On FujiRumors!
guest post by theoverratedphotographer – Twitter / Instagram
Switching systems is a big step no matter how well you know photography. Reviews do a good job of explaining how good the camera is, but they aren’t very good at explaining the learning curve which may or may not be painful coming from one system to another.
For Nikon switchers, I’ve tried to cover the differences in article. It’s written primarily coming from a full frame Nikon (or the D750 in my case) so it may not be applicable to all Nikon’s. It’s a little long but hopefully I’ve covered it in enough detail to keep everyone happy.
What this article is not:
- This is not a “Why is mirrorless or DSLR is better” article. There are many articles which argue both Mirrorless vs DSLR and DSLR vs Mirrorless with particular vigour. I’m not going to try do either. This article is assuming you’ve already made an educated decision on what system is better for you or the reason for your switch.
- It’s not intended to validate your purchase. If you want to feel good about what you’ve bought or feel that you made the right decision, go to the forum area and tell people how happy you are, you’ll find plenty of people to pat you on the back and tell you what an amazing decision you have made.
- It’s not a “How to use a Fuji XT2” or “How to use a camera in manual mode” article. This article assumes you were fairly competent on your Nikon and not shooting in auto mode. I am not going to tell you what the camera basics are, what AFS or AFC are etc. If you want a detailed X-T2 help guide, try this guide from Rico Pfirstinger on Rockynook.
- It doesn’t cover video (or at least not in any level of detail) simply because I don’t work with video, and I’m not going to pretend I know it well enough to be of any value to you. I know where the video button is…that’s all.
What it is:
- It’s a switchers guide written to help reduce the learning curve and ensure you understand how things work differently. If you’re used to working a particular way, this should give you some idea of how to work in the same way or how to achieve the same outcomes with Fuji.
Okay, you’ve got your camera out, and let’s assume you’ve found out how to put the battery in and get the basics out the way. Let’s look at the key differences:
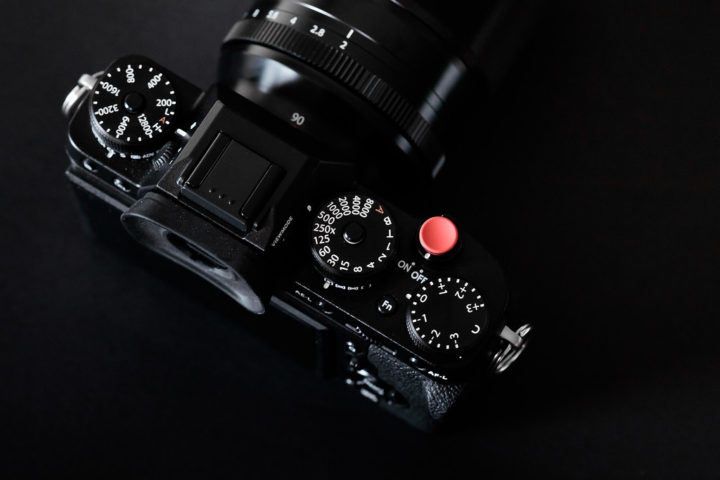
PASM – It’s different but similar, and it works well.
We’ll start with one of the easier areas.
On Nikon, you have PASM. You rotate one dial on the top of the camera and then you rotate the dials on the front and the back to set aperture and shutter to get what you want. On the X-T2, you still have these options but it’s a little different to get to the same outcome. Initially it may seem counter intuitive but once you get used to it, it’s second nature.
Instead of giving you PASM, Fuji has given you the 3 separate controls with the option to put each of them in auto mode where required. 2 dials on the top of the camera to control shutter and ISO, and a ring on the lens you can rotate for aperture (on most lenses). Each of these dials has an A for Auto.
To get Nikon equivalent of P, you set the shutter, aperture and ISO to Auto (depending on whether you use auto ISO). To get shutter priority you set the shutter and leave the other 2 at Auto. To get aperture priority, set a fixed aperture and leave the other 2 on A. At any point of time you can switch easily from two options being in auto to one or use manual adjustments as and when required. T
The advantage of the Fuji approach is you see the exposure and DOF in your viewfinder which allows you to see exactly what the impact is. It will seem counterintuitive when you start but it’s actually very effective.
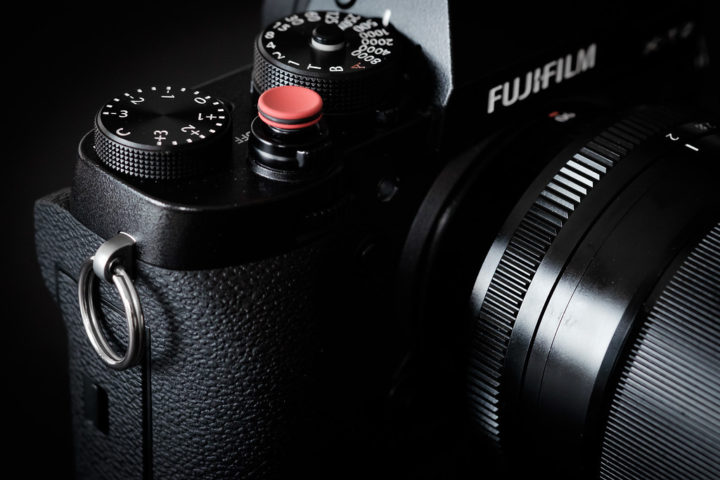
One bit of advice I can give us to use the dial locks. It’s easy to bump a dial and accidentally adjust one of them so the locks are there for a reason. I’ve bumped my ISO to 12800 a couple of times. If necessary, use the new ISO functionality attached to the front dial (by pressing the dial in) and press it again to ensure you don’t accidentally adjust it during exposure.
If you’re looking for scene modes to do things automatically, there are none on the X-T2 so it’s like the D810, not the D750 or D610. Lower level models have those so I suggest you explore the X-T20 or another model if you need scene modes.

The focus system
One of the biggest things to get used to is the autofocus system so this section will be the longest. In some respects, this is a bit of a tutorial on how the autofocus works because there is no other way to explain the differences.
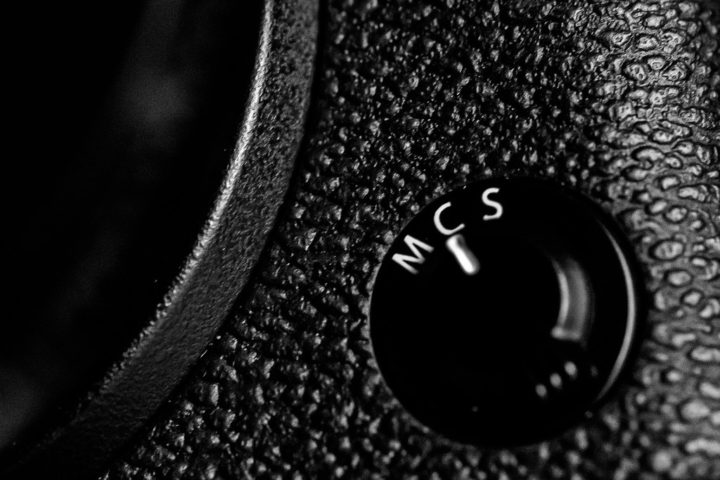
AF-S/AF-C/Manual
Firstly, let’s look at the how the newer Nikon’s worked (ignoring the older ones although they were similar). This is one area I’d say the X-T2 is a little simpler.
Nikon has two switches to achieve the same thing. They have one switch on the front to control manual/AF and a button/dial combo to control AF-S/AF-C/Auto. For more proficient photographers the Auto option on Nikon was pretty useless.
Fuji have this simplified in the sense that you have one switch location on the front where the Nikon AF/M was with AF-C/AF-S/M as selection options. If you want to switch between them, this is the only switch to worry about.
Single Point, Zone and Wide
This area is also fairly similar to Nikon. With Nikon, you have a number of options which include single, 9 point, 21, 51, 51 with 3D tracking and Group AF. Some of the newer cameras like the D500 may increase these numbers so I won’t go into all of these.
With the X-T2, you also have a similar setup with Single point, Zone and Wide.
The Fuji single point fairly close to Nikon’s single point, with the small exception that Fuji also give the option to change the size of the single point, similar to Nikon’s Group Area. Fuji give you 5 sizes instead of just 2 (Single and Group) with Nikon.
Fuji’s Zone and Wide are almost one and the same, with zone simple reducing the focus area to a smaller customisable size where wide is everything. I.e. the entire frame. Think of zone as the 9-51 point options (all with 3D switched on) covering the traditional focus points on Nikon DSLR, whilst wide as the same as the new D500 where the AF points cover the whole frame. Like Nikon, the less points you select with Fuji the more accurate it will be so if you select a smaller area, it will be quicker and more accurate, just like 9 point is more accurate than 51 point.
As far as the similarities go, that’s where they end. Nikon’s AF system is easy to understand because if you are using 21 point and you put centre focus point on something, that’s what it focuses on and if that object moves, it will track it. It does that always, and Nikon users moving to Fuji expect it to do the same and it doesn’t. It’s not Fuji’s fault you’re thinking like a Nikon user, it’s just a case of getting used to the change.
Fuji’s AF doesn’t always focus on the centre, because depending on the AF-C preset (there are 5), it’s going to do different things, which is give priority to closest, centre or auto (where it decides). It may focus on what’s in front or what’s in the centre, but it may not and this can be the source of much frustration because it does seem a little random if you’re a Nikon user. The AF preset does influence it but it’s not hard coding, it’s simply a preference. I.e. It will try there first but if it can’t focus on anything, it will try something else.
The reason for this is Fuji’s AF system is looking for high contrast and if high contrast isn’t where you have asked it to look, it will try somewhere else in an attempt to get focus. I.e. if you tell it to give preference to the centre and it can’t find contrast in the centre, it will move to one of the side points in that area. With Nikon, if it can’t find something, it may hunt and hopefully it will eventually lock onto something, but the point it’s trying to lock onto is always on the point you selected. That may sound bad, and at times it’s not ideal, but it depends a little on what you are doing. Obviously if you move to “wide” where the whole frame is available, you have an increased risk of the wrong object being picked (which is why I use Zone 80% of the time, single point 15% and wide 5%).
I’ve had photos with the wrong thing in focus where Nikon would have done the right job eventually, and I’ve had photos where Fuji has focused on wrong thing but as a result, the right thing is still in focus where Nikon may have missed the focus altogether and wouldn’t give you a shot. This means you have to think a little more about what you focus on, or try to find higher contrast areas to focus on. If you had a car coming towards you, you may not focus on the center of the bonnet, you may pick a high contrast area like a join in the car bonnet. You get used to it so don’t worry, and it’s only a problem in more challenging situations.
What’s the point of wide? Well, it works well for high contrast situations where you want to use the whole screen. Birds in the sky, children on a field, anywhere where the subject stands out, the wide angle will pick the object and stick to it like a used piece of chewing gum on your shoe. I tend to avoid this for anything that will really push the AF to the limits.

Choosing Zone, Single or Wide
Personally, the way I pick is as follows, but you can make your own calls:
- Portraits or static object where the subject is not moving (much) and where I want to focus on something specifically, I would use single point AFC. This could be something like focussing on the eye of a person, where there are multiple people.
- If the person is static enough (i.e. not kids), I may use eye recognition but I prefer to limit this to AFS. I don’t like the eye and facial recognition for AFC as I find it causes the autofocus to hunt a little instead of picking something and stopping. The only reason I put it on is if I give the camera to someone (who isn’t familiar with the camera) to take a photo and I don’t want to explain the AF to them. The nice thing is even if the camera is in single point, facial recognition looks at the whole frame so you don’t have to change the between single point and zone.
- For general fast moving subjects (for example kids) or sports, I would use the smallest zone area, maybe upsizing to a slightly bigger zone if the object is big enough.
- For low light, I find smallest zone works best because it gives a big enough focus areas to allow the camera to find contrast but confines it enough so it doesn’t go off to the wrong object.
- For landscapes I use manual (see manual focus section below) due to focus peaking and single point with moving the point around.
- The only time I would use wide is if there is a tracking situation where the object is small (a kitesurfing kite in the sky) and I know the AF won’t have an issue tracking it.
As you can see with the above, it’s most small zone and single. For 90% of AFC applications, zone is suitable so it’s my default setting. Remember that with zone and single point you can also go to one of the wide areas with a small focus area.
AF Presets
It may seem like the above is a lot to take in but once you get to grips with that, the AF presets are the next level and this really gives you the option to customize AF for specific fast moving subjects.
The options Fuji gives you are listed here so I won’t repeat them but I would suggest read the descriptions to decide how they would suit your personal requirements.
I may write a separate article on the suitability of each preset so for now this is all I will say.
I personally use a customized as my general one size fits all which uses the following settings:
Tracking sensitivity – 1
Speed tracking – 1
Zone area switch – centre

The rear AF-On option
I was a strong user of the AF-On option with my Nikon D750. Unfortunately, although Fuji offered this option, the rear button is tiny and largely too small for my purposes. That said, you can live without it for two reasons:
1. To switch between AFC and AFS is easy on the XT2
2. The ability to push the focus points wide compared to a convention DSLR means I can often move the focus point to a wider point without having to focus and recompose.
Sadly the X-T2 rear buttons are too small for back button focusing but I’ve added some Sugru to make this easier to work with. If you are used to using the AF-On, I suggest you do the same. Do a search for “Sugru Fuji Button” and you’ll find plenty of examples of how to do this. Sugru is fairly cheap and a single packet could probably do every button on about 10 cameras.
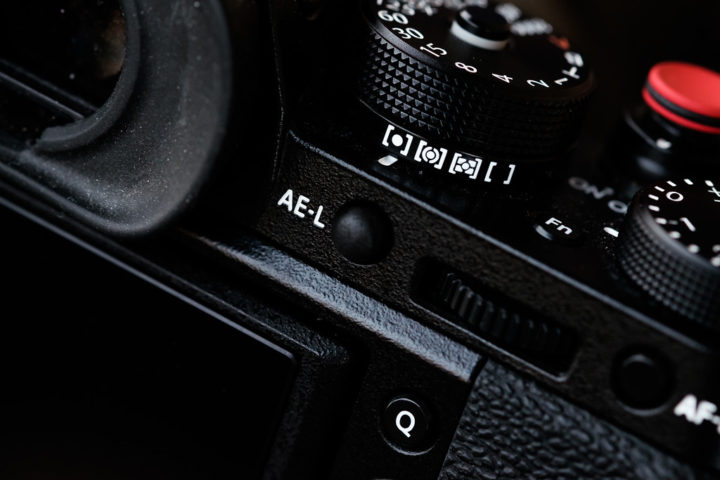
If you want to switch on AF-On, the following is the way to do it:Go to your Setup menu – Button/Dial Setting -Fn/AE-L/AF-L Button Setting, and assign either the AE-L or AF-L button to “AF-On.” Select which button you want to use for AF-On. Go to Button/Dial settings go to “Shutter AF” and set it to “Off.”
Manual Focus
Although this isn’t directly comparing to using a Nikon, I added this because manual focus on the X-T2 is incredible and whilst I wouldn’t use manual focus on a DSLR, I use it all the time on my X-T2.
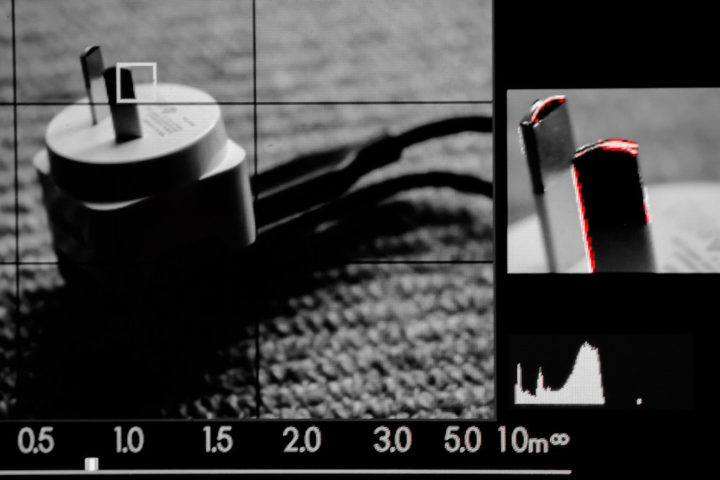
The nice thing with the X-T2 is that Fuji allow you to use the AF-On button to get initial focus and then continue manual focus afterwards so you get 99% there and refine as you want to. The split screen focus peaking is mind blowing so I would say this eclipses Nikon by a fair margin simply from a usability and accuracy perspective. I have personally find the red focus peaking with split screen is the best option but this comes down to personal preference. In short, you see the picture on one side, a 100% crop on the other and whatever is in focus is highlighted in red.
Lenses
Lenses selection is limited compared to Nikon but I don’t see this as bad as Fujifilm covers the primary lenses that people require. With the exception of a long telephoto and a true macro (the XF60mmF2.4 isn’t 1:1), the entire range of lenses is covered. The key difference with Nikon is Fuji offers pro focal ranges for APSC rather than having to use full frame glass on APSC bodies which might not give you the appropriate focal length on an Nikon APSC body. (The 70-200mm becomes an effective 105-300mm which may or may not be a good thing depending on what you shoot)
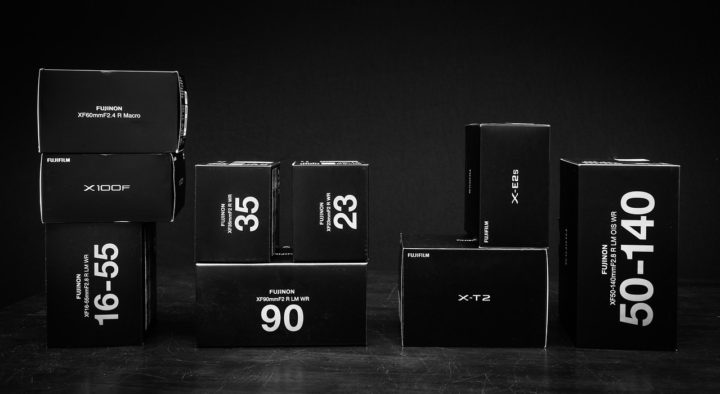
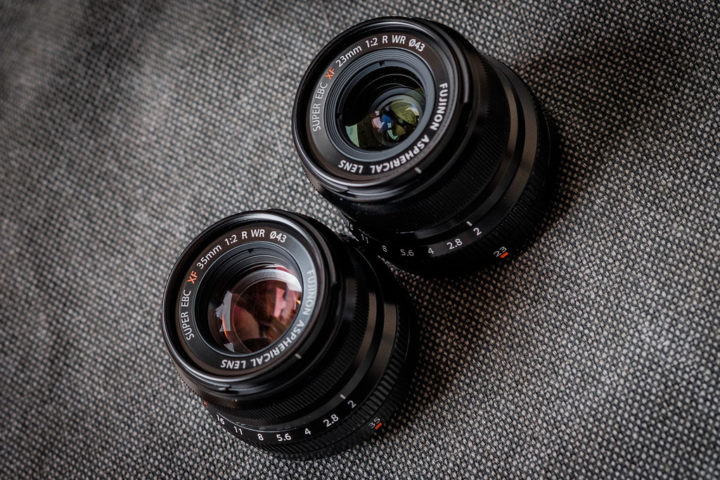
You have the trifecta covered with a 10-24, 16-55 and 50-140. Whilst the 10-24 is an f4, Fuji have a new wide angle zoom (8-16 potentially) planned for next year. From a prime perspective, there is very little missing and the vast majority of Fuji primes are very sharp. The Fujicron (f2) range is simply outstanding and I don’t think you can go wrong with the 23, 35, 50 and 90 f2 models if you’re a prime user. If you need low light glass, the 16 f/1.4, 23 f/1.4 and 56 f/1.2 are impeccable.
The major differences with the Fujifilm glass that you will notice immediately is the phenomenal quality of the metal construction on the lenses (whilst Nikon has moved to plastic for some of their lenses) and small size. The lens hoods on the other hand are terrible.
Speedlights/Strobes
EVF and speedlights/strobes
The exposure preview in the EVF is great for most exposures, but obviously the camera isn’t going to be able to preview exposure correctly when you are using flash. This isn’t an issue on DSLR because you are always seeing optical but for Fuji you have to switch it off completely unless you want to see ambient.
To switch it off, go to Menu – Set-up – Screen Set-up – Preview Exp/WB in Manual Mode and switch this off. I’ve assigned it to a button so I can switch it on and off at will. Unfortunately Fuji haven’t given the option to add this to the Q Menu but I have it assigned to one of the rear buttons as it’s something I use regularly.
Speedlight selection
Speedlight is one of the areas where the mirrorless manufacturers lag a little behind the traditional Nikon and Canon. Speedlight selection is more limited and TTL/HSS compatibility is a problem in some cases.
If you want to work in manual, you won’t have any problems. Most speedlights will work as the pin configuration is the same for manual. This opens the door to a variety of third party speedlights. The compatibility with Canon is for manual only, not TTL or HSS. If you want something cheap and effective, the Yongnuo YN560 range would be my recommendation.
For TTL and HSS, Fujifilm has it’s own (expensive) option but I’d still consider third party options like Nissin, Metz or Yongnuo which are releasing TTL and HSS supported flashes. Whilst Fujifilm’s option is good, it only supports optical wireless which is a little disappointing for a flash released in late 2016 and at a price range that is fairly high compared to the competitors.
Off camera flash
Off camera flash is well support for manual due to the Canon compatibility and I’ve been running Yongnuo YN560IV and YN560TX without incident. Most Canon compatibility trigger/speedlight combinations should work, but research anything before buying. The options for off camera TTL and HSS are still limited with only a handful of manufacturers releasing wireless support for TTL and HSS but this will grow In time.
If you want to use your existing Nikon flashes for Fuji, there is a product called a Cactus V6.

Strobes – TTL and HSS support (updated April 2017)
Strobes in manual is supported via Canon compatibility but for TTL strobes or HSS on strobes, you don’t have a lot of choice. There is talk that Profoto will introduce some Fuji support in 2017 but at the moment it’s just rumors, so until it’s confirmed, it’s wait and see. Godox have indicated they will support TTL and HSS on their strobes in May 2017 so that should at least open the door for anyone who has a critical need for it, and this will cater largely to the enthusiast base. Elinchrom support HSS via the Cactus triggers (in beta currently) and there are videos online showing how this works. I will continue to update this section as time goes on.
Sports shooting and the EVF
Live view is great, but it also has some limitations, most of which only come into play with sports shooting. Unlike a DSLR, the viewfinder obviously digital and when you go beyond 5fps for extended bursts, you get lag which will cause you to fall behind the action.
8/11/13 Frames is only really useful for short bursts or where you are relying on camera AF system to Follow the subject with minimal movement of the camera. Anything beyond 5 fps you lose live view and that means when you starting holding down the shutter button, you get a staggered view like a powerpoint that will lag behind the live view and cause you to fall behind the subject.
Batteries and battery life
How bad is it?
Battery life has always been one of the biggest issues with mirrorless and coming from DSLR, it’s a little scary. Part of this is psychological so it isn’t actually as bad as people make out. I think part of the issues relate to people playing with new toys, compared to the way you shoot. I.e. When you get a new camera, you explore every option, look at every photo, etc which is not quite indicative of how you would normally shoot. Realistically you have to ask yourself how often do you take more than 350 photos in a single shoot. For most people, not that often unless it’s an event or you’re an event photographer.
I personally turn on boost permanently and I still get more than 350 photos out of a battery, probably close to 450 by my guess.
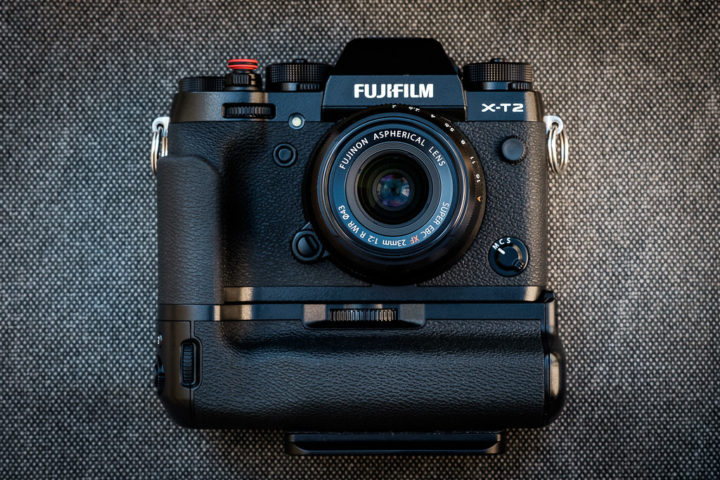
The Battery Grip
One of the options to consider if ongoing battery life is a concern (longer shoots) is the battery grip. It is pricey but not bad when you consider the quality of the grip, combined with the ability to charge batteries in the grip which was not available with Nikon. What this means is you can charge 2 batteries in the grip at the same time as one battery in the camera.
You can see my review of the grip under the review section or through this link – Fuji XT-2 Battery Grip Review.
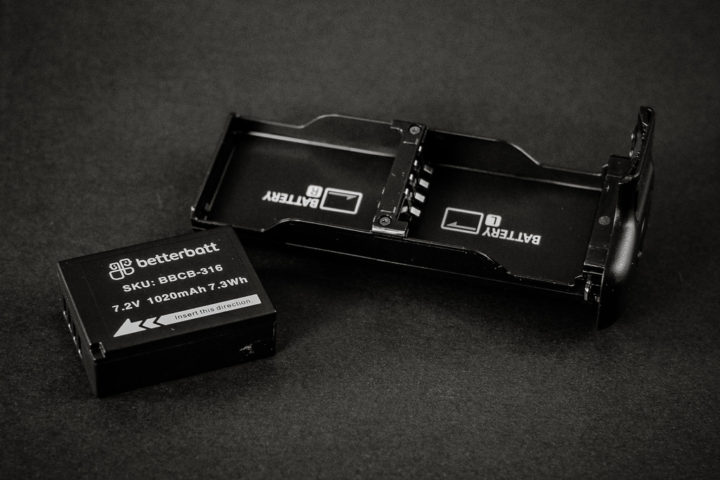
Consider third party batteries, but only if you don’t do 4K video
With Nikon, I always bought original batteries but that’s easy to say when you only need one or two spare batteries. This was also in part because you can put AA’s in your battery grip. OEM is always preferable, but when you need to have 5+ batteries, the OEM batteries can be a little pricey for some pocket. If you do go down this path, only use established and reputable battery suppliers and don’t use third party batteries if you intend doing 4K video. I have 5 third party batteries and haven’t noticed any major difference.
Custom Modes/User Presets
The Q menu confused me a little because initially I just thought it was a quick menu. It’s also a set of user presets you can configure for different scenarios similar to user presets or profiles on Nikon. I.e. You can create a configuration for landscape, portrait, sports, street, flash and switch between them.
The only warning I’ll give is that not all the options you are likely to use in the Q menu are available, for example, switching off preview exposure for flash or changing the configuration for back button focus, so some of these you will have to assign to shortcut menus.
Read the manual to understand how to change the default options shown in the Q menu, it’s too long to include here.

Post Processing
I added this in as there are some differences in post processing between Nikon and Fuji. I’ve heard plenty of good things about Iridient Developer as a post processing tool, but to be honest, I’ve always worked in Lightroom and Photoshop and I’ll probably stay that way.
Biggest differences between Nikon and Fuji I’ve noticed is the use of the standard camera profiles (film simulations). With Nikon, I honestly wouldn’t bother because they were terrible. With Fuji I use them and I post process from there. I use the X-LR plugin to apply specific settings and automatically apply the correct film profile after importing and I would highly recommend getting this.
Once you’ve selected your profile, there is minimal post processing required unless you are going to go to the extent of pushing something into photoshop. I’d honestly say that my post processing requirements are 20% of what it would have been with Nikon.
Obviously sharpening etc is different to what you’d expect on Nikon files so my default import sharpening is:
Amount – 40
Radius – 1.0
Detail – 50
Masking – 20
This is a starting point so I work from there to adjust the sharpening based on the image. If anyone has better suggestions, feel free to correct me.
ISO & Shutter – The difference between a dial and a digital value
With Nikon, ISO and Shutter are digital so adjusting shutter and ISO will give you the digital values.
The one thing you’ll notice with the X-T2 is the dials skip increments on ISO and Shutter. They aren’t missing, but obviously every value can’t be put on the dial. To get the missing increments, simply set the closest value and rotate the rear dial to get the value you want. I.e. if you need to get to a shutter of 32,000, set 8,000 and rotating the rear dial will take you through the range of numbers from 8,000-32,000 and also down from 8,000 to 4,000.
Soft Shutters
Most people who are new to Fuji probably aren’t aware of why there is a little hole in the shutter button. This is designed for a cable release but in a number of cases, people use what is called a “Soft Shutter” which is a screw in shutter button that gives you a little more flexibility on the type of shutter you can use. I.e. concave/convex/large/small
There are a number of brands and models of soft shutters. Some are cheap, some are expensive. There are a couple of things to be aware of:
- Cheap shutters on eBay can be bad if they aren’t designed for Fuji. There are different soft shutter threads so this can effect whether it screws in properly, damages the camera thread or results in you losing shutters every week. I.e. if you buy a $10 shutter you could end up losing one every week and wasting your money. Expensive also isn’t necessarily better, as an example, Leica shutters may have a different thread to Fuji.
- Whatever shutter you get should have a small rubber o-ring. This prevents you having to over tighten the shutter which can damage your camera.
- As above, do NOT over tighten the shutter, this can result in damage to the shutter. There are many cases of people on the web who has damaged their shutters by over tightening with pliers.
- Some people have recommended using Loctite blue to keep the shutter in place. I say whether this will damage the camera or not, or whether this is recommended. Typically Loctite should not do any damage as it’s just a thread lock which prevents loosening through vibration and when you break the thread lock to remove it, the small pieces should technically just fall out (which shouldn’t be a risk on a camera which is weather proof). As mentioned, I can’t say whether this is recommended because it could break your camera, but I have not heard of anyone breaking their camera with Loctite (I use it myself without problems and the shutter has remained in place) whilst I have heard of a lot of people breaking theirs through over tightening.
As to what one I would recommend, I use the Thumps up Bop from Match Technical, a well known brand. The Bop is the smaller concave version as shown in the pictures. The Fuji cameras require the long thread version.