X Trans Sensor Cleaning

GUEST POST FEATURE HERE
Write Your Articles Directly On FujiRumors!
guest post by Chris Sargent – website mostly.photos – google+ – Twitter pixelstate
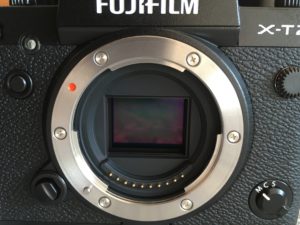
Fuji X-T2 wet sensor cleaning is not for the faint hearted but the location and accessibility of the sensor is far more convenient than you will find on a digital SLR and the process although daunting at first is actually fairly straight forward with the right tools.
ARCTIC BUTTERFLY
I recommended the excellent Visible Dust Arctic Butterfly Sensor Brush as a good next step beyond bulb blowers for Digital Camera Sensor cleaning. I would caution against not keeping the bushes clean though as oil from the sensor chamber can get on to the filaments and will smear onto your sensor.
I didn’t follow my own advice and added some smears as well as dust to my new Fuji X-T2
I was not helped by the fact that my Arctic Butterfly is the larger size (I used to have a Nikon D800) and this makes cleaning the smaller APS-C X Trans Sensor trickier.
CLEAN YOUR ARCTIC BUTTERFLY
It is a good idea to keep the filaments of the Arctic Butterfly clean. This is easily achieved with a few drops of Sensor Brush Cleaning fluid and distilled water.
- Wet the filaments of the Arctic Butterfly in Distilled Water
- Add around 5-10 drops of Sensor Brush Clean (8ml) by Visible Dust
- Leave for 30 seconds and rinse thoroughly in distilled water
- Leave to dry
SENSOR SWABS – WET CLEANING THE X TRANS SENSOR
 This weekend it was time to reach for the sensor swabs and carry out some quick ‘open heart surgery’ and clean away the crud.
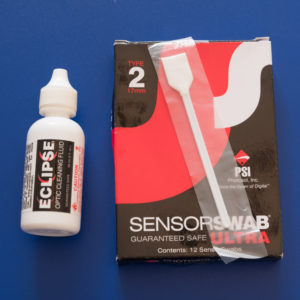
Visible Dust offer a wide range of high quality sensor cleaning products but I have always used Photographic Solutions Sensor Swabs and Eclipse fluid. I have never had a problem with their product and I’m comfortable with using it.
X TRANS SENSOR CLEANING
The Steps to clean the sensor are pretty straight forward once you have the tools to hand. X Trans APS-C sensors require the Type 2 (17mm) size swabs (Shown Above) and Eclipse Fluid.
- Charge the Battery and Remove the Lens to Reveal the Sensor
- Use a good quality bulb Blower (Giottos Rocket Blower does the job) to clean away any loose particles
- Remove a Swab from its packet and add two drops of Eclipse fluid onto it (I tend to place one on each side of the middle of the swab) Don’t soak the swab as this may result in streaks and be prepared to use 2 or 3 swabs for one clean
- Ideally use a Loop to check the sensor and repeat if there are obvious streaks (Happens sometimes)
- Take some test shots and check them at 100% (You might try De-Haze in Lightroom up to +20 or so to really highlight any dust
- Don’t try to get it perfect, it is not worth the effort or stress
- Have a well earned cup of tea :)
The trick to sensor cleaning is not to aim for a totally spotless sensor. Try not to worry about the odd two or three spots in your shots. Wet cleaning should be the last resort step you take after a bulb blower and a static brush have failed to shift the stubborn dust such as pollen or grease spots.
I recommend watching the Cleaning video from Photosol for reference and yes, you do have to put a reasonable amount of pressure on the swab, enough to bend it around 45 degrees!
HOW TO SEE SENSOR DUST
If your camera has dust on its sensor, you can quickly spot it by doing the following:
- Set your camera on Aperture Priority Mode.
- Set your metering mode to Matrix/Evaluative Metering.
- Set your camera ISO to the lowest number such as ISO 100 or 200.
- Turn off Auto ISO.
- Turn off autofocus and set your lens on manual focus.
- Set your aperture to the largest number available for your lens by rotating the camera dial. For example, the minimum aperture on the Nikon 50mm f/1.4G is f/16, so if I were shooting with this lens, I would set my aperture to f/16.
- If you are outside, point your camera up at the clear blue sky and take a picture. If you are indoors, find plain white paper, zoom in all the way so that the paper fits the whole frame, then make sure that the lens is completely out of focus and take a picture. If you are in front of a computer, open up a text editor such as Notepad, maximize it to the screen and then get as close to the monitor as possible so that only the white color is visible in the frame. Make sure that your focus is way off (completely out of focus) – that way only dust particles will be visible.
X TRANS SENSOR CLEANING – BEFORE AND AFTER
RAW photo edited in Adobe Lightroom with Dehaze set to around +20 to highlight the dust spots. You can see that there are a large number of spots on the sensor but these will not really cause a major problem in most conditions

RAW photo edited in Adobe Lightroom with Dehaze set to around +20 to highlight the dust spots. click on image for larger view. You can see that the wet clean has eradicated a large number of dust spots from the sensor. There is no indication of streaking or other artifacts.
There is one persistent spot that remains despite cleaning which indicates that this is likely to be located below the sensor glass. This would need a Fuji Service to address
Chris Sargent – website mostly.photos – google+ – Twitter pixelstate