Skip to content

DigiDirectTV X-E1 video review

The X100s and the X20 are the hot cameras of the moment. And with all the new features inside these cameras, the X-E1 seems already to be old (I hope that a firmware update will bring focus peaking also to the X-E1 / X-PRO1). But just click on the review section at Fujirumors, and read the X-E1 reviews: “the closest thing to perfection”, “for everyone who celebrates photography” and of course the great riflessifotografici review (translated version)… we are talking of an amazing camera.

So, just take a look at this 10 minute enthusiastic review at DigiDirectTV. How the speak without taking breath and put as much information as possible in 10 minutes! :-)

Now, if he convinced you to purchase the X-E1, check the in stock status here.

AmazonUS: X-E1 kit BLACK / X-E1 kit SILVER / X-E1 body only BLACK / X-E1 body only SILVER

Adorama: X-E1 kit BLACK / X-E1 kit SILVER / X-E1 body only BLACK / X-E1 body only SILVER

B&H: X-E1 kit BLACK / X-E1 kit SILVER / X-E1 body only BLACK / X-E1 body only SILVER

EbayUS: X-E1 kits (via slidoo)

Wexphotographic: X-E1 body only BLACK / X-E1 body only SILVER

Jessops: X-E1 kit SILVER

Amazon GER: X-E1 body only BLACK / X-E1 body only SILVER

Fujinon XF18-55mm in stock status check

 Amazon US / Adorama / B&H / ebayUS via slidoo)

PREORDER

X100S: AmazonUS / Adorama / B&H

X20: AmazonUS: silver and black version / B&H: silver versionblack version / Adorama: silver versionblack version

Europe: UK: Wexphotographic X100s for £1099 / X20 silver and black for £599

Do you agree with the position of Fuji about IBIS?

View Results

Loading ... Loading ...

FujiRumors should....

View Results

Loading ... Loading ...


miXed Zone

Fuji X photography

gizmodo top 10 cameras 2012

Gizmodo released his top 10 cameras 2012 rating (click here). The X-PRO1 reached the 8th position. First position for the Canon EOS 5D MARK III, second position for the Nikon D800 and the RX100 is third.

X-PRO1

Landscape photography and X-PRO1? See the results at fstopguy.com. His landscape photography equipment is: XF 18mm, XF 35mm, XF 60mm. Accessories: L-Bracket and grip for X-PRO1cable release, extra batteries, SanDisk Extreme PRO, Circular Polarizer, ND Filters, Tripod with ball head.

The X-PRO1 in the metro of Paris. See all the people with their mobile phones and read the impressions of parisphototours.

Street photography with the X-PRO1 and 18mm lens? See the pics of the trip in Melbourne here.

Some X-PRO1 pics at high Iso. (click here)

Is the X-PRO1 the perfect travel camera? Read the opinions of mcgaughey here.

X-PRO1 highlight recovery at hfortysixit.com

From 11th. of August 2012 Juha Periniva started to shoot with Fuji X-Pro1 and four lenses. Click here to see his beautiful shots in Finnland.

X-E1

Street photography by derekclark (click here). Don’t avoid to shoot in the rain or in the midday sun! Read why.

All I want for X-mas is a X-E1… read the creativelondonphotographer review here.

Did Simon Peckham the right decision by selling his Nikon DSLR and purchasing the X-E1? Here are his first thoughts. And once he received the camera, he posted his first impressions and pics (click here). (also he enjoyed “the best review of the X-E1 to date” of riflessifotografici as he worte here. If you want to read the riflessifotografici review, click here!)

A German video review on youtube can be seen here. If you want to read the review and look at sample pics click here (translated version).

Many, many snapshots can been seen here: brandonremler

Read the sansmirror review here. It focuses also on the difference between X-PRO1 and X-E1.

Fuji’s has always made cameras and camera sensors that intrigue me and have enabled me to turn out beautiful files. And their lenses are also well regarded“. Read the whole opinion about the X-E1 at visualsciencelab (click here)

X-F1

A video review of PhotoNewsReview here.

Fuji F800 EXR

For a first look at digitalcamerareview click here.

VOTE THE X-PERT CORNER POLL

The Best Locations for Streetphotography are... (max. 2 selections)

View Results

Loading ... Loading ...

Using Shooting Profiles and the Quick Menu

by Rico Pfirstinger

An “expert” column about the X-Pro1, the X-E1 and other Fujifilm X-series cameras? Isn’t it okay if we just read the owner’s manual? After all, it briefly documents all of the camera’s functions – including features that I (and probably most of you) won’t ever use. There’s something missing, though: background information and practical tips based on experience. What’s the best way to activate a function? Which setting should you use in different circumstances? Why is the camera exhibiting a certain behavior? And what functions don’t work the way you would expect them to and how you should handle them?

So yes, you should definitely read the owner’s manual. But you may also find this column somewhat useful, because (like my book “Mastering the Fujifilm X-Pro1” which it is  based on to a large extent) it picks up where the manual leaves off. I’ll try to include personal experiences, tips, and background information – not only from me, but from other photographers as well. After all, the Internet is full of knowledgeable people and valuable advice. It would be unwise to ignore this wealth of information.

Using the Quick Menu

Let’s get started with something so basic that’s it is mostly ignored: using shooting profiles and the Quick menu. As you will probably know, the Quick menu (aka the Q button) are part of Fujifilm’s efforts to enhance the (not so perfect) electronic user interface of their X-series cameras. You can currently find different iterations of the Quick menu in the X-Pro1, the X-E1 and the X10.

Let’s be clear: The Quick menu isn’t yet another menu to expand the contents of the Shooting, Playback and Setup menus. Instead, it’s here to make frequently used functions (that are buried in those other menus) more accessible. It’s just a shortcut, nothing else.

While your camera is in shooting mode, you can open the Quick menu by pressing the Q button. This allows you direct access to 16 of the most commonly used camera features: select custom settings (aka shooting profiles), change ISO settings, dynamic range settings, select a white balance setting, set noise reduction, image size, image quality, film simulation, highlight tone, shadow tone, color, sharpness, the self-timer, AF mode, flash mode, and change the viewfinder/LCD brightness.
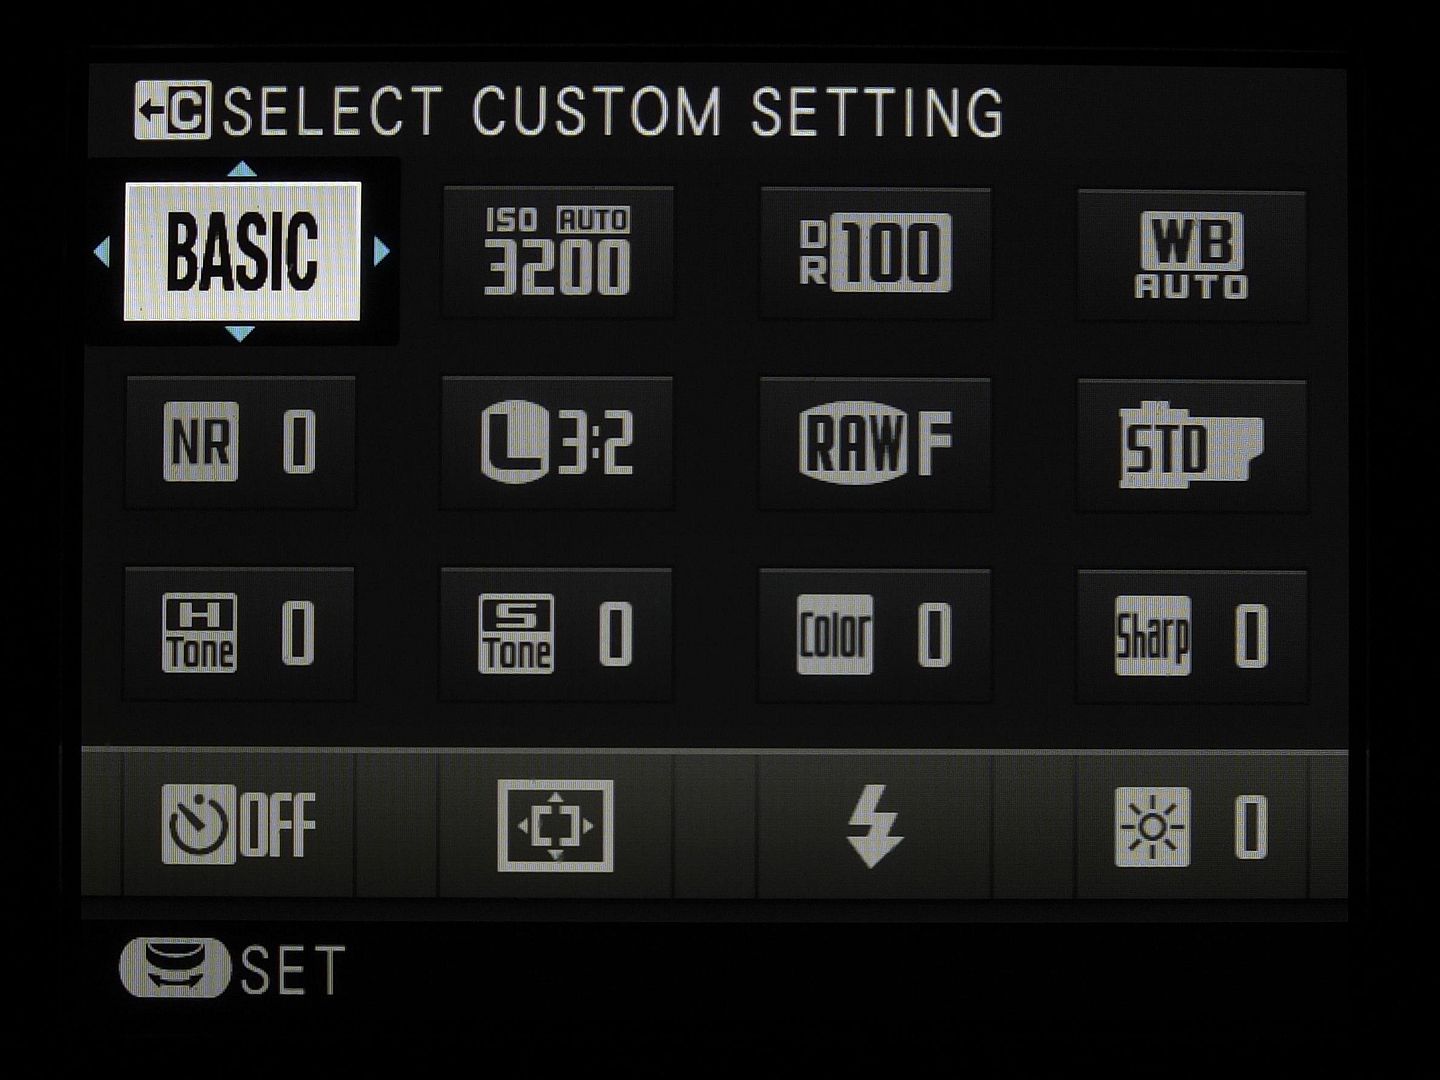
Qmenu1

Use the four selector (arrow) keys to navigate to any of the 16 functions and then use the command dial to change the settings for the function of your choice. You can apply any changes you make in the Quick menu using one of three buttons: you can press the Q button once again, you can press the MENU/OK button, or you can depress the shutter button halfway.

The X-Pro1 and X-E1 allow you to create up to seven custom settings or shooting profiles, which you can bring up and select in no time with the help of the Quick menu. To create a new shooting profile or change the settings of an existing one, hold down the Q button for a few seconds. This will bring you directly to the menu option EDIT/SAVE CUSTOM SETTING in the shooting menu, where you can either save your current camera settings as one of the seven profiles (SAVE CURRENT SETTINGS) or manually set and save values for ISO, dynamic range, film simulation, white balance, color, sharpness, highlights, shadows, and noise reduction for each profile.

While in the Quick menu, you can use the command dial to shuffle rapidly through the seven shooting profiles. As you do this, you will be able to see a live image on the camera’s display depicting the settings of each profile. In other words, you not only see which one of your up to seven profiles is currently selected, you also see all of the actual camera settings that are associated with that profile. You can of course use these predefined profiles as a starting point and then use the Quick menu to make further adjustments to the settings. Any changes you make to each profile’s baseline settings will be indicated with a red dot.
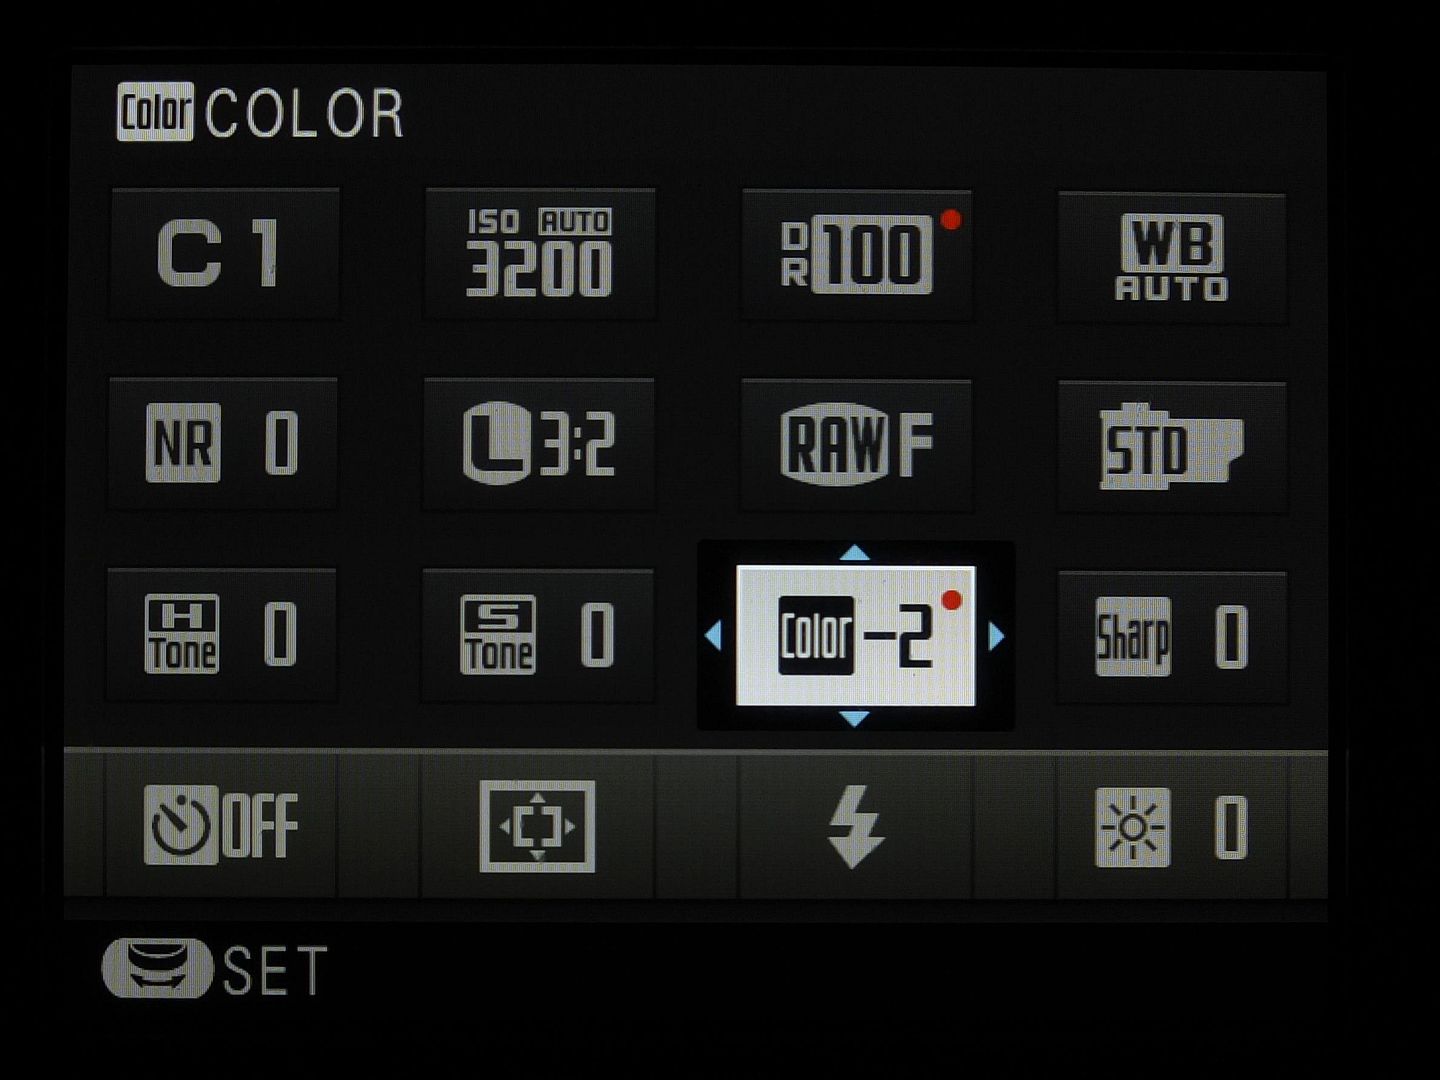
 

Qmenu2

In this illustration the first shooting profile is selected (C1), but the values for the dynamic range (DR100) and color (–2) have been manually adjusted. The camera indicates these changes with a red dot. These changes won’t be saved with the shooting profile; they are only active until you overwrite (change) them again or select another shooting profile. To make permanent changes to a shooting profile, hold down the Q button for a few seconds or select EDIT/SAVE CUSTOM SETTING from the shooting menu.

What about the BASIC setting in the upper left of the Quick menu? I have seen some confusion about in a few photography forums, so here’s the deal: While it’s clear that C1 to C7 are labels for the camera’s custom shooting profiles 1 to 7, BASIC simply means your current, active settings. So once you select one of the seven shooting profiles and then confirm your selection (with or without making any changes), those settings immediately become the camera’s new (= current) BASIC setup and there won’t be any more red dots indicating any changes you made to a previously selected shooting profile. In other words, BASIC simply shows the settings that you and your camera are currently working with. Whatever you do in the Quick Menu – once you close it (by pressing the Q button once again, by pressing the MENU/OK button, or by halfway depressing the shutter button), the settings you left it with become the BASIC settings.

Using Custom Shooting Profiles

The X-Pro1 and X-E1 have a plethora of settings options: ISO, DR function, white balance selection, film simulation, color, contrast (highlights and shadows), sharpness, noise reduction. Excluding ISO and DR, the remaining settings are also referred to as “JPEG settings”, as they do not affect what’s in the RAW file.

You may be wondering, “How am I supposed to define all of these settings quickly when I’m ready to snap an image? I want to take pictures; I don’t want to stand around fumbling with my camera!”

Here is where the seven custom shooting profiles come into play. They allow you to program each variable independently and then save them together in a bundle. Then you can switch back and forth quickly among your predefined profiles.

Examples of Custom Profiles

Which profiles should you save? Only you can answer this question for yourself – photographers not only have individual requirements and aims, but they also have their own stylistic preferences. This is exactly why the X-Pro1 and X-E1 feature so many different programming possibilities. If there were one “optimal” universal setting, Fuji could have done away with many options. Nevertheless, here are a few recommendations for potentially useful custom shooting profiles:

  • General profile: In this profile, I save the settings that generally apply to everyday situations and quick snapshots. My typical settings for my all-around profile are automatic white balance, auto ISO, auto DR, ASTIA or PROVIA, and occasionally a decreased noise reduction set at medium low.
  • DR100% profile: This is a variation of the general profile with the dynamic range setting fixed at DR100%. This profile allows me to use the live histogram for correcting the exposure and target the brighter areas of my image more accurately when defining the exposure settings.
  • Black-and-white profile: Any time I imagine an image would look good in black-and-white, I use this profile, which includes the black-and-white film simulation and increased contrast settings. The electronic viewfinder gives me a practical (black-and-white) preview of my subject.
  • Special profile: I generally reserve one profile for special situations, such as shooting in a studio or taking infrared images, when it is practical to shoot with a color temperature setting predefined in Kelvin.
  • RAW shooter” profile: I use this profile when I know in advance that I will probably want to expose the image very carefully so that I can develop and edit it with an external RAW converter.

A JPEG Profile for RAW Shooters

Yep, no kidding: a JPEG shooting profile for RAW shooters. While JPEG settings have no effect on RAW files, they do affect the image you can see in the electronic viewfinder (EVF) and on the LCD display. Moreover, the data for the live histogram is derived from the image that appears in the live view – in other words, it too is affected by your current JPEG settings.

What does this practically mean? If you select VELVIA as your film simulation, for example, not only will you have a brightly colored JPEG; you’ll also have a brightly colored live view preview with pronounced contrast. This image preview is reflected in the live histogram as well, and the Velvia simulation will cause the peaks of exposure to shift to either the left or the right limits quicker than if Provia were used instead.

The same goes for the contrast settings (HIGHLIGHT TONE and SHADOW TONE): if both parameters are set to HARD then the highlights and shadows will shift beyond the right and left limits of the histogram faster than they would if both were set to SOFT.

As I’ve already said, the RAW file itself isn’t affected by any of this – it collects all of the image information that the sensor is capable of capturing. Conversely, JPEGs rely on only a portion of the RAW data. The objective here is setting the JPEG parameters in a way that allows you to see the largest possible portion of the RAW data – because this is the information that interests us as RAW shooters. We want to squeeze everything possible out of our camera and its sensor – to get the absolute maximum and to leave nothing behind. We want to explore the limits of the dynamic range and expose as close as possible to its borders. And we want the live histogram to inform us of where these limits are as precisely as possible.

The JPEG settings influence how we expose and adjust our images because we make our decisions about exposure using the information we can gather from the histogram and the live image. As a RAW-only photographer, you will be typically shooting with ETTR (Expose To The Right). We are therefore looking for JPEG settings that produce the softest contrast in order to obtain a histogram that reveals the most useful information about dynamic range for RAW files. Here are my recommendations for this profile:

  • DYNAMIC RANGEDR100%. The live histogram supplies meaningful information only with this DR setting.
  • FILM SIMULATIONPROVIA. This is the most neutral film simulation and also has the softest contrast. This setting will prevent highlights and shadows from unnecessarily being cropped at either end of the histogram.
  • HIGHLIGHT TONE(–2) SOFT. The RAW format of the sensor has an exposure reserve of approximately 0.4 EV in comparison to the processed JPEG format. You can access this reserve with an external RAW converter. The live histogram should be set to SOFT at its edges to prevent RAW shooters from exposing their images too conservatively.
  • SHADOW TONE (–2) SOFT. When you use DR100% with high-contrast subjects (in order to use the live histogram to base your exposure on the bright areas of your image), the dark areas often end up appearing as blocked-up black areas. This SHADOW TONE setting of (–2) SOFT counteracts this problem, since it brightens the dark tonal values in the viewfinder (and in the live histogram).

What’s next? Obviously, there’s much more to say about using the live histogram, the camera’s exposure modes or about how to use ETTR. In fact, one could easily fill a book with all this stuff, so that’s exactly what I did. It took me about a year to finish it, and you can have a look at 65 pages of reading samples by clicking this link for the German and this link for the English version of “Mastering the Fujifilm X-Pro1”. Or you can actually buy the book at Amazon by clicking here for the German or here for the English version.

As X-PERT CORNER is supposed to become a weekly column here on FUJIRUMORS, I have already identified over 20 topics I could write about. Here’s a pretty random pick of three of them:

The Best Locations for Streetphotography are... (max. 2 selections)

View Results

Loading ... Loading ...

So what’s it going to be next week? You decide by answering the poll! Till then, I wish you a happy New Year – and have fun with your Fuji X-series camera.

Rico Pfirstinger studied communications and has been working as journalist, publicist, and photographer since the mid-80s. He has written a number of books on topics as diverse as Adobe PageMaker and sled dogs, and produced a beautiful book of photographs titled Huskies in Action (german version). He has spent time working as the head of a department with the German Burda-Publishing Company and served as chief editor for a winter sports website. After eight years as a freelance film critic and entertainment writer in Los Angeles, Rico now lives in Germany and devotes his time to digital photography and compact camera systems.


Roundup reviews

X-E1 and 18-55mm

bertstephani.com, X-E1 and XF 18-55 lens (click here). Read why says, at the end of his post: “The 18-55 does everything I could reasonably expect from it and even exceeds my expectations. Let’s hope Fuji can continue like this and give us many more great lenses in the (near) future.”

cnet.com review: the good: Superb image quality and low-light performance; faster AF performance than X-Pro1; good ergonomics; versatile pop-up flash. the bad: Lack of a dedicated movie button; AF accuracy needs to be improved; pricier than competing models.

The ePhotozine review can be read here. For some sample pics click here.

The X-E1 and XF 18-55 dc-watch review can be read here (translated version).

The EVF is superb, and my worries over no OVF are unnecessary. Read the first impressions of photomojomike here.

This review is basically a translation of the digitalliving review, and also picutres are from this review. So I will extract just a few things in addition to what I have already translated for you:  Read the whole review here. “The EVF provides outstanding, high contrast images. All effects, settings and depth of focus are displayed before exposure. The high frame rate ensures that virtually no delays or stuttering are experienced… Good news for fans of polarizing sunglasses: The image in the viewfinder is visible in both portrait and landscape formats (with the X-Pro1, the viewfinder turns pitch-black). In contrast to the X-Pro1, a locking button which is depressed to release the shutter speed from the “A” position is missing in the X-E1. That’s good news because, in practice, it is almost impossible to turn these dials accidentally — in stark contrast to the exposure compensation button. There’s a subtle change in the remote release. The X-E1 features an electronic remote release along with the mechanical release. Fujifilm provides the RR-80 (click here) which is connected via USB port. The X-E1 offers single shots and sequence shooting with 3 or 6 fps. A panorama function automatically shoots a series of pictures and then puts them together on a widescreen. Auto bracketing is not used to its full potential, unfortunately. It shoots three images with a maximum deviation of plus or minus an aperture — definitely not enough for HDR photography. But there is the hope that Fujifilm will follow up with new firmware. The body alone weighs 350 grams (including battery and card), 100 grams less than the X-Pro1. Eliminating the electronic viewfinder means, however, that the X-E1 is not a rangefinder camera like her big sister but a mirrorless system camera, as the Sony NEX range or the Olympus OM-D E-M5.”

A comprehensive ISO performance test of the X-E1 can be seen on pixinfo.com

X-F1

The popular German newspaper Spiegel.de posted his review about the X-F1. Click here to read it (translated version)

Read the first impressions of thephoblographer here.

dcwatch posted his super-comparison between the X-F1 Olympus XZ-2, Canon PowerShot G15, Sony RX100, Nikon P7700, Panasonic DMC-LX7. There are many sample pics to compare. So take a look and declare your winner!

X-PRO1 (and Fujinon XF 35mm f/1.4 and XF18-55)

Some beautiful X-PRO1 XF35mm sample pics can be seen here at johnnypatience.

Tests, specs, quirks, bugs, deals… apart this, the X-PRO1 can shoot pictures. And one of those photographers out there that enjoyed shooting with it during the music festival in Telluride is mikelyonsphotography (click here to see X-PRO1 shots).

aboutphography.blogspot posted his XF18-55 lens review. The conclusion: “This lens is a winner.  Not perfect, but for the price and purpose it is an excellent option particularly if you only want to carry only one lens for your X-Pro1.  It may be an even better match for the Fuji X-E1.

Some pics and one complaint: “I have about the camera is the autofocus in really backlit situations.” Click here to see the shots of  alexanderolsson.com.

There are people that are disappointed with this camera. On of these is clearingthevision (click here). Read the reasons why he sells his X-PRO1! Yes, it’s the focus. The focus speed on this lens, but more: “It came to a head in a well-lit cafe in Taos with my daughter. She was sitting across the table from me and had her back to a window about ten feet behind her. I lifted the camera to photograph her, and I got the red box of uncertainty as I tried to focus. I moved focus slightly, got it again, and then I tried an area of greater contrast, and then the lens went back and forth a couple of times, before it finally focussed for me. But by that time, whatever fleeting expression I’d wanted to capture had gone, and I didn’t want to take the photograph any more. I wanted to throw the camera on the floor.” So the focus isn’t fast and reliable. But “if you’re slower and more methodical in your work, or excellent at manually focussing, or maybe all around a better technical photographer than me, then the X-Pro1 might be perfect for you.

X-PRO1 and the autumn… see some images here.

Fuji X-100

Some people still love the X-100 more than everything else. So I got an email, and the person said: “I know that the X-E1 is the hot camera right now, but the X100 is still the most compact and an amazing camera too.” He send me another “real world” review. The review is not the newest, yes, but it’s well made, and you can see shot taken from Spain to Morocco. For everyone who’s interested, click here to the X-100 review of stuff review.

Fujifilm X Pro 1 vs Sony Nex 6

Phoblographer posted an informal comparison between the Fujifilm X Pro 1 and the Sony Nex 6. He compared both cameras in landscape shooting. The image samples you can watch on phoblographer show some differences. The first thing we recognise is that pictures on the Sony Nex 6 look warmer than on the Fuji X Pro 1. Phoblographer notices also that “at the same exposures the X Pro 1 will retain more detail in the highlights but the NEX 6 will retain more information in the shadows”, and that pictures taken with the X Pro 1 look sharper.

Sony Nex 6                                                                         Fuji X Pro 1

Watch the test and more sample pictures at Phoblographer.

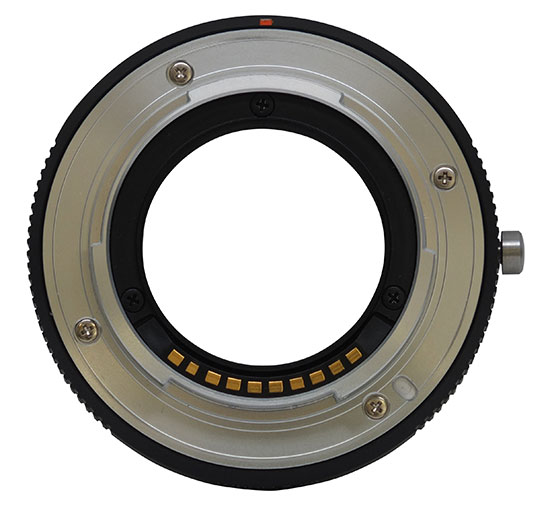
Fuji launches the new M mount adapter for the X system!

Fuji just released the new M mount adapter you can already preorder at Adorama (Click here).

PRESS RELEASE
trans Fujifilm releases their own adapter for Leica M lenses

Valhalla, N.Y., May 24, 2012 – FUJIFILM North America Corporation today announced that it will release an M-Mount Adapter for the FUJIFILM X-Pro1 interchangeable lens digital camera system, specially made to enhance the experience of taking photos with the professional X-Pro1 digital camera. The all new M-Mount Adapter is designed to expand the lens selection of the FUJIFILM X-Pro1 interchangeable lens digital camera system, and give photographers a wide range of shooting capabilities.

“Since the introduction of the FUJIFILM X100, Fujifilm has made a commitment to expanding the functionality of the X-Series, and today we are very pleased to offer customers a premium accessory that they can truly be excited about – an M-Mount Adapter for the FUJIFILM X-Pro1,” said Go Miyazaki, division president, Imaging and Electronic Imaging Divisions, FUJIFILM North America Corporation. “We listened very carefully to our customers about their desire for an M- Mount for the FUJIFILM X-Pro1, and we are proud to announce that this accessory will be available soon for everyone.”

Precision Made M-Mount Adapter
Similar to the FUJIFILM X-Pro1’s exacting design standards, the precision made M-Mount Adapter is engineered to deliver superb results for discerning photographers.

The M-Mount Adapter is comprised of three parts: an aluminum mount for the body, a stainless steel mount for the lens, and an aluminum central tube. This construction enables an accurately-maintained distance of 27.8mm from the lens mount to sensor, which is crucial for delivering high quality and high resolution images.

The camera side of the M-Mount Adapter features an array of electronic connections that automatically pass information to the FUJIFILM X-Pro1 body based on pre-registered lens profiles. With firmware version 1.10 or later, this information is transmitted by pressing the Function button on the side of the adapter, which allows users to access the M-Mount Adapter Settings menu on the rear LCD.

While attached, the M-Mount Adapter still allows users to enjoy the benefits of the FUJIFILM X-Pro1’s extraordinary Hybrid Multi Viewfinder. The Electronic Viewfinder (EVF) and LCD monitor both offer a 100% field of view, and the Optical Viewfinder (OVF) displays a bright frame corresponding to the focal length in use.

Fujifilm Leica M mount adapter X Pro1 bottom Fujifilm releases their own adapter for Leica M lenses

M-Mount Adapter ProvidesUltimate Control
The FUJIFILM M-Mount Adapter provides ultimate control by allowing users to create and fine tune lens profiles through the X-Pro1’s Mount Adapter Settings menu. This menu allows X-Pro1 users to profile up to six lenses. There are four pre-sets for 21mm, 24mm, 28mm and 35mm lenses, plus two optional settings for additional optics.

With the Fujifilm M-Mount Adapter attached, profiles can be user-defined, based on distortion, peripheral illumination and color shading corrections.

Three levels of distortion correction are also available to combat barrel distortion on wide-angle lenses, and pincushion distortion on telephoto lenses. Users can select from Strong, Medium or Weak correction, or simply turn any correction off.

Peripheral illumination controls the amount of darkening at the four corners of an image. Eleven levels of correction can be applied from +5 to -5 (including “0”) with users given the choice of darkening the corners of the image to emphasise a central subject or lightening edges for more even illumination across the frame.

Finally, color shading correction allows each corner of the frame to be color corrected to combat any shift in color between the center and edges of the frame. Corrections can be made to red/cyan color shading and blue/yellow color shading from -9 to +9 relative to the green channel.FUJIFILM M-Mount Adapter key features
  • Three-piece aluminium and stainless steel construction
  • 27.8mm lens mount to sensor distance
  • Electronic connections and Function button
  • Compatible with Hybrid Multi Viewfinder
  • Lens profiles and corrections available through Mount Adapter Setting menu (firmware version 1.10 or later must be installed for using above features)

The M-Mount Adapter will be available in June 2012 for $199.99.