First Look Review: Fujifilm X-T2

Fujifilm X-T2USA: BHphoto / AmazonUS / Adorama / CANADA: AmazonCA / EUROPE: AmazonDE / Calumentphoto DE / AmazonUK / AmazonITA / AmazonFR / AmazonESP / PCHstore / WexUK / AUSTRALIA: CameraPro
Vertical Booster Grip: USA: BHphoto / AmazonUS / Adorama / CANADA: AmazonCA / EUROPE: AmazonDE / AmazonUK / AmazonITA / AmazonFR / AmazonESP / PCHstore / WexUK / AUSTRALIA: CameraPro
New NP-W126S Batteries: BHphoto / Adorama /
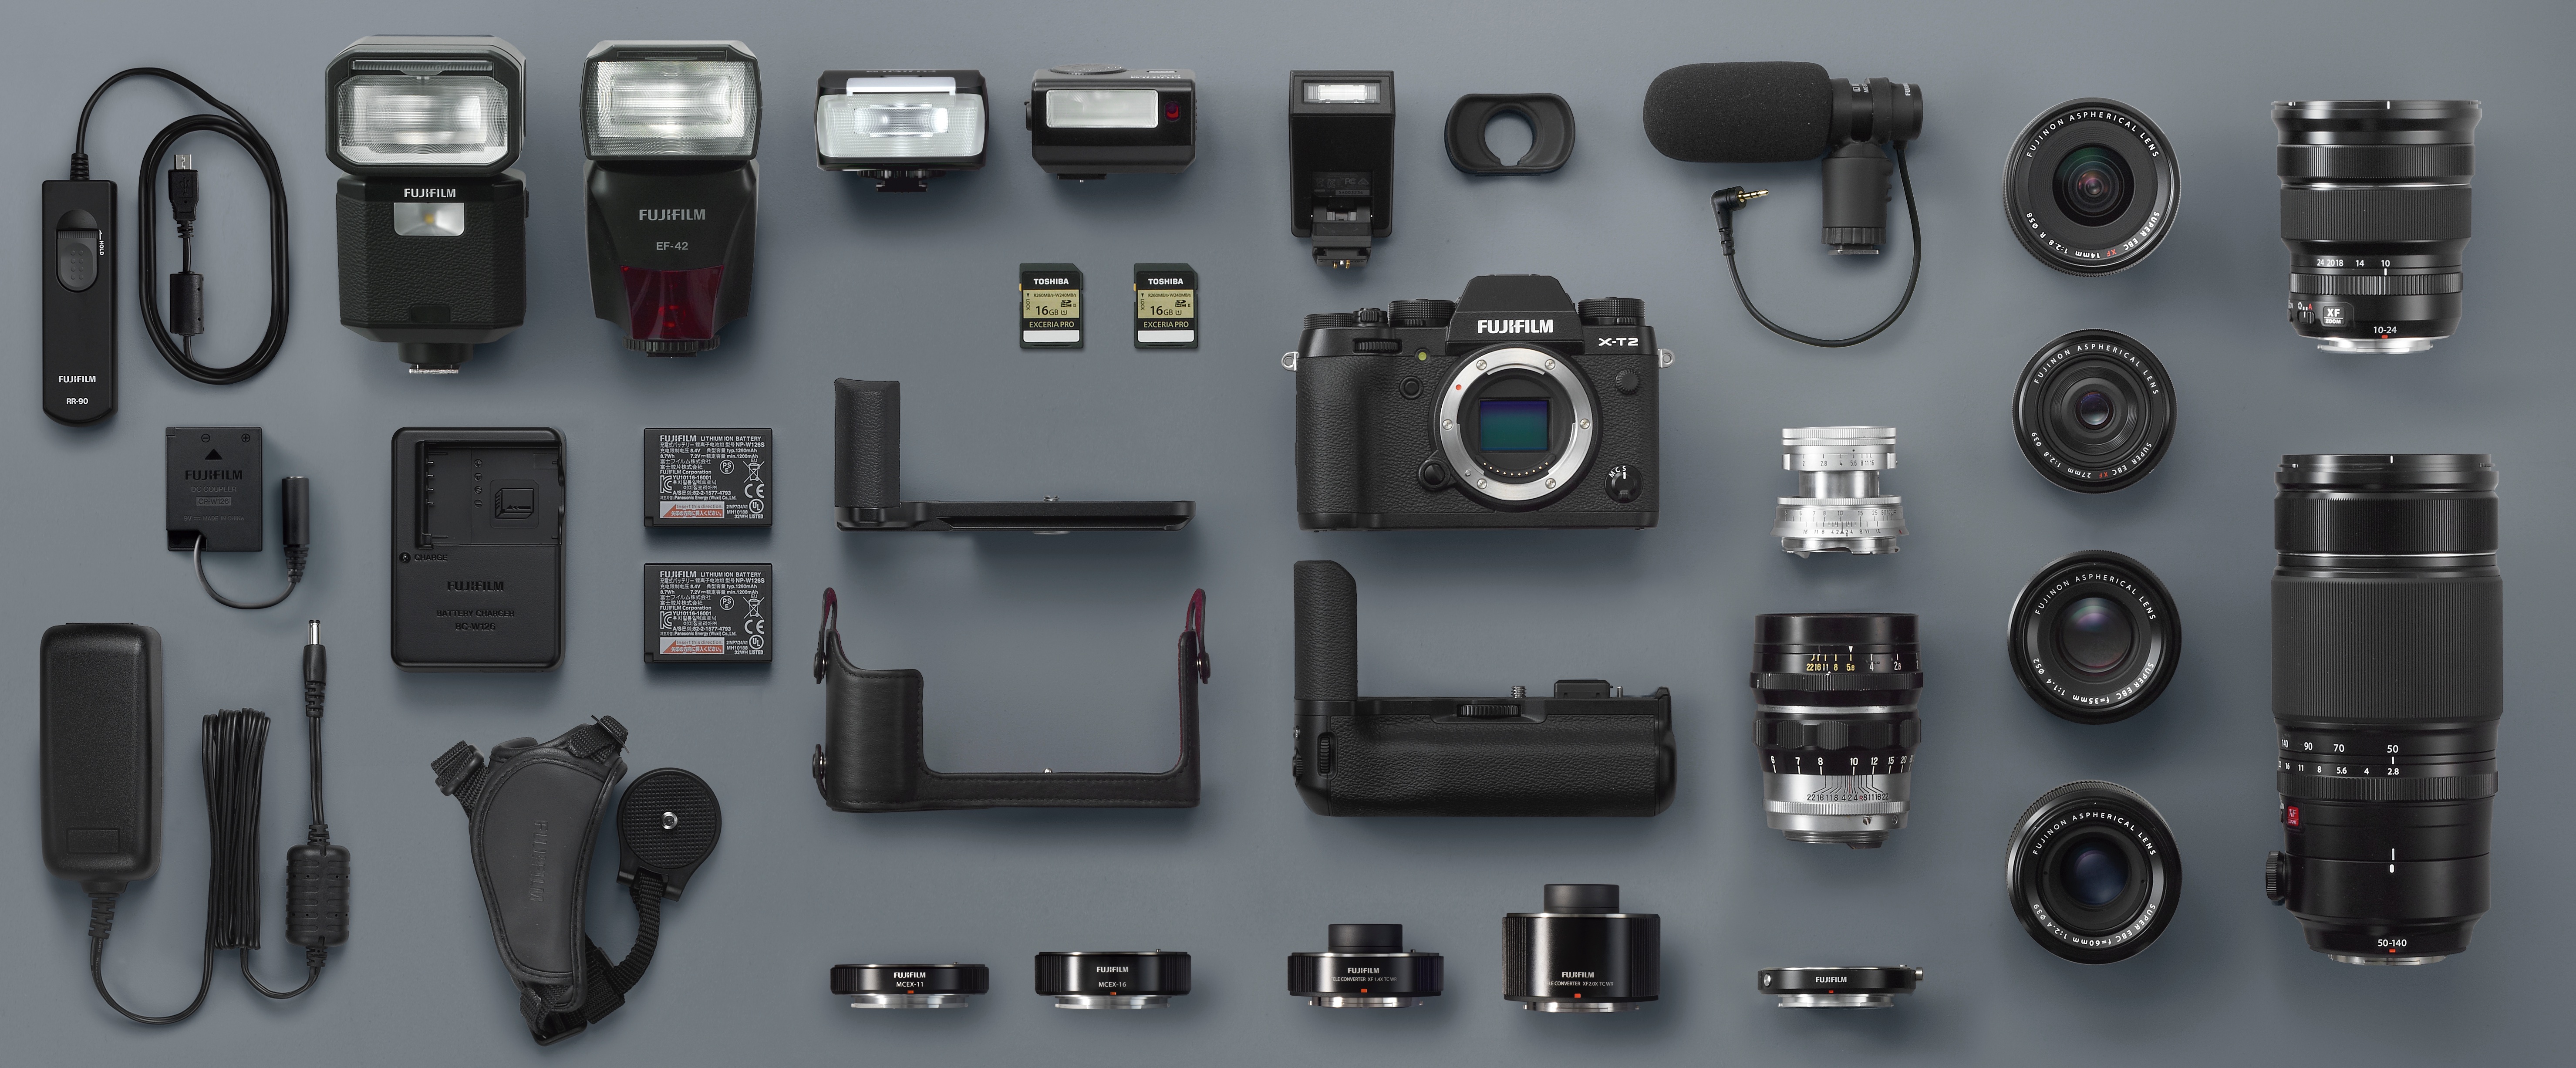
The Complete Camera
Talk to Rico (open forum for questions & feedback)
Rico’s Books at Rocky Nook * Fuji X Secrets Workshops * Rico’s Flickr Sets
The Fujifilm X-T1: 111 X-Pert Tips * The Fujifilm X-T10: 115 X-Pert Tips
*** NEW *** The Fujifilm X-Pro2: 115 X-Pert Tips *** NEW ***
(use coupon XPERT40 for a 40% discount)
The X-T2 may be Fujifilm’s most important product launch since the introduction of the X-Series. Building on the best features of the X-T1 and X-Pro2, can this richly featured workhorse convince enthusiasts and pros to consider the X-Mount as a universal go-to system for all their photographic needs? Let’s find out in this first impressions review.

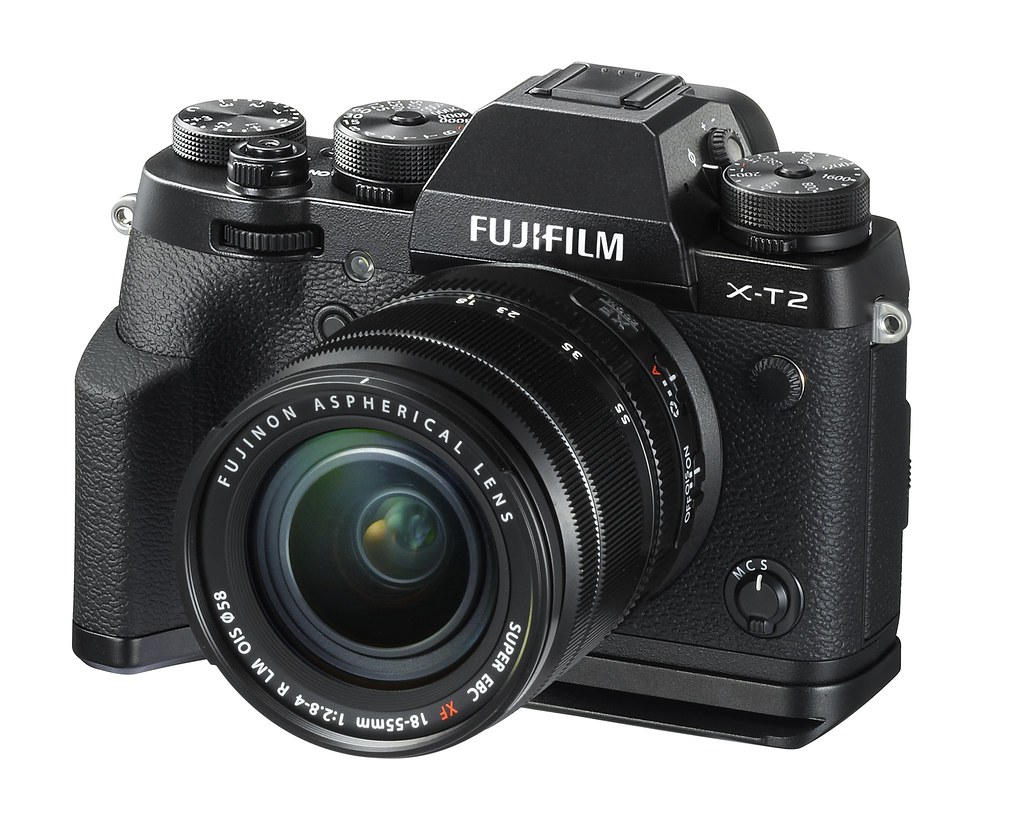
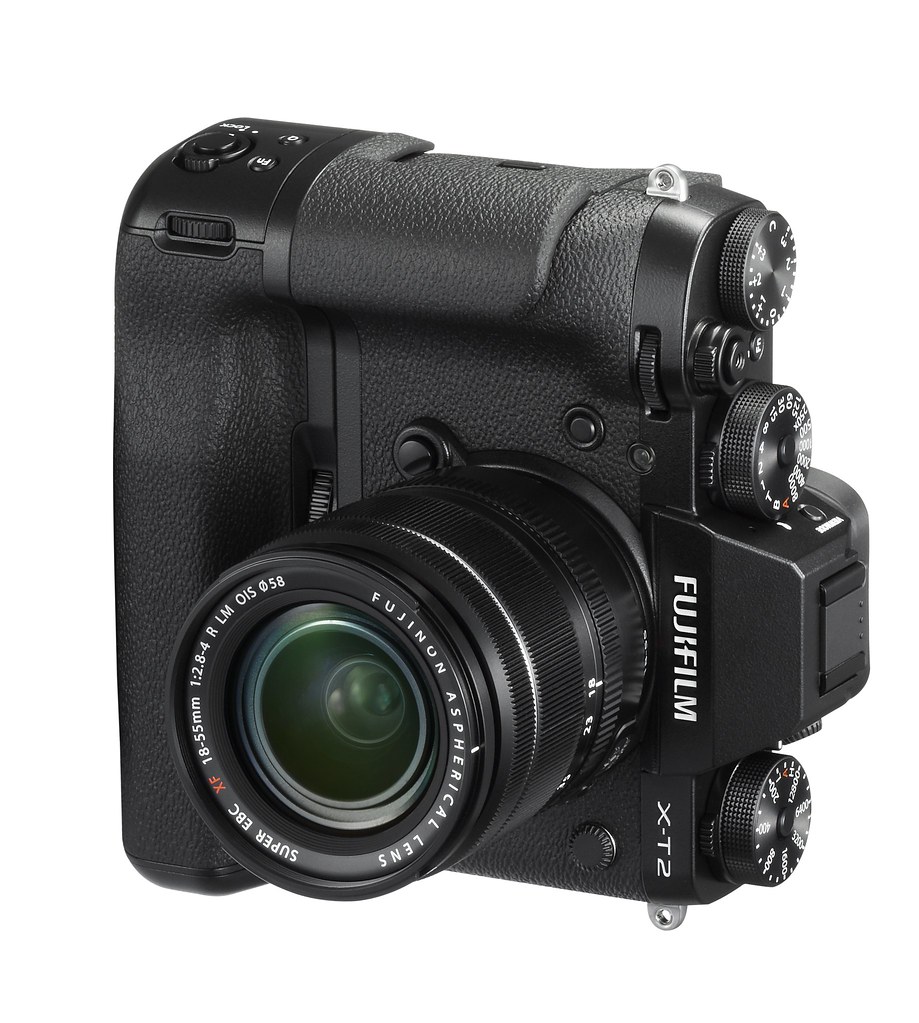
Getting serious: The X-T2 is Fujifilm’s high-powered successor to the X-T1.
Please note: This carefully researched and ridiculously comprehensive First Look Review of the Fujifilm X-T2 and Vertical Power Booster Grip is based on three different X-T2 pre-production models and more than ten different (and continuously evolving) beta firmware generations. The final hardware and firmware are expected to ship in the first half of September 2016.
***
Fuji X Secrets Ultimate workshops in Phuket, Thailand
From Nov. 12 – Nov. 19 and from Nov. 19 – Nov. 26, I am going to entertain a unique Fuji X Secrets workshop experience in Phuket, Thailand. We have rented one of Thailand’s most stunning villas as our base for an exclusive group of X-afficionadoes. The first week on offer will be for English speaking participants, and the second week for German speaking delegates. This exclusive event is designed for only seven participants per workshop week. However, each delegate is invited bring along a non-participating friend or loved one to share this wonderful experience and location. With daily photo excursions and the full curriculum of our popular multi-day Fuji X Secrets Weekend and Fuji X Secrets RAW workshops, this will be an unforgettable week of living and breathing the Fujifilm X spirit in a collaborative group of like-minded enthusiasts. Once you get there, everything will be taken care of—welcome to X-Paradise! The information and registration site is now open. Click here for the English and here for the German workshop weeks.
The Fujifilm X-Pro2: 115 X-Pert Tips is available
Please click here to order the printed edition or your ebook copy in three different DRM-free formats (all for the price of one), including a 40% discount if you use coupon code XPERT40. German readers can click here to order the German edition.
***
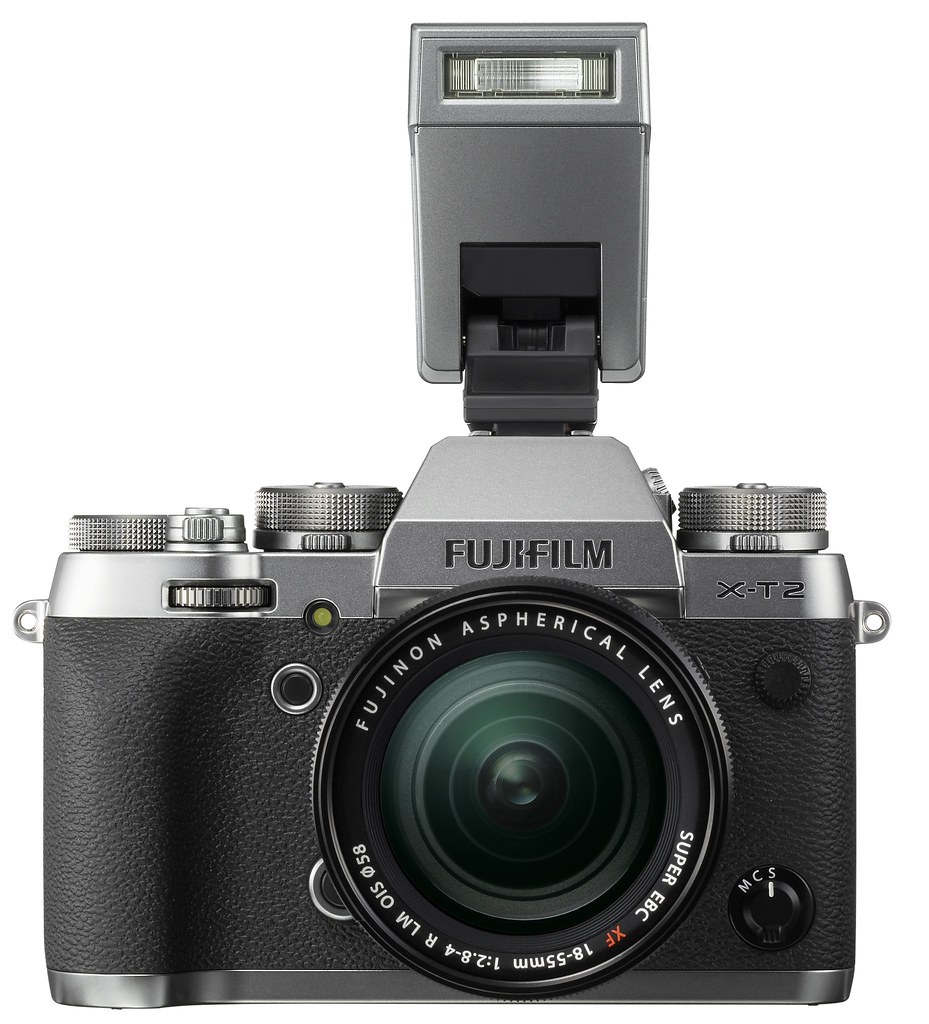
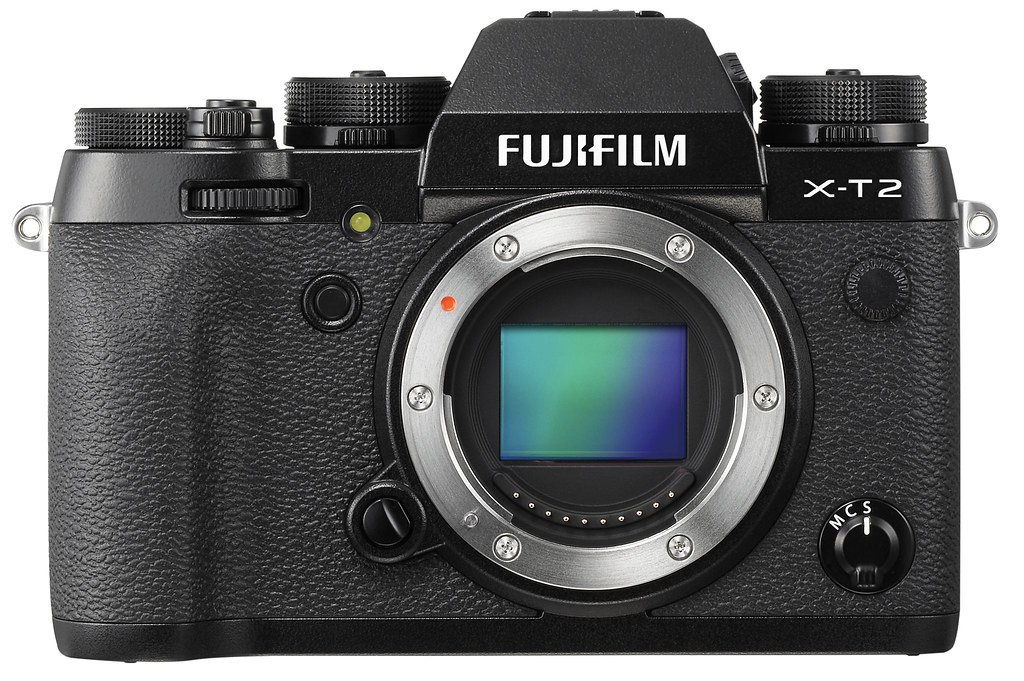
In September 2016, the X-T2 will be available in black (and eventually perhaps also in silver).
In any case, a matching camera-powered EF-X8 mini flashgun is included.
About two and a half years after the introduction of the successful X-T1, Fujifilm is getting serious with taking the X-series into “we can do everything” territory. At first glance, the X-T2 looks very much like its predecessor—why change a concept that stood behind Fujifilm’s (so far) most successful X-series camera? However, it’s a different story on the inside. At several global launch events, Fujifilm has made it very clear that the X-T2 is supposed to address all photographic needs, including sports and action shooting. It’s supposed to be a “complete mirrorless camera”.
Ready for business
- X-T2 Specifications
- X-T2 Sample Images
- X-Pro2 Sample Images
- X-T2 AF Tracking Samples
- ISO Comparison
- Film Simulation Comparison (SOOC & Lightroom)
- Acros High-ISO-Samples
- Le Mans Classic Samples
- Theresienstadt Samples
- X-T2 First Look Article Samples
- 4K AF-C Video Tracking Demo 1
- 4K AF-C Video Tracking Demo 2
Compared to the X-T1, the X-T2 features dozens of changes and improvements. Here’s an overview in 40 bullet points:
- 24.3 MP X-Trans CMOS III sensor (Sony-built with 14 bit readout) with no anti-aliasing filter
- X-Processor Pro is four times as fast as the EXR II processor used in the X-T1 and offers improved image quality, better noise response and higher dynamic range
- improved ISO performance (about 1 stop better than the previous generation) with native ISO covering 200 to 12800, and extended ISO settings of 100, 25600 and 51200 (all with full RAW support)
- 100% faster sensor readout, resulting in improved AF tracking performance, a dramatically reduced minimum blackout time of only 114 ms, and a high 100 fps EVF refresh rate
- 0.005s display lag, 0.06s max. AF speed, 0.17s shooting interval, 0.045s shutter lag
- configurable AF-C modes to adapt the AF system to different sports and action shooting scenarios
- up to 11 fps burst speed in boost mode (14 fps when using the electronic shutter) with AF tracking
- 3, 4 or 5 fps slow burst mode (CL) with full live-view and CDAF support
- improved user interface and a new menu structure, including a custom My Menu with up to 16 entries
- DSLR-style “AF-ON” option and new settings to individually engage/disengage focus and exposure lock when the shutter button is half-pressed
- more tactile dials and buttons and a new push-button lock mechanism for top-plate dials
- better grip and improved standard eyecup
- convenient focus stick to quickly move the autofocus frame or zone (with up to 325 AF frames to choose from)
- articulated rear screen works in landscape and portrait orientation
- new Vertical Power Booster Grip with two additional battery slots for extended shooting (1000+ images) and duplicate controls
- weather sealing with protection against rain, dust and freezing
- improved 0.77x electronic viewfinder with better image quality and twice the brightness of the previous model, now also featuring an auto brightness mode
- low-vibration 1/8000s mechanical shutter with 1/250s flash sync (supplemented by an electronic shutter with 1/32000s), rated for 150,000 shots
- new flash system offers high-speed sync, wireless TTL and multi-frame shooting (in concert with compatible flash units such as the new EF-X500)
- dual SD card slots (both support the ultra-fast UHS-II standard)
- improved hybrid autofocus system with pro-level subject tracking, a larger phase-detection area and more focus points (7 x 13 or 13 x 25 focus points, including either 7 x 7 or 13 x 13 phase detection points)
- automatic pixel mapping (to map out dead pixels)
- improved JPEG quality and new ACROS film simulation with ISO-controlled film grain and noise shaping
- expanded JPEG settings with additional options for contrast, noise reduction, sharpness, color saturation and film grain simulation
- broader ±2 EV bracketing and ±5 EV exposure compensation (along with expanded Push/Pull options in the camera’s built-in RAW converter)
- lossless RAW compression cuts RAW file size in half
- improved battery life indicator for up to three batteries at once (including a 1% accuracy display)
- enhanced electronic depth-of-field and distance scale with either pixel-based or film-based precision
- new center-weighted metering option
- WYSIWYG simulation of fixed dynamic range settings (DR200%, DR400%) in the live view and live histogram of the EVF and LCD, and enhanced highlight DR in Natural Live View mode
- dedicated video mode on DRIVE dial replaces video record button
- high-quality 4K video and HD video with 100 Mbit/s and oversampling (to minimize moiré and artifacts)
- vastly improved video focussing
- HDMI output to mirror EVF and LCD displays on monitors and HD beamers, or to record the live view with an HD frame grabber
- uncompressed 4:2:2 HD and 4K HDMI output to external recording devices, including “F-Log” flat gamma 4K recording with expanded dynamic range
- threaded cable release option, fast USB 3.0 interface, 3.5mm mic input, 2.5mm remote control input, 3.5mm sound/headphone output (in the Vertical Power Booster Grip)
- USB charging for the in-body battery
- Vertical Power Booster Grip includes an external power input to power the camera and charge batteries inside the grip (2 hours charging time for two batteries)
- new NP-W126S battery with reduced heat dissemination (old batteries remain fully compatible)
- USB and wireless tethering options (after a future firmware update) with new and improved plug-ins for Adobe Lightroom
X-T2 with XF18-55mmF2.8-4 R LM OIS and Arca-Swiss hand grip MHG-XT2
Improved Ergonomics
In an improvement over the X-T1, Fujifilm located the tripod connector directly under the optical axis and enlarged the top-plate dials to offer a better grip. More importantly, the shutter speed and ISO dials have a new lock/unlock mechanism: press the button once to lock the dial, and press it again to unlock it.

Lock and unlock control dials with new push-button locks
Another perk: The dreaded Focus Assist button of the X-T1 is gone. Instead, the X-T2 features finger-friendly front and rear command dials that can be depressed without compromising the camera’s weather sealing.
Unfortunately, the addition of center-weighted metering to the metering dial has made it very difficult (at least for me) to switch the camera from average metering back to one of the three other modes. In the Average setting, there simply isn’t sufficient space for my finger between the metering mode dial and the on/off switch.
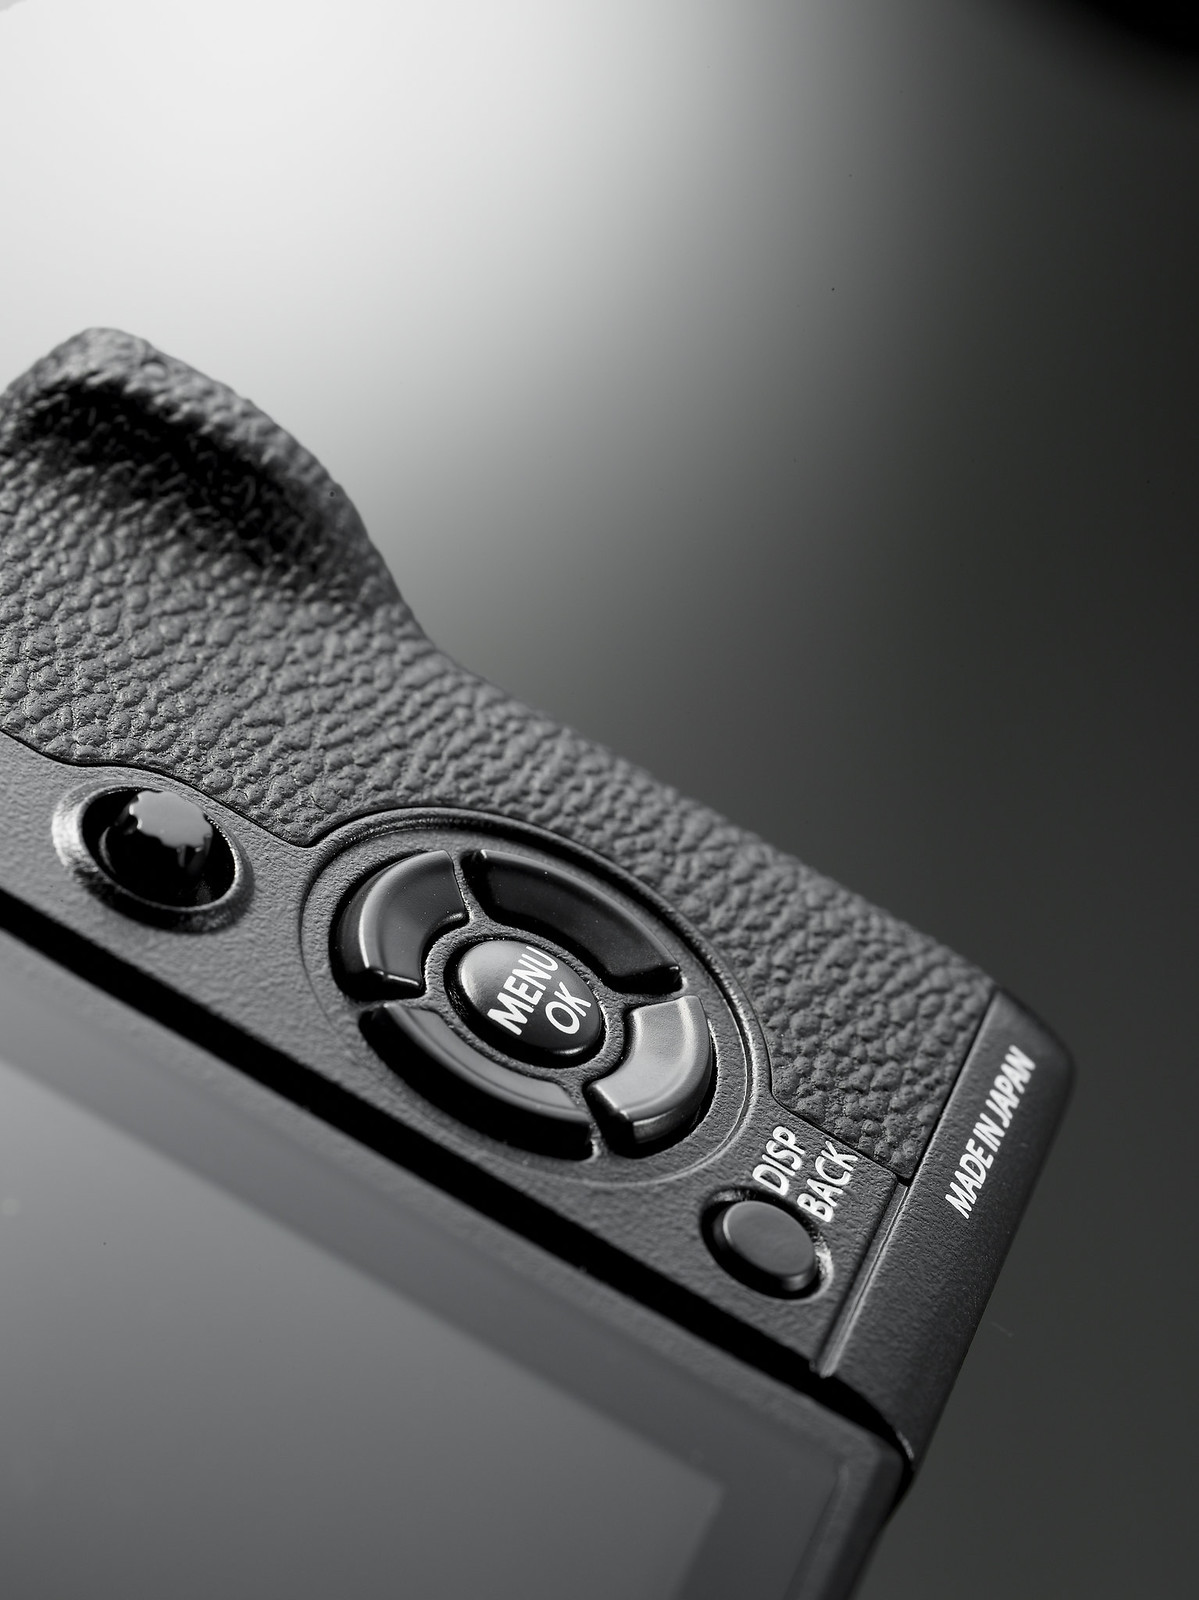
The tactile response of the four selector keys has been improved
On a brighter note, the four directional selector buttons are more ergonomic than those of the X-T1. However, I still prefer the selector buttons of the X-Pro2. By the way, the weather sealing side doors covering for the card slots and external connectors bay are more robust than those of the X-T1, so it’s now pretty much impossible to accidentally open a cover door.
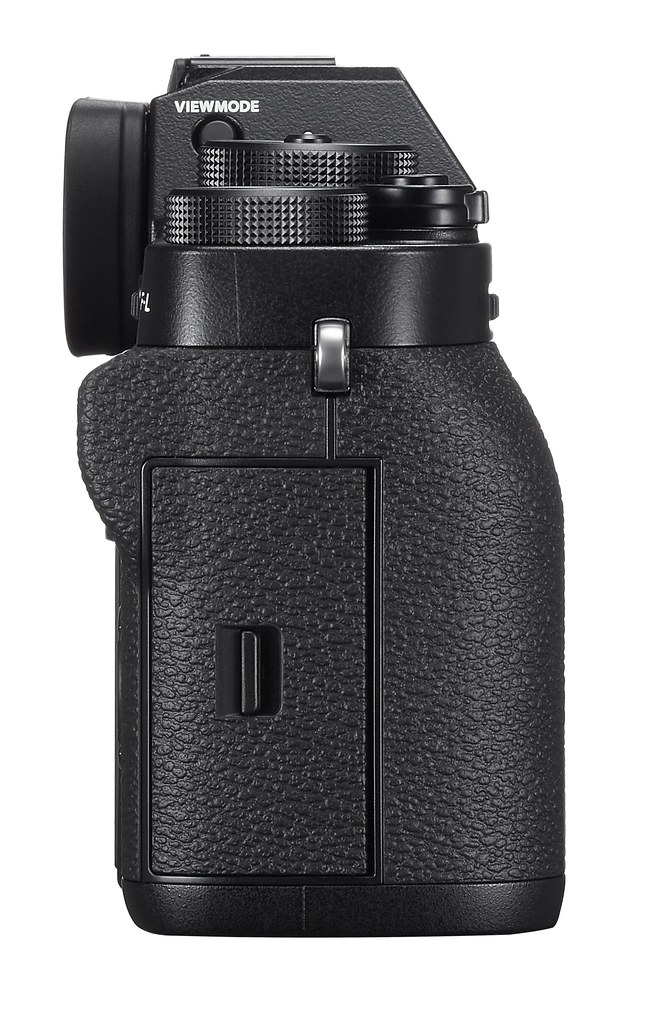
The side door protecting the X-T2’s two UHS-II card slots is more robust and features a locking mechanism

Unlike the X-T1, the tripod socket of the X-T2 sits on the optical axis
The most welcome addition to the array of buttons and dials is the focus stick (first introduced in the X-Pro2) that lets you directly change the active focus frame or AF zone. It works in eight directions: vertically, horizontally and diagonally. When you press the stick, the focus frame selection window appears, where you can pick one out of five different focus frame sizes by turning the front or rear command dials.
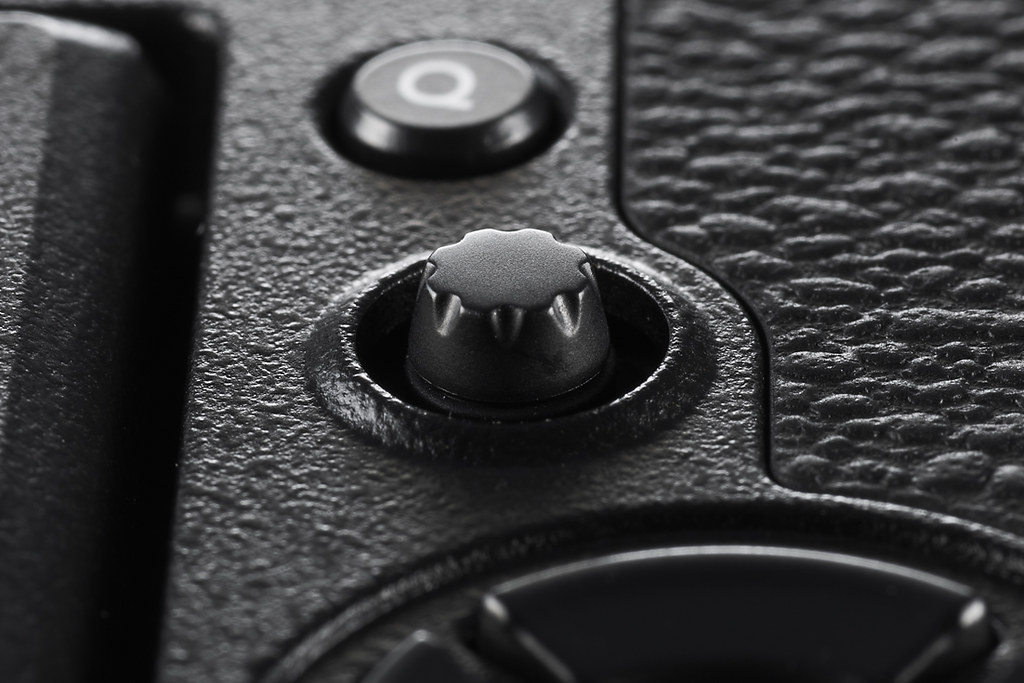
Quick and easy focus frame selection with the 8-directional focus stick
The X-T1 offers 49 individual focus frames to choose from. In the X-T2, this number has been upgraded to 91 (7 x 13) frames, but you can switch to an option with even 325 (13 x 25) focus frames for pin-point focus frame positioning. Thanks to the focus stick, navigating that many focus frames is quite easy.
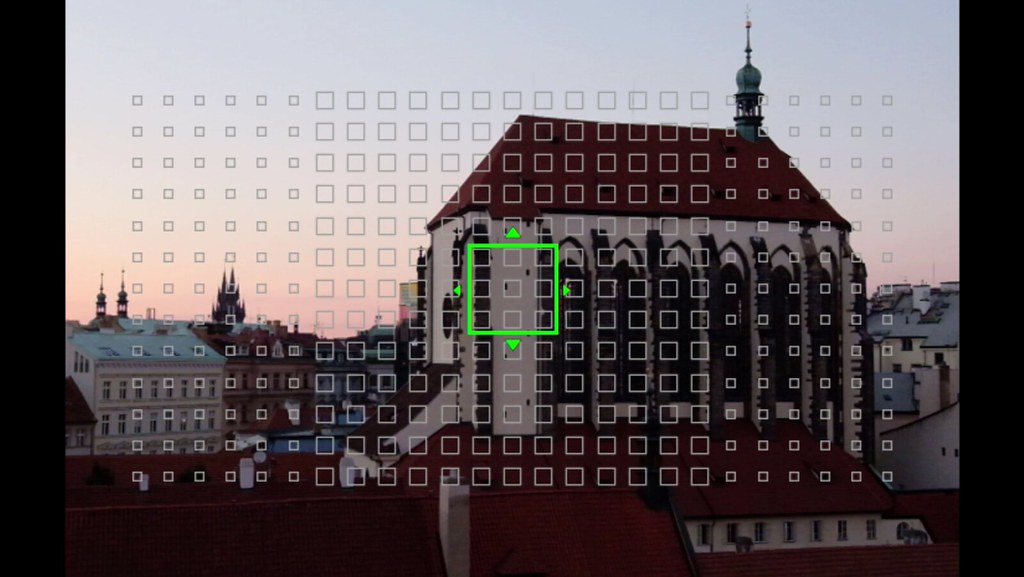
Up to 325 focus frames (each in 5 different sizes) are available. The larger squares in the selection matrix mark PDAF-enabled AF frames, while the smaller squares near the horizontal edges are CDAF-only frames.
The ±3 EV exposure compensation dial known from the X-T1 has been enhanced, as well. It’s harder to turn, and you can now select a “C” position which assigns exposure compensation to the X-T2’s front command dial, where the exposure can be adjusted within a wide range of ±5 EV in 1/3 EV steps.
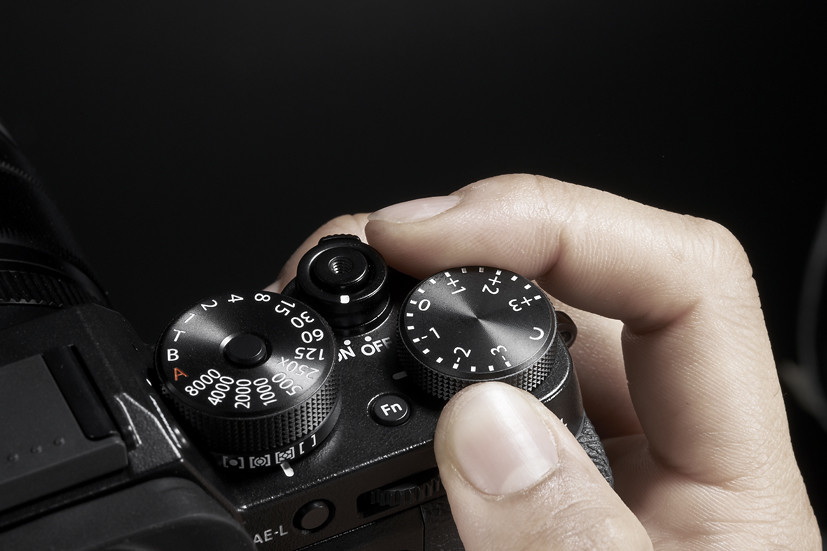
Enhanced exposure compensation dial
Exposure bracketing has been expanded to support double the previous range: ±2 EV. However, it’s still limited to only three different exposures per bracketing series. On the other hand, HDR usually doesn’t require a large number of exposures in the day and age of ISOless sensors. In concert with Lightroom’s HDR-DNGs, you can expand the dynamic range of an X-Pro2 or X-T2 by up to 7 EV with just two (2) shots that are taken with an exposure difference of 4 EV (which AE bracketing can handle). Since not too many users seem to be aware of this capability, I have included a step-by-step guide in my book on the X-Pro2, and I have also added a brief version later in this article.
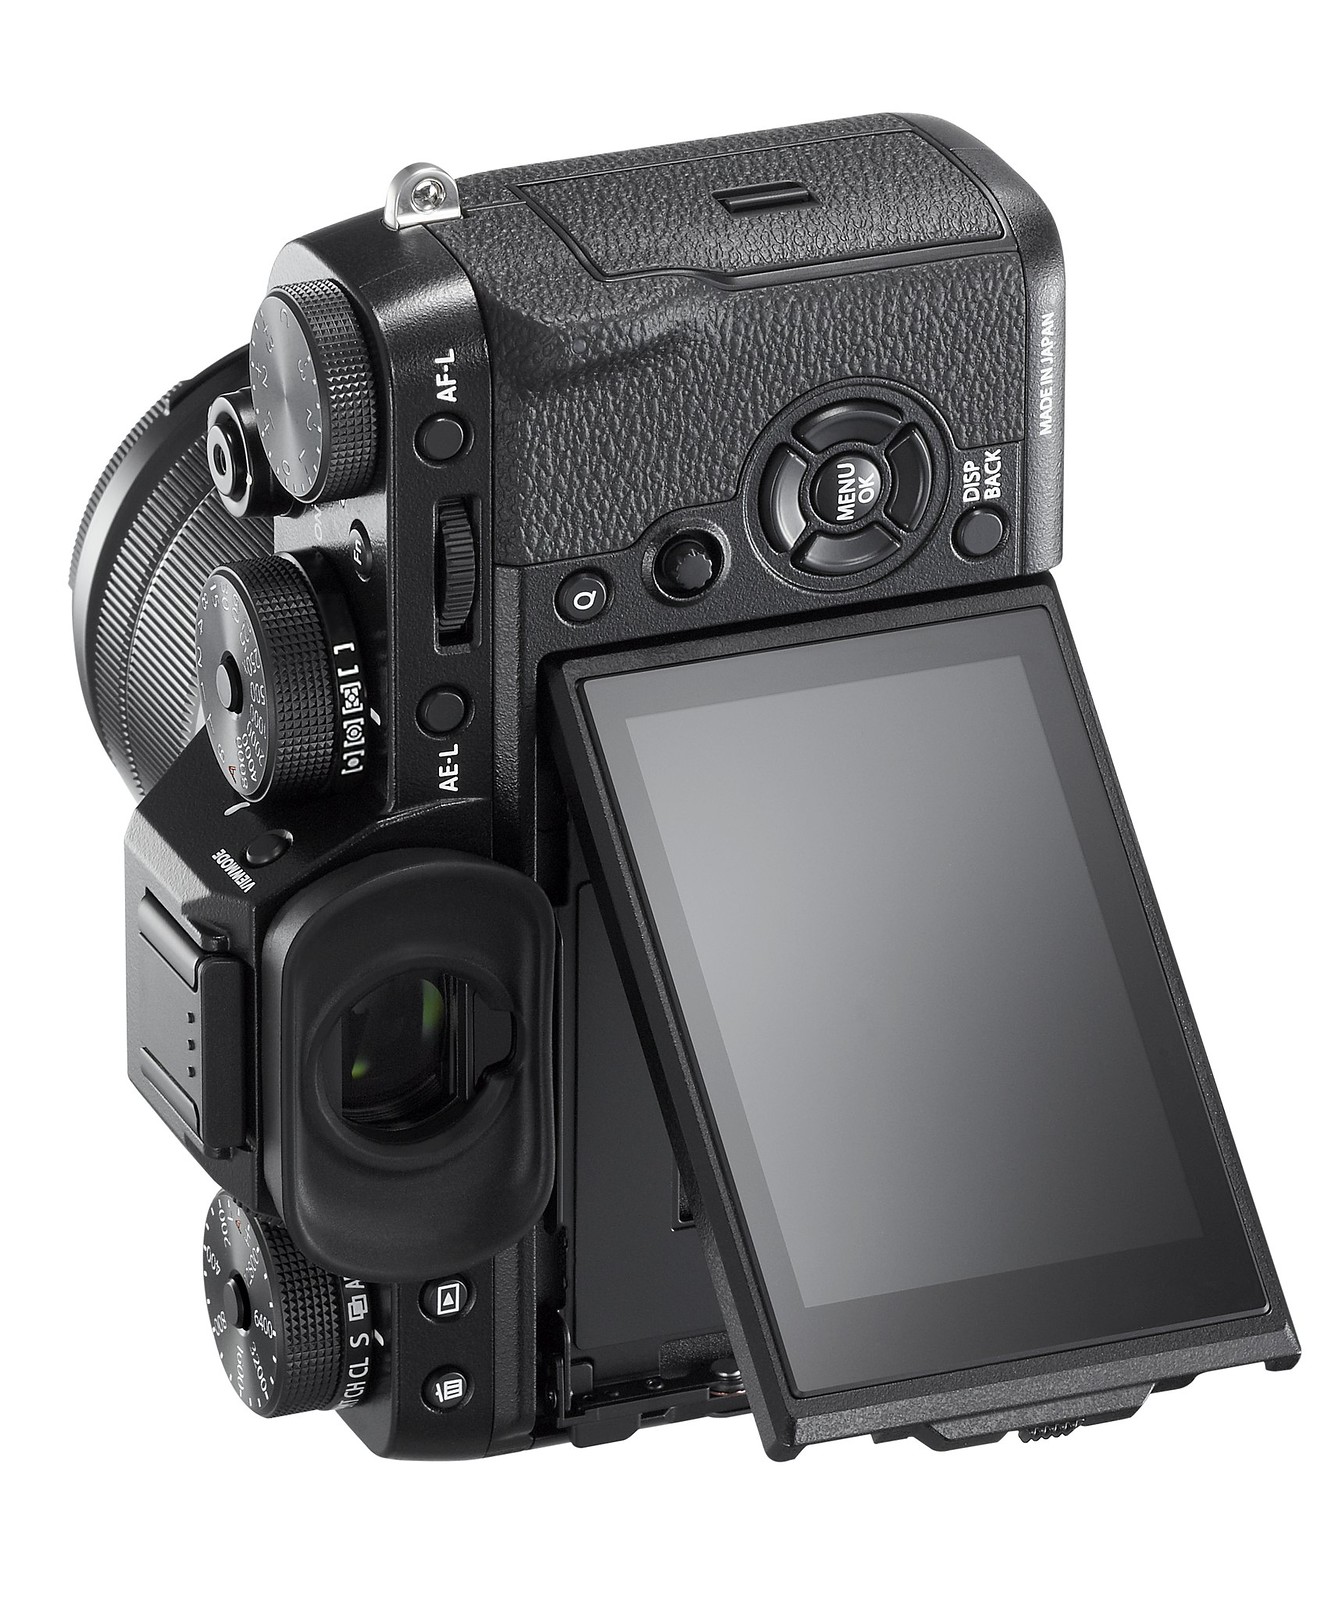
Vertical tilting is limited to an angle of about 45 degrees
The 3-inch LCD display of the X-T2 can be tilted horizontally and vertically. The latter is useful when your are holding the camera upright and want to shoot from above or from below. However, vertical tilting is limited to about 45 degrees. On the bright side, this limitation makes the mechanism quite robust, and the screen remains on the optical axis.

For upright shots from the ground, the vertically tilting LCD of the X-T2 is quite a bonus
The standard eyecup for the EVF has grown larger and is more effective, but you can still purchase an even larger eyecup to protect the viewfinder from stray light.
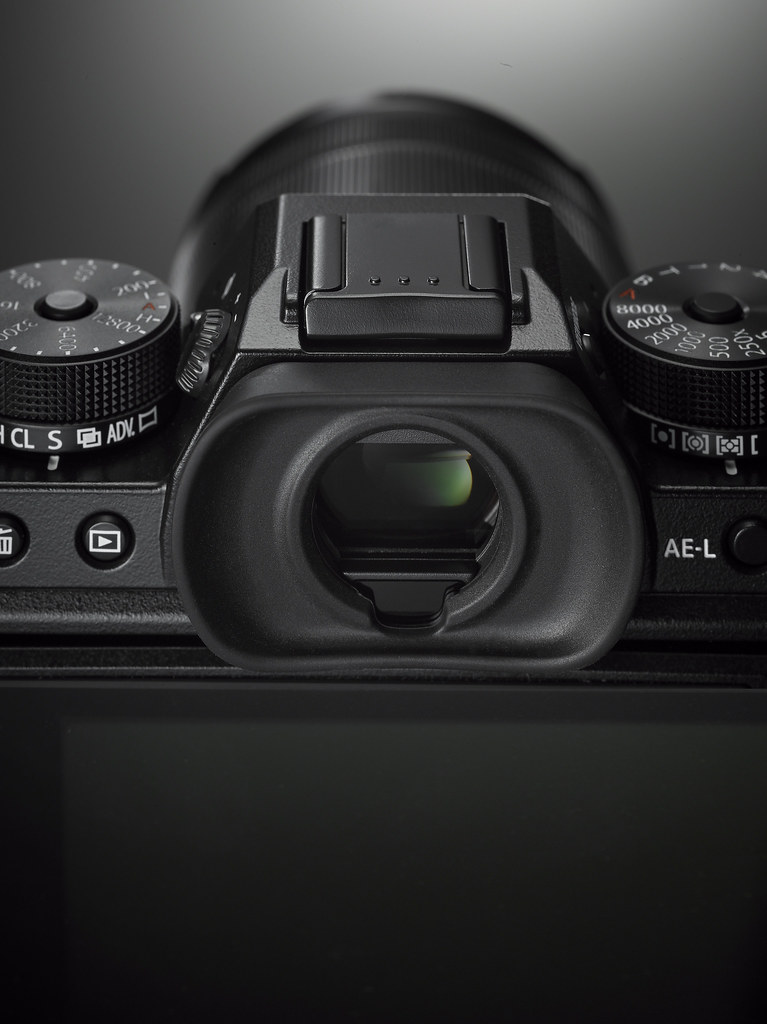
The larger standard eyecup of the X-T2
The X-T2’s dedicated ISO dial features the same easy push-button lock mechanism as the shutter speed dial. ISO can be adjusted between 200 and 12800 in 1/3 EV steps. The dial also offers an Auto-ISO (“A”) position and two positions for extended ISO: “L” (ISO 100) and “H” (either ISO 25600 or 51200). In Auto-ISO mode, you can pick one of three different presets (AUTO1-3) that can be configured with respect to ISO range (200 – 12800) and minimum shutter speed (1/4s – 1/500s).
All my Auto-ISO settings make use of the camera’s full ISO range (200 – 12800), differing only in the minimum shutter speed settings which I adjust to the task at hand
To switch between different Auto-ISO configurations, you can either go to the camera menu or assign Auto-ISO to one of the camera’s six (or eight, if you also count the AE-L and AF-L buttons) customizable function (Fn) buttons. I prefer the latter option.
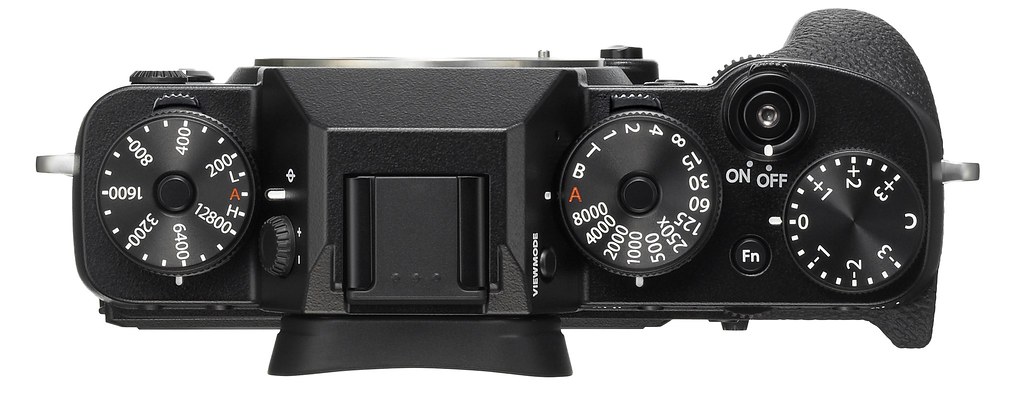
A view from the top: The ISO and shutter dials feature simple and effective push-button locks, and the exposure compensation dial doesn’t turn as easily as on the X-T1
Sadly, the ability to fully unlock the ISO dial also means that idiots like myself can forget to relock ISO and accidentally end up shooting with, for example, ISO 1000 instead of an intended ISO 200. Luckily, the X-T2’s ISOless sensor and advanced processor are pretty forgiving at higher ISOs. But still: Watch out and check your locks to avoid accidental ISO and shutter speed changes! Otherwise, your newly gained ISO dial freedom may come back to bite you.

A bunch of roses mistakenly shot at ISO 1000 instead of ISO 200 (Lightroom CC, Astia)
Higher ISO
As usual, the X-T2’s ISO calibration is based on Standard Output Sensitivity (SOS) and very much in line with other current and previous Fujifilm APS-C camera models. Please note that cameras from Canon, Nikon and Sony use a more liberal ISO standard named Recommended Exposure Index (REI). Just like one British ounce isn’t the same as one American ounce, identical ISO numbers mean different brightness levels in SOS and REI cameras. Surprisingly, such fundamentals are often ignored in inter-brand ISO comparisons.
Compared to the X-T1, ISO performance has been improved by about 1 stop. Since the X-T2 and X-Pro2 feature the same image sensor and processor, their image quality is virtually identical, so we can use X-Pro2 samples to assess the X-T2’s IQ. Click here for a Flickr album showing an X-Pro2 ISO comparison that covers ISO 100 to ISO 25600 with camera factory settings.

Click on the image to access the ISO comparison album
Unlike most older X-series models, all expanded ISO settings of the X-T2 are capable of writing corresponding RAW files. Naturally, with a base ISO of 200, selecting ISO 100 (aka “L”) will result in a loss of 1 EV of highlight dynamic range, but this can sometimes be quite useful and intentional, for example in situations with flat lighting or scenes with limited dynamic range. It can also be practical in situations where you want the result to look particularly contrasty.

A straight-out-of-camera (SOOC) VELVIA sunrise, shot at ISO 100 (8s exposure time) to increase contrast
In fact, ISO 100 works like a virtual dynamic range setting of DR50%, adding contrast and “punch” to an otherwise flatter looking image.
However, this is a double-edged sword:
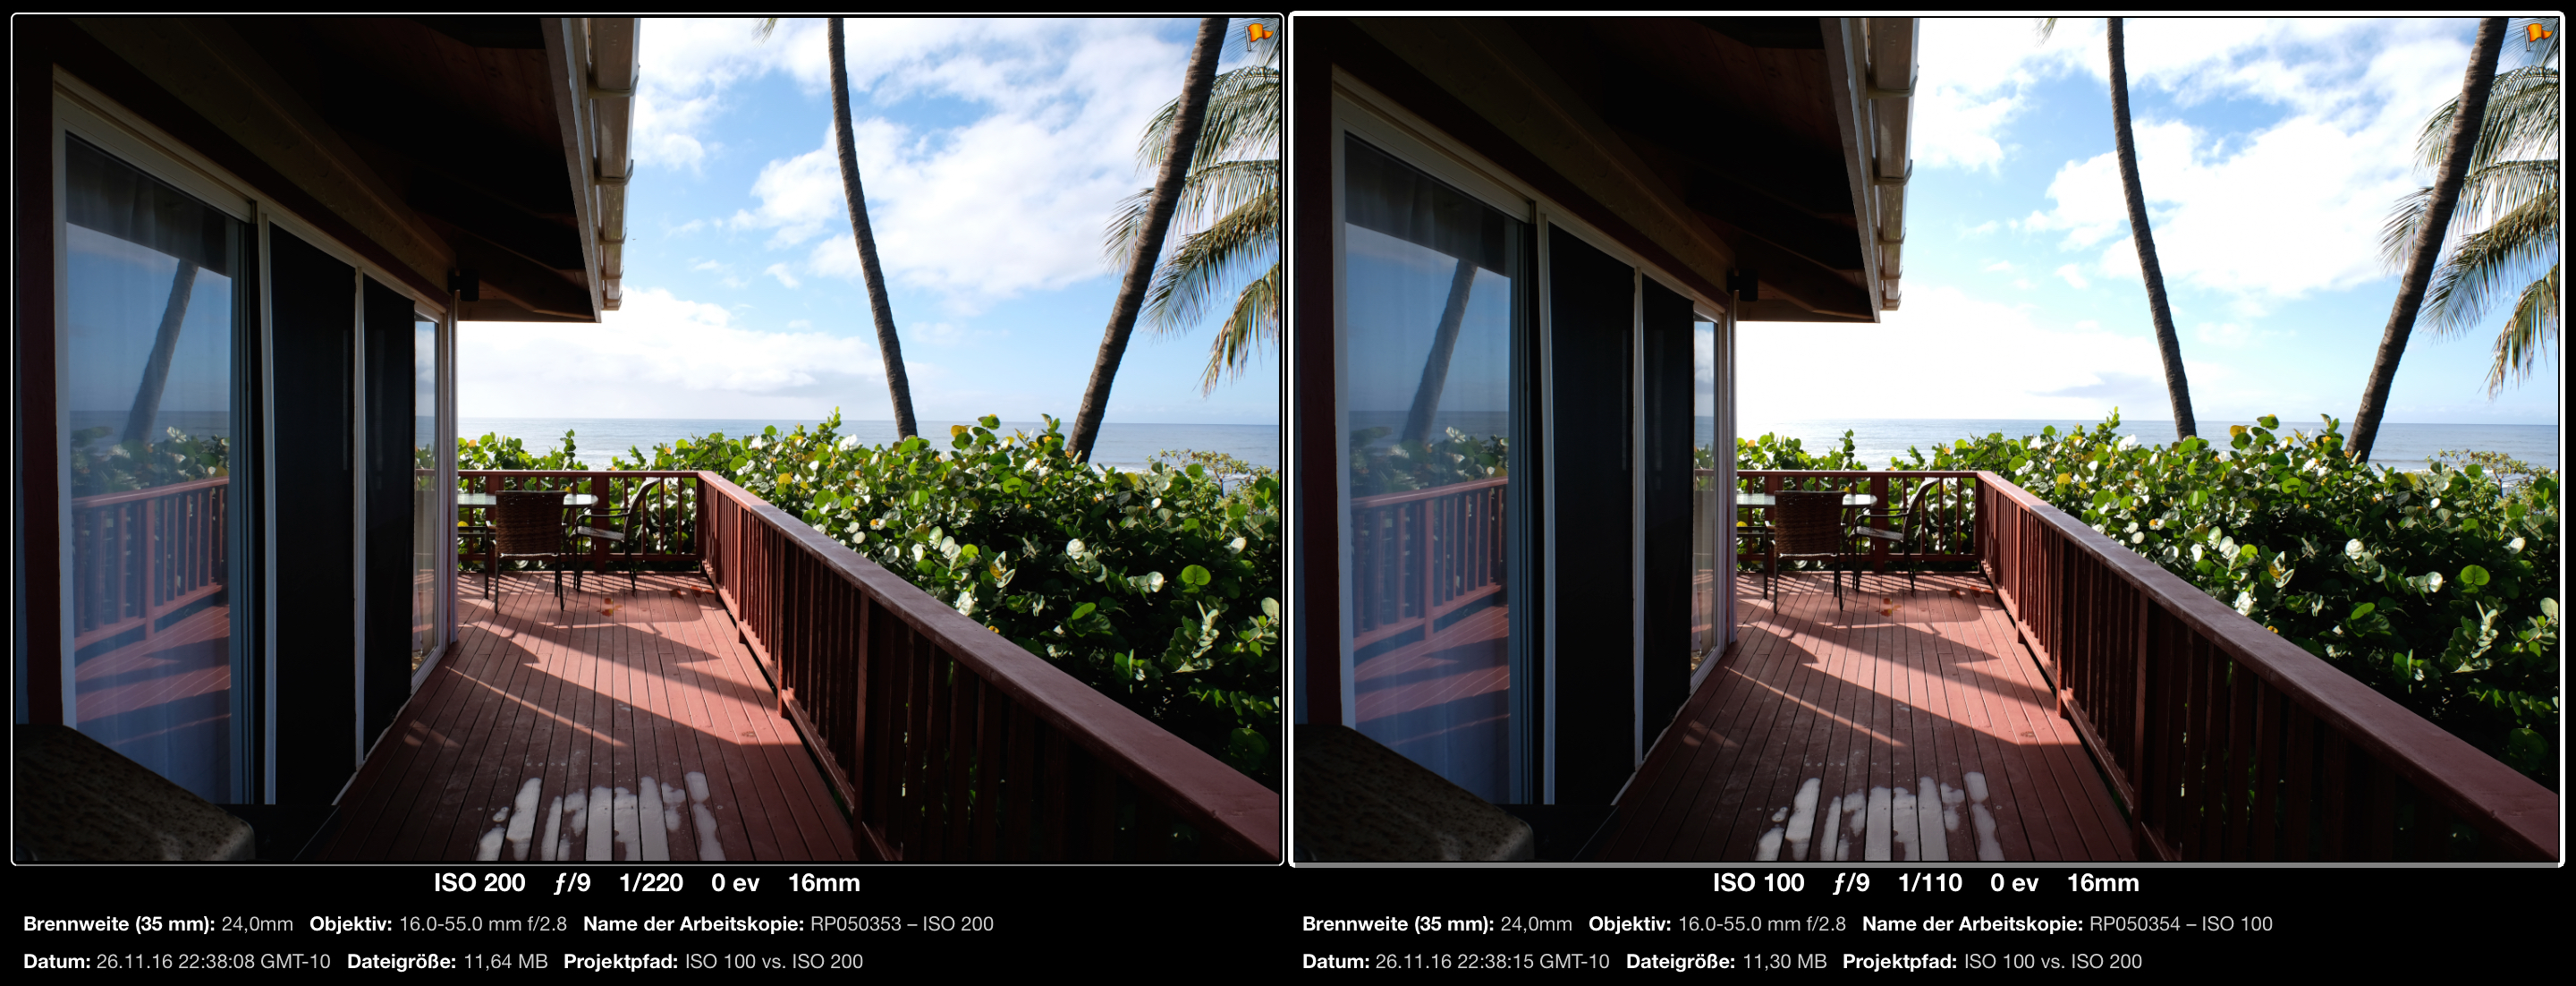
Highlight dynamic range: ISO 200 vs. ISO 100
(X-Pro2 samples)
In the example above, selecting ISO 100 resulted in blown highlights. There’s no texture in the clouds and the sky is turning greenish due to an oversaturated blue channel. This makes ISO 100 a “grown-ups only” setting for users who know what they are doing.
This is especially true because the live view and the live histogram will give you a misleading ISO 200 reading when the camera is in extended ISO 100 mode, suggesting more highlight dynamic range than is really available. Only when you half-press the shutter button, will the reduced highlight dynamic range also be simulated in the live view.
Please read my First Look Review on the X-Pro2 to learn more about the perks and perils of the ISO 100 setting and the high-ISO performance of the new sensor/processor in the X-Pro2 and X-T2.
Improved EVF
Large electronic viewfinders (EVF) are a trademark of the Fujifilm X-T series. The X-T2 features the same 2.36 million dots OLED EVF with the same cinematic 0.77x magnification as the X-T1. Except that it isn’t really the same: It’s twice as bright (500cd/m² vs. 250cd/m²) and it’s also faster, now refreshing with up to 100 frames per second in boost mode (X-T1: 54 fps). It also offers better display image quality (especially in low-light situations and during AF operation) and exhibits less moiré and false color when set to boost mode.

X-T2, XF18-135mmF3.5-5.6R LM OIS WR
This high refresh rate not only improves AF performance, it is also vital for sports and action tracking in the viewfinder. You don’t want to lose contact with your subject, so frequent frame updates are necessary to keep things “real”. The short display lag of only 0.005s (“real-time viewfinder”) and a blackout time as short as 0.114s make it possible to confidently track fast and/or erratically moving subjects at a burst rate of 5 frames per second in the EVF. Unlike Sony’s a6300, which only displays one single live view image between consecutive shots at 8 fps, the X-T2 (when set to 5 fps “CL” burst mode) gives you a dynamic 100 fps display during the 0.086s long live view phase between continuous shots, genuinely closing the gap between electronic and optical viewfinders.
With a refresh rate of 100 fps, a display lag of 0.005s and a blackout time as short as 0.114s, confident subject tracking in the EVF is possible at continuous burst rates of 3, 4 or 5 fps
The EVF offers three different display modes: Normal, Wide and Dual. The latter is only available in manual focus mode and displays a split screen featuring a regular live view plus a zoomed-in crop of the subject to facilitate manual focussing.

The large EVF can display a regular Wide and a more constrained Normal view. The latter is useful to avoid “tunnel vision” when you are tracking action subjects. The MF-only Dual view is also available for the rear LCD screen and can be combined with manual focus assistants like Focus Peaking and Digital Split Image.
New Batteries
The X-T2 uses the same NP-W126 batteries as Fujifilm’s ten previous X-mount camera models, so there’s a good chance that you may already have several of them at home. There’s also a new NP-W126S battery with an improved heat signature, which is ideal for hard-core applications like recording extended 4K video clips or quickly taking many of images in burst mode on a hot day and/or in direct sunlight. As far as I can tell after several weeks of testing under varying conditions, the new batteries aren’t mandatory, but you certainly can’t go wrong using them. However, if you already have a bunch of regular NP-W126 batteries, you shouldn’t feel any pressure to replace them for the newer model.

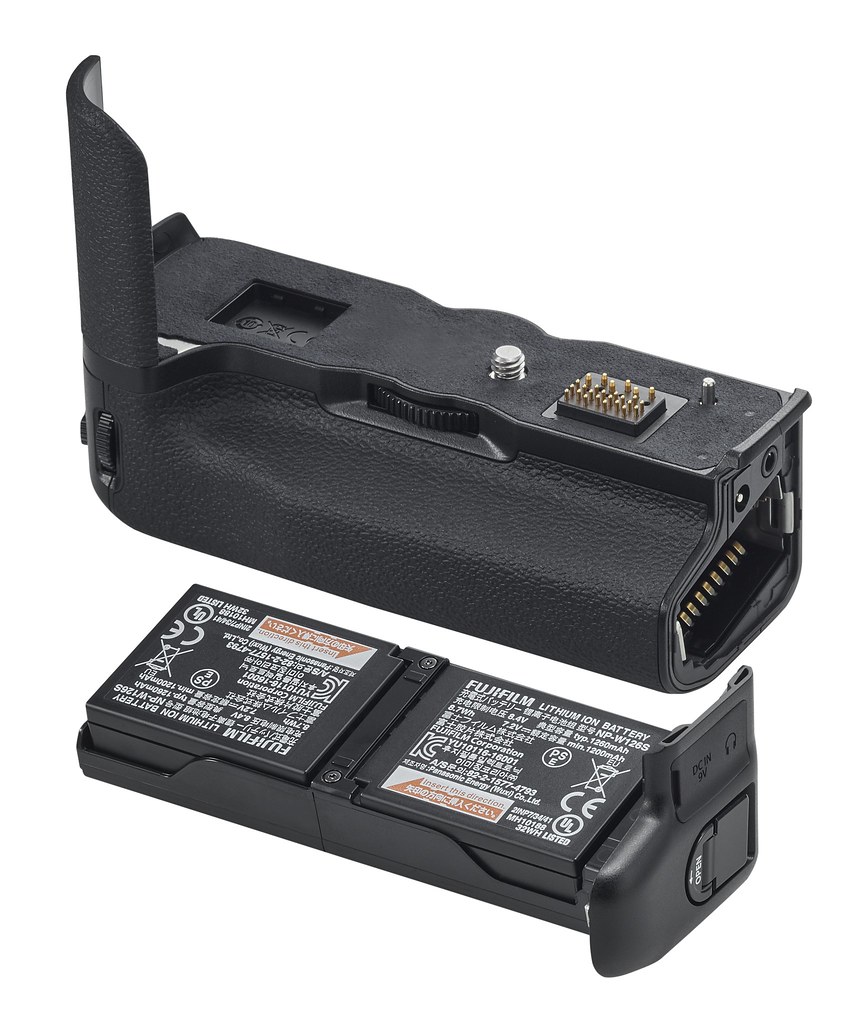
The new NP-126S batteries have the same size, weight and capacity as the previous version. Older and newer batteries can be mixed and used at the same time.
The X-T2 features the same accurate battery life indicator as the X-Pro2, which includes an optional percentage display with 1% accuracy. Since the X-T2 can host up to three batteries at once, there are also up to three seperate indicators with an accurate percentage display of each battery’s remaining power.
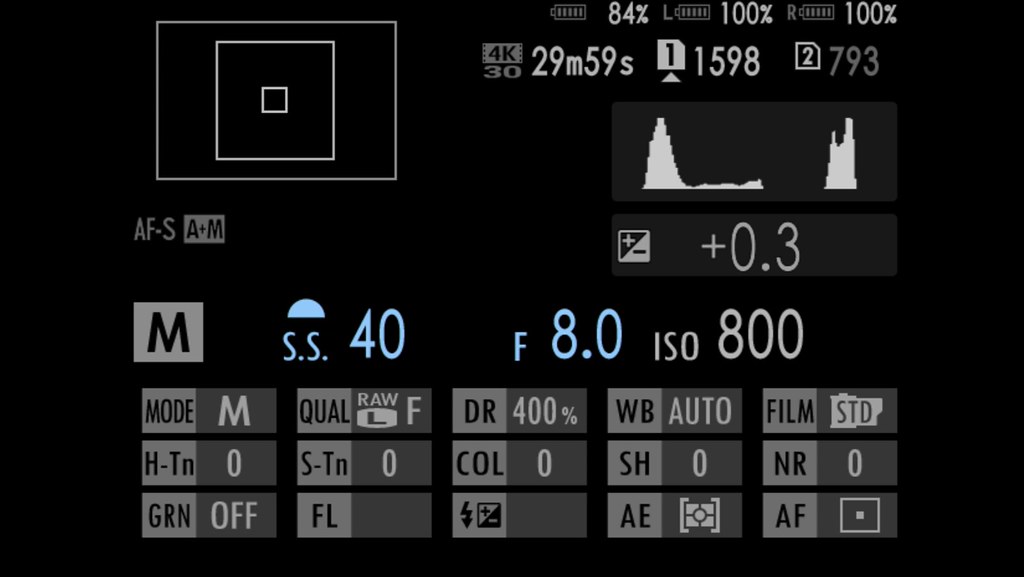
The Info display shows accurate battery life indicators for up to three batteries. One battery is hosted in the camera, and one or two additional batteries can be placed in the Vertical Power Booster Grip.
The X-T2 is the first X-series system camera model that allows in-camera charging via its USB 3.0 port at the left side of the body. Charging starts as soon as you plug-in a Micro-USB 2.0 or 3.0 cable that’s connected to a power source (like your laptop or any USB charger).
With two additional batteries in the optional power grip, the X-T2 can take approx. 1000 shots in boost mode without changing or recharging batteries. We could verify this claim during a recent Le Mans Classic race event, where approx. 200 guests (mostly media and retailers) were using pre-production X-T2 cameras for a full day of action shooting and chimping. While I can’t vouch for every participant, not a single member of our 20 people strong group from Germany, Austria and the Netherlands ran out of juice during the event.
Batteries in the optional Vertical Power Booster Grip can be charged by connecting a 9V power supply that is included with the grip. This power supply also makes it possible to use the X-T2 without any batteries at all (for studio work, video productions or long time lapse sessions), or you can simply insert any combination of up to three batteries in the camera and/or vertical grip. Anything goes.
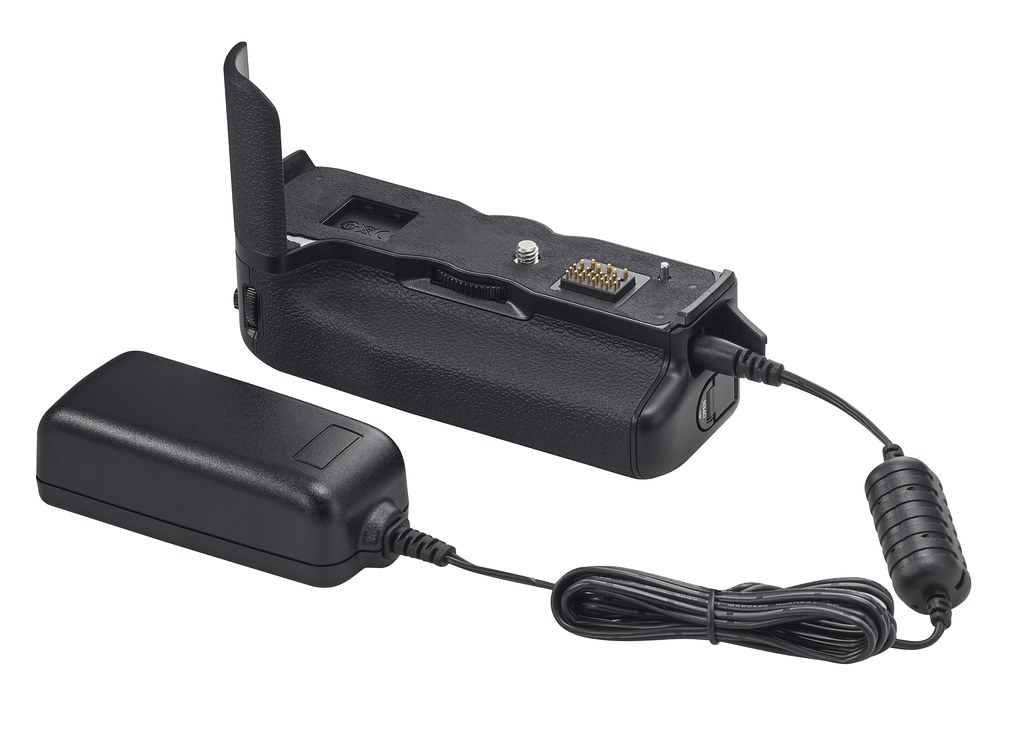
With the included 9V power supply, the Vertical Power Booster Grip can power the camera externally. It will also charge your batteries. Charging two empty batteries in the grip takes about two hours.
Dual Slots
Like the X-Pro2, the X-T2 features dual memory card slots, but unlike the X-Pro2, both slots support the fast UHS-II standard. That said, my testing of pre-production cameras with beta firmware suggests that slot 1 works a little bit faster than slot 2.
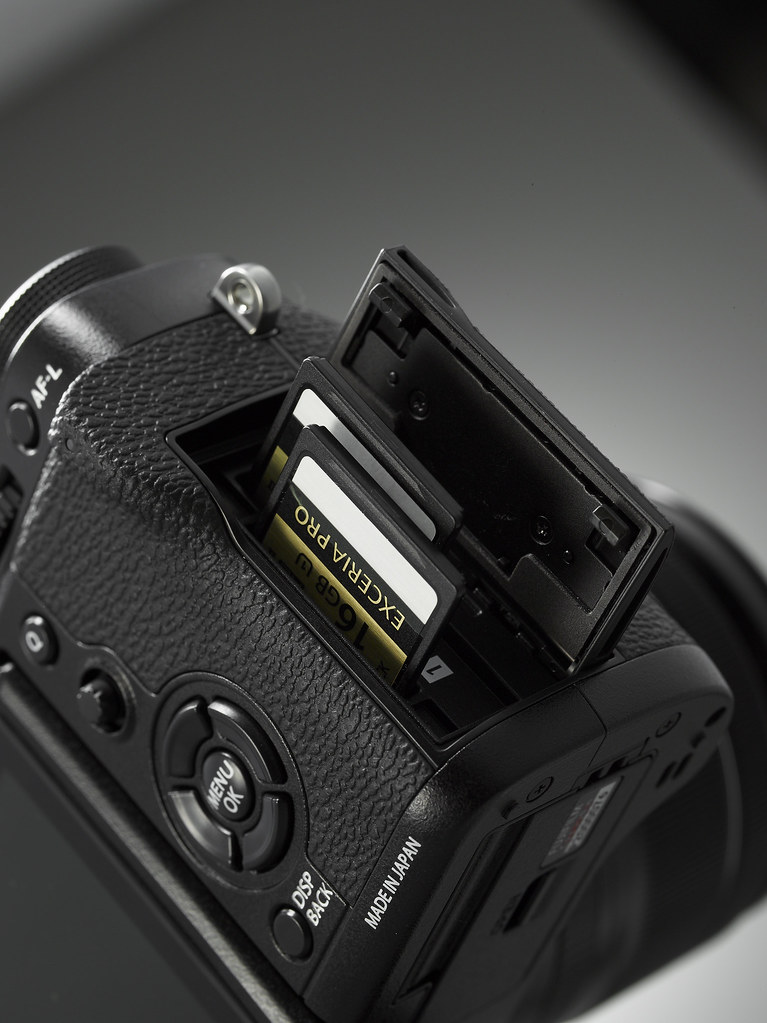
For maximum data throughput and data security, the X-T2 contains two UHS-II-compatible memory card slots
Having two slots can bring peace of mind, especially when you use them in Backup mode. In this setting, the camera is writing all image data to both card slots simultaneously, basically making on-the fly copies of everything you shoot. There’s also a Sequential mode that works like a one-slot camera, but with a readily available second slot once your primary card is full. In my tests, automatic switching from a full card in slot 1 to a still empty card in slot 2 worked like a charm.
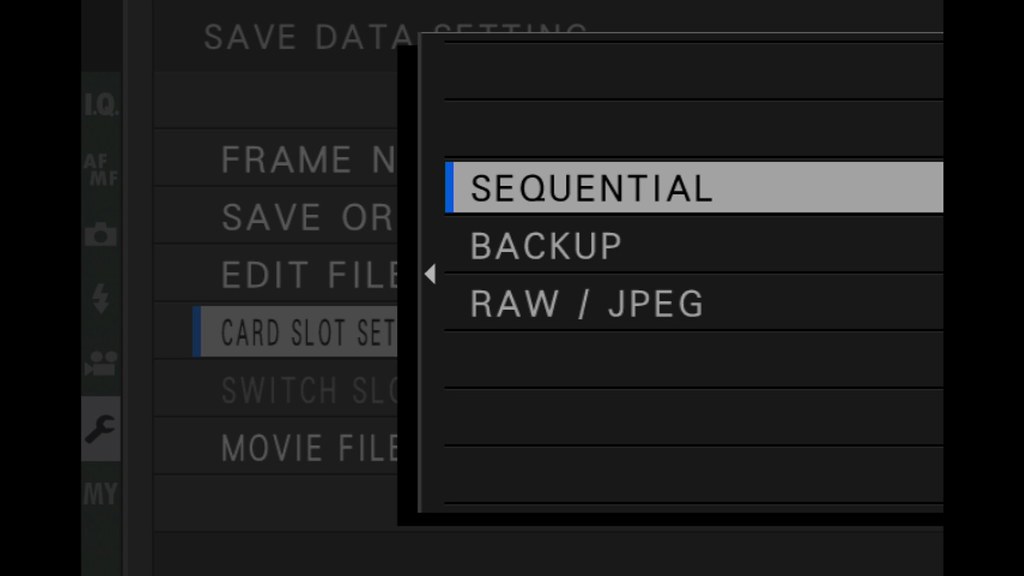
When you are working with two memory cards, you have three data saving options: SEQUENTIAL is the default setting and works like single-card mode, BACKUP saves a duplicate copy of the image data on the second card, and RAW / JPEG saves RAW files in the first and JPEGs in the second slot.
RAW / JPEG is an interesting setting for FINE+RAW shooters lusting for maximum performance. In this mode, RAWs are transferred to slot 1 (where I use a super-fast Lexar Professional 2000x UHS-II card), while my FINE-quality JPEGs are simultaneously transferred to slot 2 (where I use a “regular” UHS-II card like the SanDisk Extreme Pro UHS-II or Toshiba Exceria Pro). This is the fastest setup for anybody who wants to work with RAWs and high-quality JPEGs, and it’s also pretty secure, because if one card (or slot) fails, you’ll still have either the JPEGs or the RAW files on the other card. In this mode—and with the memory card combination I just mentioned—you can actually shoot an endless stream of full-size FINE+RAW images at 5 fps, because the camera’s frame buffer will empty just as quickly as it is restocked.
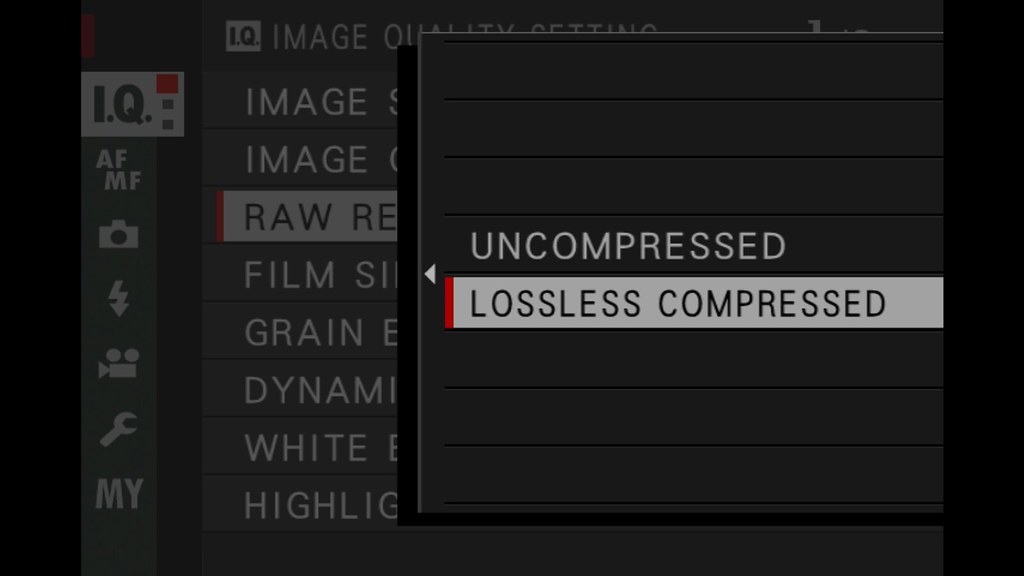
Want maximum performance, minimum file size and zero compromise in image quality? Then select lossless compressed RAWs.
To achieve this impressive performance, it’s mandatory to use the compressed RAW data format, which basically cuts the RAW file size in half (down to 20-30 MB per image). Yes, that’s smaller than the uncompressed RAWs of the 16 megapixel X-T1.Fujifilm’s compression method is completely lossless, so using it takes no toll on image quality. The compression is hardware based and super-fast.
Sadly, a few reluctant RAW converter makers (including Phase One with Capture One) still do not support the compressed format, because they can’t be bothered to include Fujifilm’s free SDK for compressed RAW files in their program code. Fuji-friendly converters such as Iridient Developer, Photo Ninja, AccuRaw and of course Silkypix and Lightroom/ACR fully support the compressed RAW file format, though.
Faster Shutter
The X-T2 is Fujifilm’s second camera to feature a new robust focal plane shutter with a maximum speed of 1/8000s and improved 1/250s flash synchronization speed. High-speed sync. (HSS) up to 1/8000s is supported with the company’s upcoming EF-X500 flash unit that is supposed to hit the market in concert with the X-T2. Despite the speed gain, the new shutter is of the low-vibration kind (hence no shutter shock effect), and it isn’t louder than the previous model. It’s rated for at least 150,000 shots.
New focal plane shutter with 1/8000s max. shutter speed and 1/250s flash sync. speed
In case 1/8000s isn’t fast enough, there’s also a silent electronic shutter with a maximum speed of 1/32000s. Flash isn’t available in concert with the electronic shutter, but AF-C tracking in burst mode is. Since the sensor readout speed has doubled in comparison to the X-T1, it’s clear that rolling shutter effects are less of an issue than they used to be. In electronic shutter mode, the maximum continuous burst rate is 14 fps, and it is readily available in normal (non-Boost) mode without the Vertical Power Booster Grip.
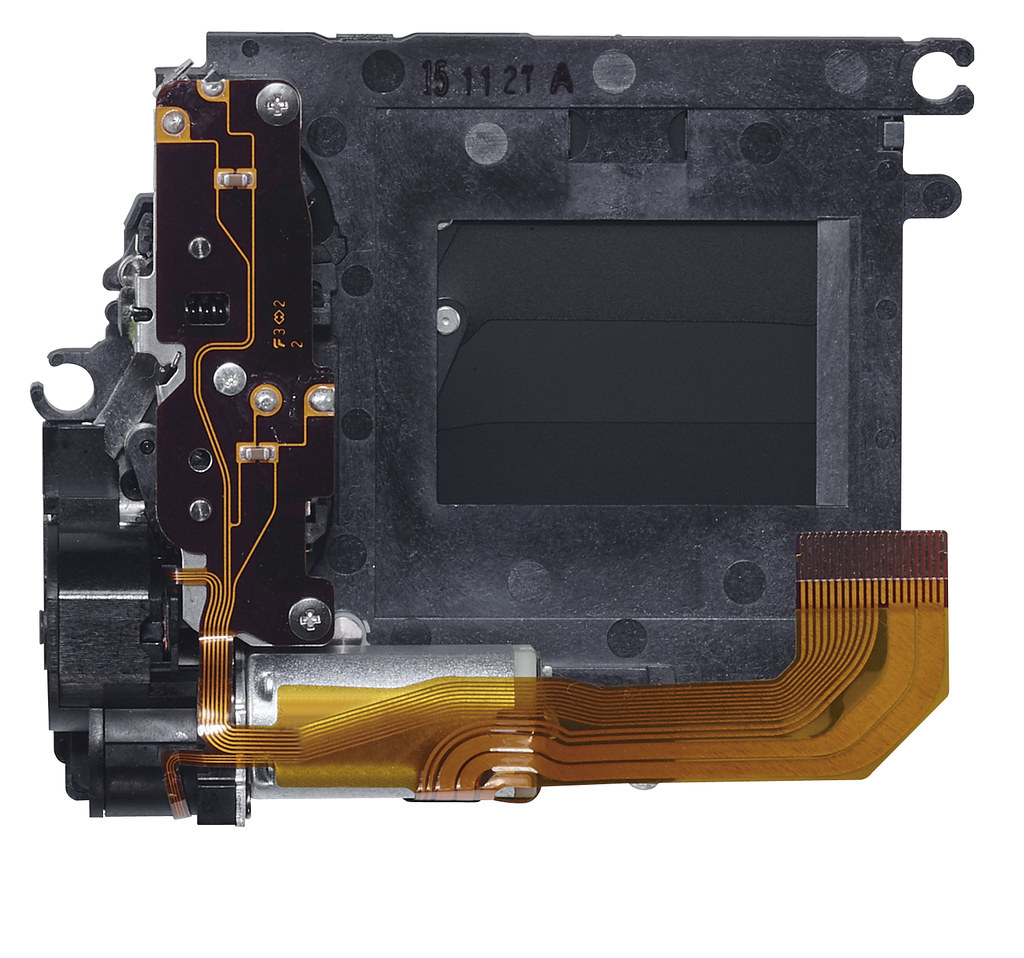
New Sensor
The Sony-built 24.3 MP sensor in the X-T2 is a leap forward, especially when it comes to taking images of fast moving subjects. That’s not surprising, since the previous X-Trans CMOS II sensor was introduced in early 2013 with the X100S (and was apparently based on the Sony IMX071 sensor, a popular workhorse from 2011 that was used by companies like Sony, Nikon, Pentax, Leica and, of course, Fujifilm).
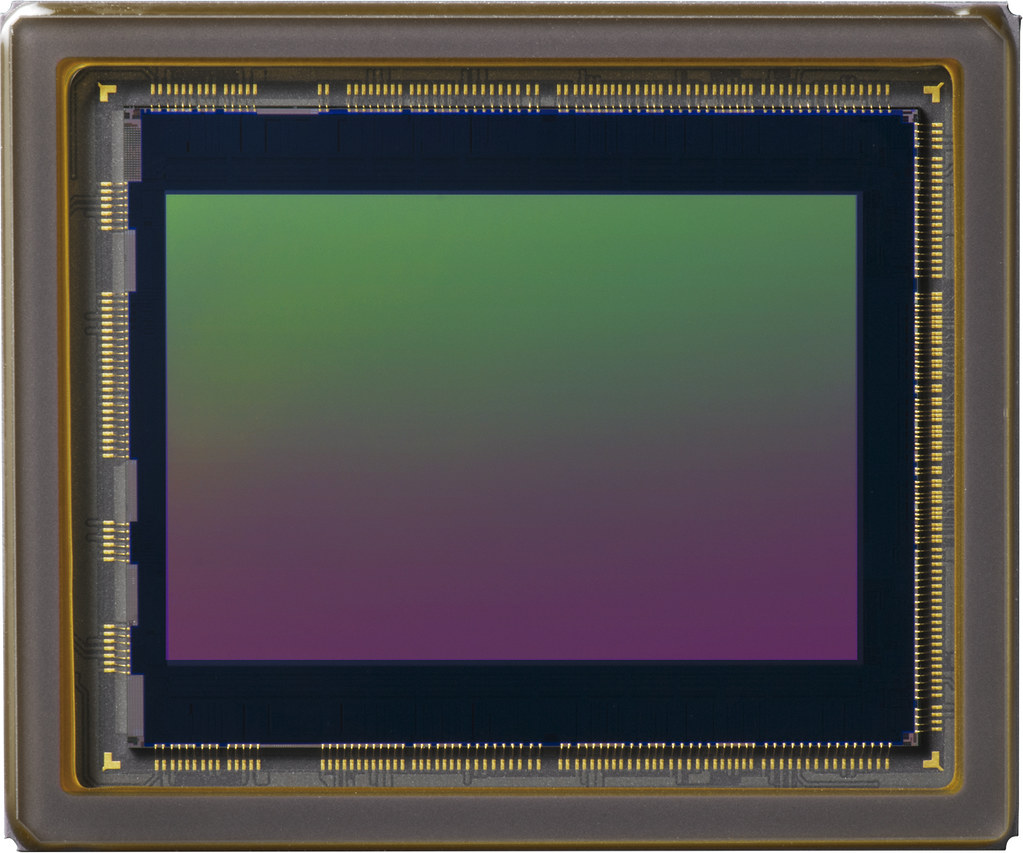
The almost ISOless X-Trans CMOS III sensor features a larger PDAF area, a reduced readout time, increased dynamic range and very low read noise
Sensor readout is now twice as fast (despite the larger pixel count). This means that everything else gets faster, too: autofocus tracking performance and speed, EVF frame rate, electronic shutter readout, blackout time—you name it.
Luckily, fears that the higher pixel count would negatively impact noise (and with it high-ISO and dynamic range) performance are unfounded. Quite to the contrary: Normalized to 16 MP, the X-T2 outruns previous 16 MP cameras by about 1 EV, so you can set the camera to ISO 12800 and still get results that look as clean as those taken with ISO 6400 and the previous sensor generation. In fact, an ISO 12800 image from an X-T2 that has been downscaled to 16 MP will still reveal better detail resolution than an original ISO 6400 image of the same scene from an X-T1.

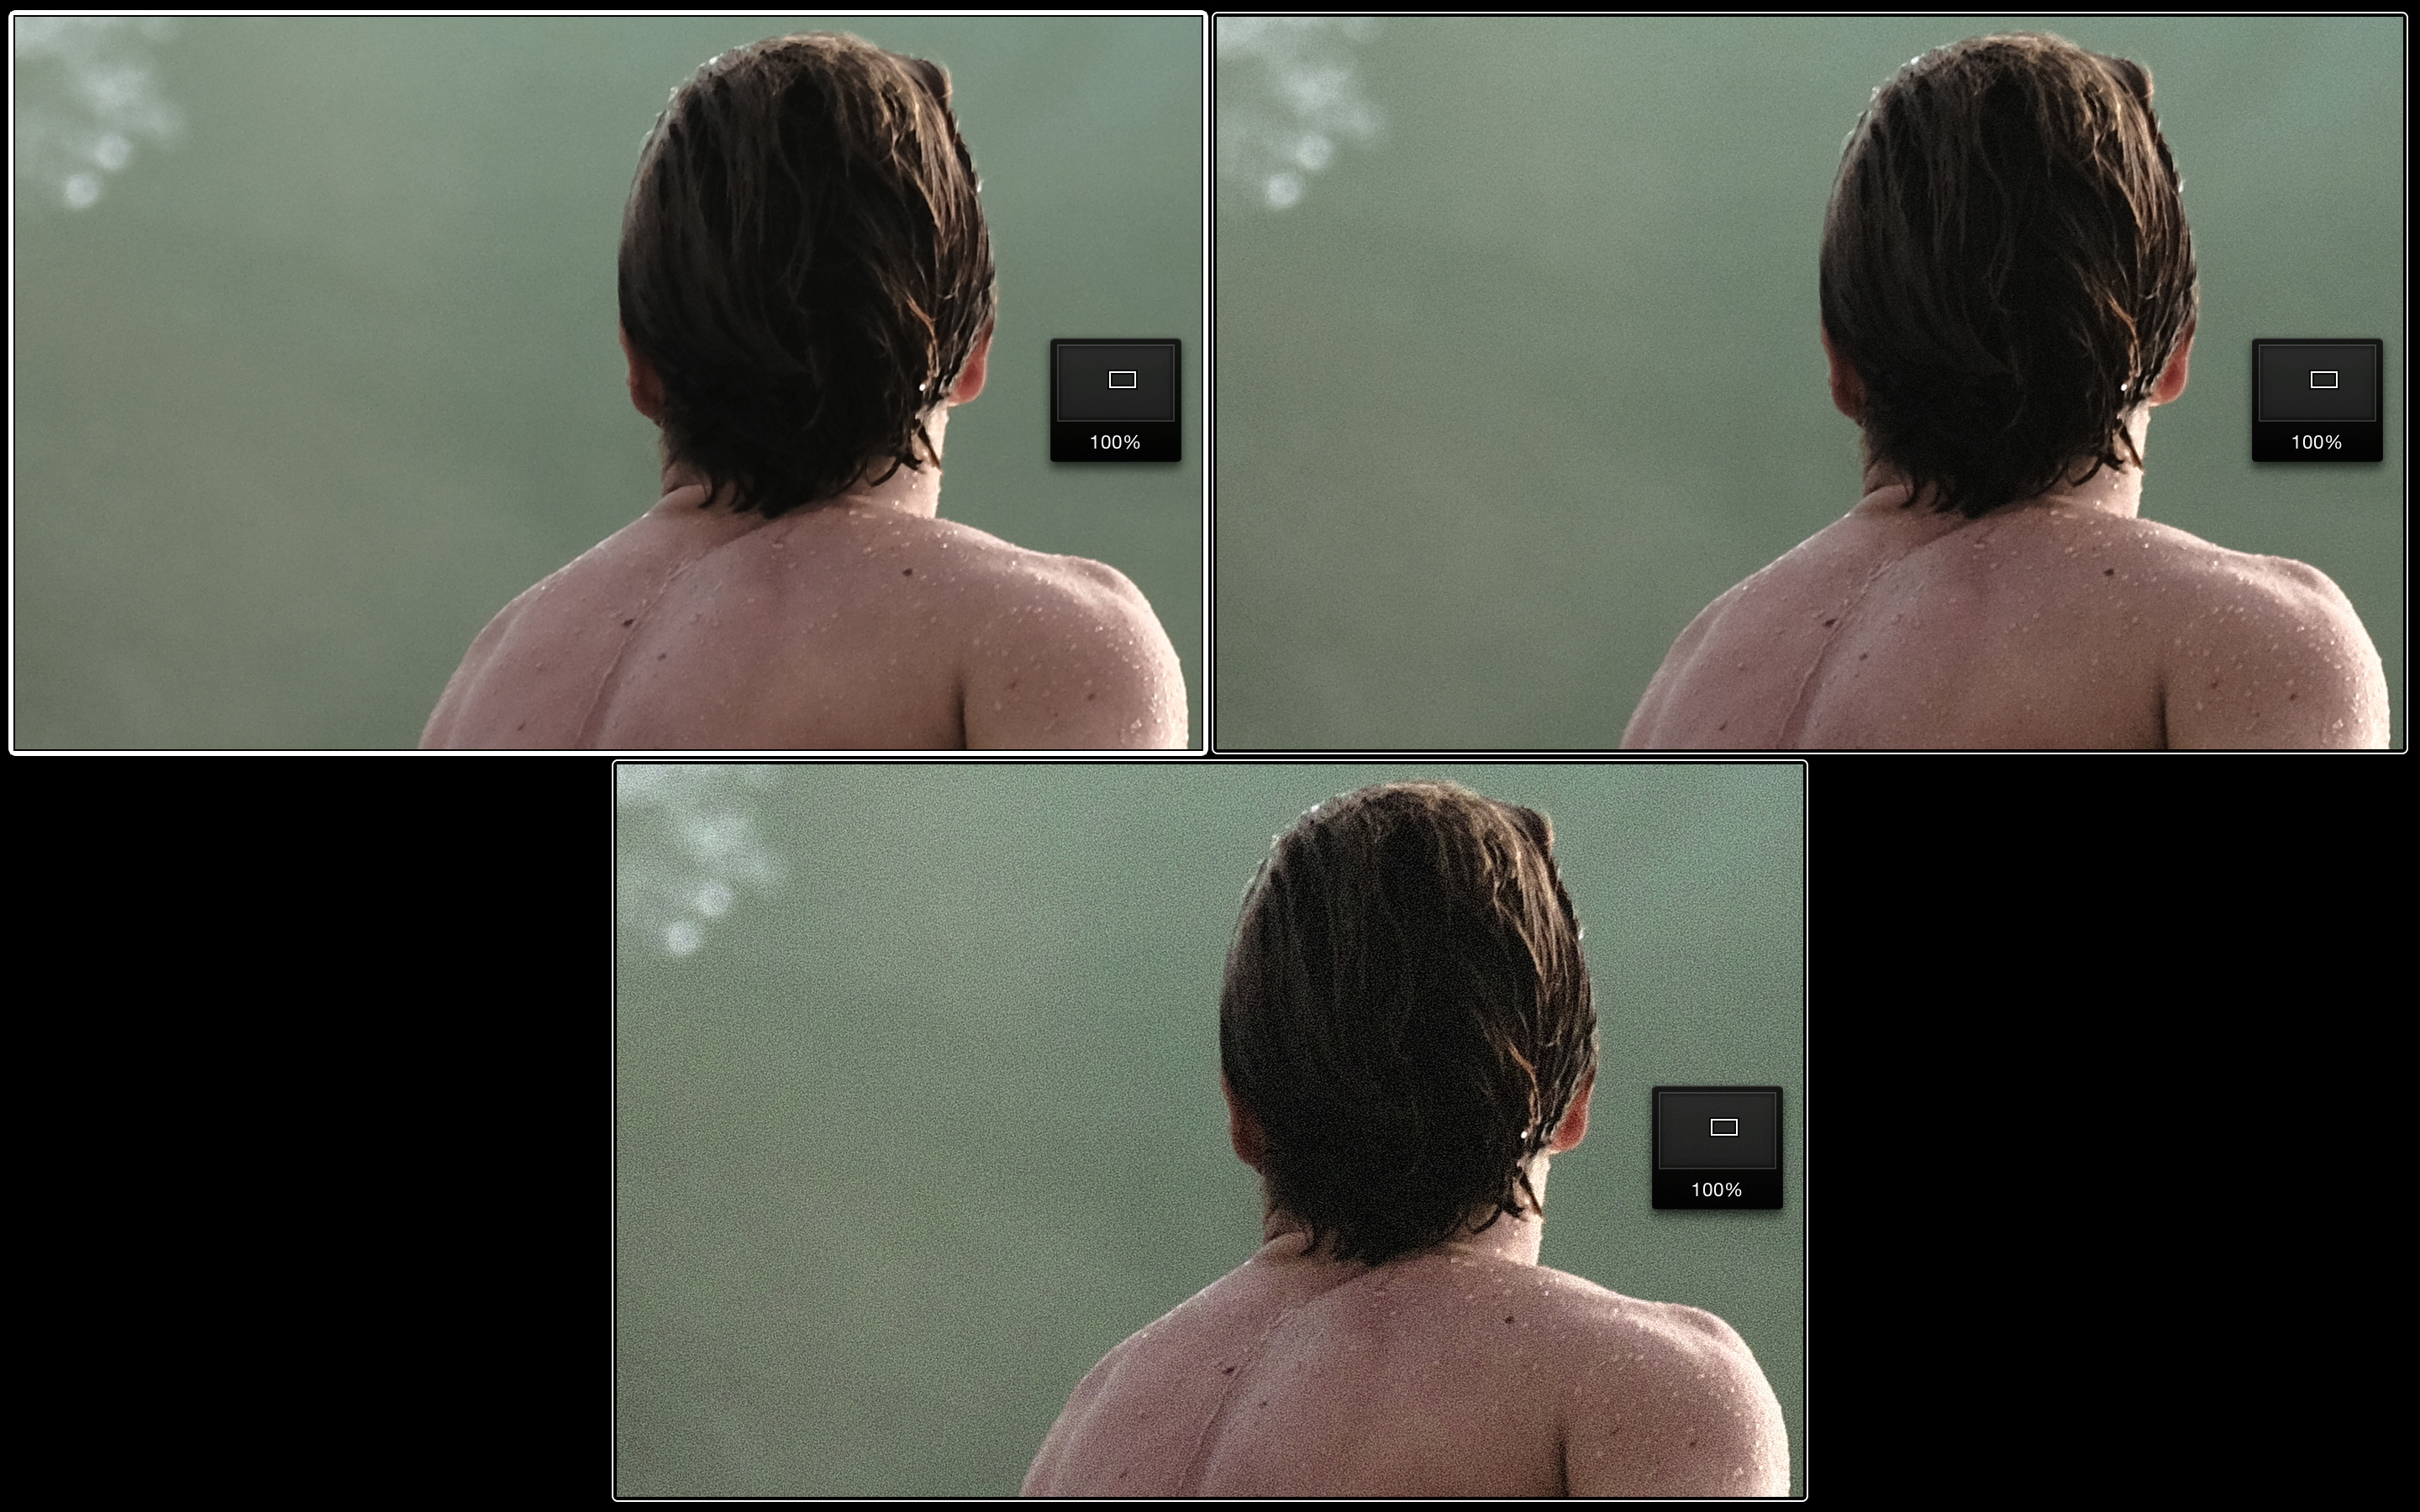
Here’s an example based on the popular dpreview studio scene: X-T1 @ ISO 6400, f/5.6, 1/2500s (left) vs. X-T2 @ ISO 12800, f/5.6, 1/5000s (right). I processed both sample RAW files in Adobe Lightroom 6.6 using default settings and normalized them for exposure (brightness) and resolution (16 MP). Please make your own comparisons here at dpreview by downloading original RAW files and processing them in your favorite RAW converters.
AF on Steroids
As far as autofocus performance goes, the larger PDAF area on the sensor makes it easier to track moving subjects across the frame. About 40% of the sensor area (a large square area in the middle) are now equipped with fast PDAF pixels that allow predictive AF tracking with up to 11 fps (or even 14 fps in electronic shutter mode).

DRIVE SETTING allows you to set different burst rates for continuous mode: 3, 4 or 5 fps in CL mode and 8, 11 or 14 fps in CH mode. PDAF tracking is supported at all six burst rates, but a live view real-time display and the outer CDAF-only AF frames are only available using the three slower CL speeds. The maximum burst rate of 14 fps is only available when the electronic shutter is in use, and it doesn’t require Boost mode or the optional vertical grip. Without the Vertical Power Booster Grip, 11 fps bursts are also limited to the electronic shutter, so if you want to shoot 11 fps with the mechanical shutter, the Vertical Power Booster Grip is mandatory and has to be set to Boost. Burst rates of 3, 4, 5, and 8 fps are always available with any shutter type and don’t require Boost mode or the power grip.
The live view supports burst rates of 3, 4 or 5 fps with a blackout time of only 0.114s. This means that even at 5 fps, you can follow moving subjects in the viewfinder with far less effort than in the X-T1.
The real-time live view image at burst rates of up to 5 fps is quite helpful when you are tracking subjects that move fast and unpredictably
Let’s look at a few numbers to make this clearer: Set to 3 fps in “CL” mode, the X-T1 and X-T2 take three shots per seconds—that’s a time window of about 0.33s per shot. During this brief period, the X-T1 spends 0.28s blacking out the EVF, so only 0.05s remain to actually display a live view image that the photographer—and the camera’s AF system—can use to spot and track the subject. That’s only 0.05s to track a fast moving object and predict its position for the next shot.
The X-T2 is significantly faster, because it only spends 0.114s of the 0.33s time window blacking out the EVF. This means that the live view is available over a period 0.216s. That’s 4.3 times as long as in the X-T1. This positively affects both the performance of the AF system and of the photographer behind the camera.

X-T2, XF18-135mmF3.5-5.6R LM OIS WR, AF-C tracking @ 5 fps
But wait, there’s more! Since the viewfinder of the X-T1 updates with “only” 54 fps, while the EVF of the X-T2 can update as fast as 100 fps, the AF system in the X-T2 can also take a higher number of measurements per second, which results in better subject tracking resolution.
Highly accurate focus has always been the domain of mirrorless cameras. With its fast AF tracking system and significantly reduced live view blackout times, the X-T2 now also brings speed and usability to the table.
End of story? Not quite, because Fujifilm also changed the autofocus algorithm to be faster and more effective:
- The camera’s maximum AF speed is 0.06s and the preferred phase-detection autofocus method (PDAF) is used twice as often as before (according to Fujifilm, PDAF is now used in 2/3 vs. a previous 1/3 of all instances).
- The improved AF algorithm is better at focussing on specular highlights and low contrast subjects, and it’s also better at catching high-frequency subjects such as animal hair.
- Last but not least, the X-T2 now remembers the last-used focus distance after a restart.
Face/eye detection has been improved, as well: For example, “Auto” eye-detection mode has become better at recognizing the eye that’s closer to the camera. However, face/eye detection is still limited to the slower contrast detection autofocus (CDAF) method, giving the X-T2 a disadvantage against some high-end cameras from Sony. Until a firmware update changes this, I recommend face detection for non-moving subjects only.
Automatic eye-detection is supposed to look through glasses and lock on the eye that’s closer to the camera. While this often works, I usually prefer a hands-on approach: using the smallest version of one of the X-T2’s up to 325 Single Point AF frames. Thanks to the new focus stick, navigating focus frames is now much easier than with the X-T1.
Here’s some good news, though: The X-T2 is Fuji’s first camera to allow the use of the AE-L function (exposure lock) when face or eye detection are active. This means that the correct exposure can be locked for a series of consecutive portrait shots (but it can still be adjusted with the exposure compensation dial).
The improved autofocus system of the X-T2 will also find its way into the X-Pro2. A firmware update (version 2.00) has been scheduled for October 2016.
Focus Modes
The X-T2’s focus modes include AF-S, AF-C and MF with the familiar Single Point, Zone and Wide/Tracking options, but the interface is more streamlined than in the X-T1. 91 AF frames (including 49 PDAF frames) are now available in all three modes. In Single Point mode, there’s also an option with 325 focus frames (including 169 PDAF frames). Each focus frame is available in five different sizes, covering the image area without gaps.
The X-T2’s basic focussing modes AF-Single, AF-Continuous and Manual Focus are accessible via a dedicated selector dial at the body’s front. These basic AF modes can be combined with either Single Point, Zone or Wide/Tracking AF modes.
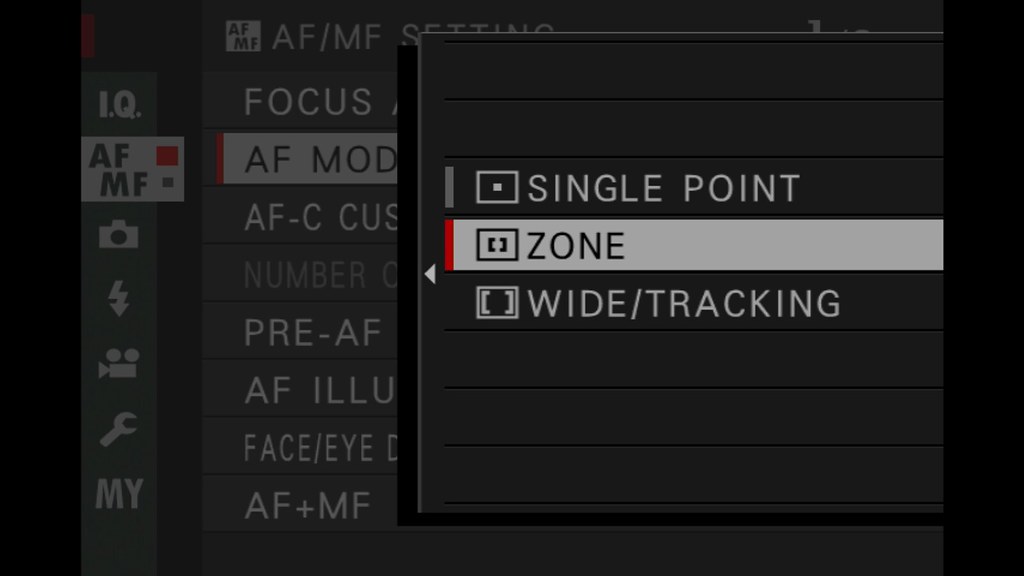
AF modes Single Point, Zone and Wide/Tracking (which actually means Wide-AF when used with AF-S, and Tracking-AF when combined with AF-C) can be selected in the AF/MF Setting menu, or preferably via a dedicated Fn button


In Single Point mode, you can select a focus frame from a matrix of either 91 or 325 points (top). Each focus frame is available in five different sizes (bottom).
Zone mode offers larger focusing areas that can consist of either 3 x 3, 5 x 5 or 7 x7 focus points. The built-in focus stick is ideal for quickly adjusting the position of a focus frame (or zone) in eight directions.
If you aren’t familiar with the various modes of Fujifilm’s autofocus system (or need a quick refresher), please click here for a description of all available modes and combinations.

Modern mirrorless cameras cover the entire image frame with virtual focus frames. In the X-T2, there are up to 325 frames to choose from. This means that the error-prone focus and recompose method from the old (D)SLR days is becoming obsolete. Instead, you can (and should) first compose the picture and then use to focus stick to quickly move and resize the focus frame for pin-point focus and exposure.
Manual Focus
Manual focusing has been improved, as well. You can choose between two different electronic depth-of-field scales:
- a conservative “pixel based” scale that shows the focus distance range that will be as sharp as the sensor can resolve it
- a much less (about 4.5 stops) conservative “film format based” scale that’s reminiscent of the old analog film days and matches the engraved DOF scale on Fuji’s clutch-type 14mm, 16mm and 23mm wide-angle prime lenses

Comparing hyperfocal distance settings: the larger focus distance strip is using the outdated “film format based”, the smaller one the more accurate “pixel based” electronic distance and DOF scale
Unlike the X-T1, clutch-type lenses set to MF mode don’t hide the electronic distance / DOF scale in the X-T2, so you can use the more accurate electronic scale to fine-tune manual focus, set a hyperfocal distance or set-up a manual focus distance zone.
It’s important to understand that with a sensor pixel pitch of 3.91 µm, diffraction blur is kicking in around f/9. The camera’s Lens Modulation Optimizer (LMO) can push this threshold back one stop, but the LMO only works with JPEG output from the camera’s built-in RAW converter, not with external RAW converters such as Lightroom/ACR, Iridient Developer, Photo Ninja, Silkypix or AccuRAW.
DSLR-Style Focus and Exposure Features
Fuji’s X-T line of cameras—and particularly the new X-T2—have been designed to appeal to DSLR users and converts. This means that many users expect their mirrorless camera to behave just like a DSLR, while at the same time it shall offer all advantages of mirrorless technology. In the X-T2, Fujifilm is catering to such demands by implementing several DSLR-specific features:
- Half-pressing the shutter button (and keeping it half-pressed) can be decoupled from initiating an autofocus run or from metering and locking the exposure.
- Any Fn button can turn into an AF-ON button. AF-ON is a popular DSLR feature that activates the autofocus (AF-S or AF-C) as soon and as long as the AF-ON button is pressed.
- After taking a shot, releasing the shutter button only halfway back to its half-pressed position (instead of fully letting go) retains focus and exposure of the previous shot for your next shot.
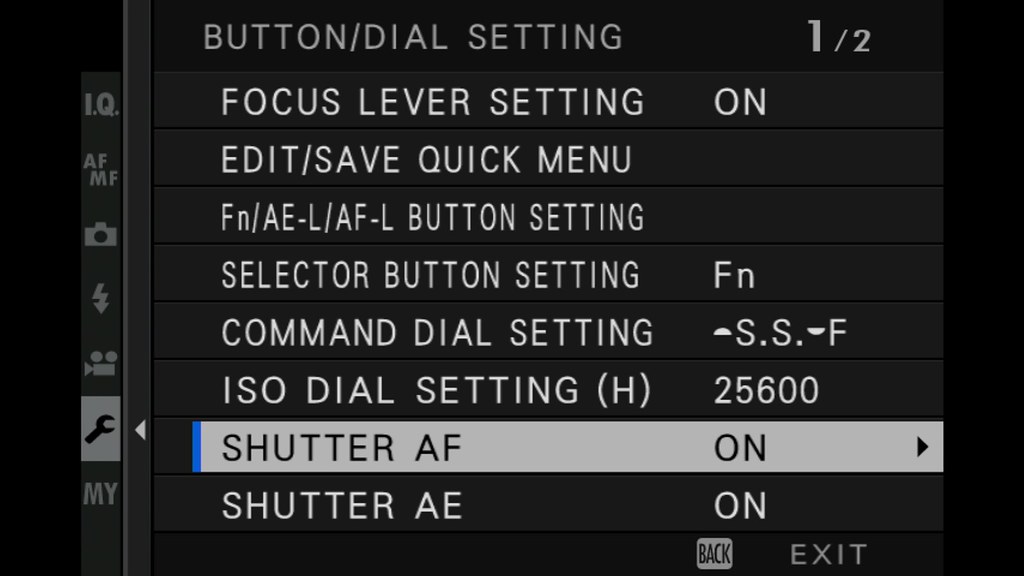
The Shutter AF and Shutter AE settings offer a personalized configuration of what the half-pressed shutter button should or shouldn’t do. Turning Shutter AF OFF means that half-pressing or fully pressing the shutter button won’t initiate an autofocus run. Turning Shutter AE OFF means that the camera will meter the exposure only in the very instant before a shot is actually taken (instead of metering and locking the exposure when the shutter is half-pressed). When Shutter AE and Shutter AF are set to ON (which is their default position), taking a shot and then releasing the shutter button halfway back to the half-pressed position will retain the focus and exposure settings of the previous shot for the next shot.
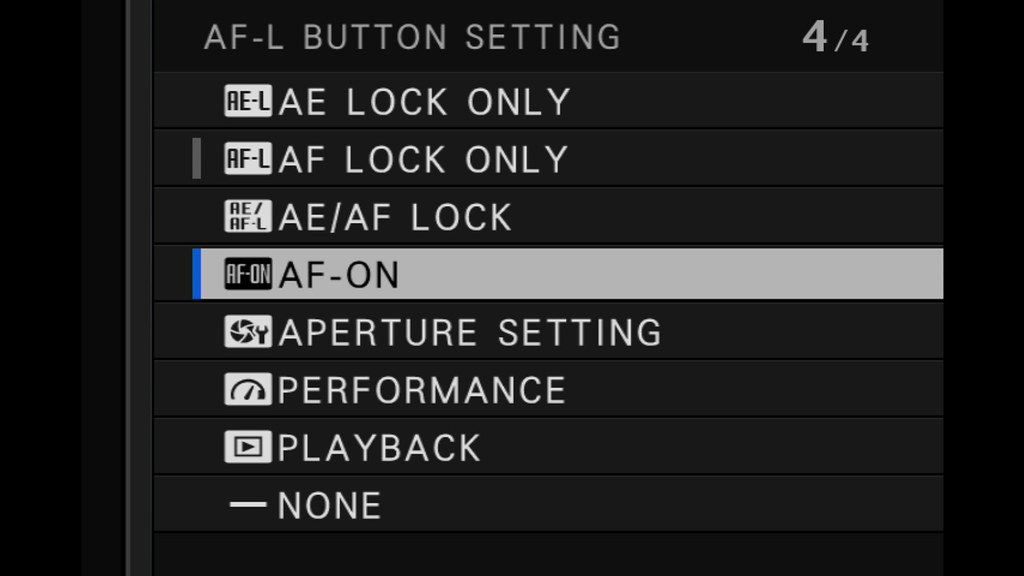
The AF-L and AE-L buttons are now regular Fn buttons that can assume one of 32 different functions, so DSLR fans can turn the AF-L button (or any other Fn button) into an AF-ON button. This is particularly useful when Shutter AF has been turned off.
AF-C Custom Settings
Don’t let its retro design fool you: The X-T2 is built and marketed as a mirrorless “ready for action” camera, so Fujifilm has made an effort to not only maximize AF performance, but also to include several Canon-like options to customize AF-C behavior. In the new AF-C Custom Settings menu, you have a choice between five pre-configured presets and one option where you can define your own custom preset based on three different parameters.

In the new AF-C Custom Settings menu, users have a choice between five presets that are based on commonly encountered sports and action shooting situations. There’s also a sixth option where users can adjust three different AF-C parameters (Tracking Sensitivity, Speed Tracking Sensitivity and Zone Area Switching) to their own liking.
Sounds complicated? Don’t let the many options intimidate you. Think of them as a ladder with three steps:
- Step 1 is using preset number 1, which is the default Multi Purpose setting. In this configuration, the AF-C of the X-T2 behaves very much like an X-Pro2, just faster and more accurate (at least until the X-Pro2 gets its promised October firmware update).
- Step 2 is using one of the five pre-configured AF-C presets to better adjust your autofocus to the photographic task at hand. While the camera is offering brief explanations of each preset, Fujifilm has compiled a more comprehensive online guide that you can (and should) read by clicking here.
- Step 3 involves building your own AF-C preset by manually adjusting Tracking Sensitivity, Speed Tracking Sensitivity and Zone Area Switching. Again, the Fujifilm folks try to be helpful by explaining these parameters on their dedicated AF system special site.
That said, the X-T2 also illustrates what the three AF-C parameters are doing in three animated menus:
Adjusting Tracking Sensitivity is useful when the subject you are tracking disappears behind an obstacle, goes out of the frame or when a second target at a substantially different distance from the subject comes into the frame. Selecting 0 makes the camera switch its focus immediately, while choosing 1-4 progressively lengthens the time it will retain focus on the original subject.
Speed Tracking Sensitivity defines the camera’s tracking characteristics based on changes to the subject’s speed. Selecting 0 (constant speed), the camera does not consider a change of speed when predicting subject movements. Choose 1 or 2 (variable speed) and the camera takes speed changes into account when predicting subject movement, making it more suitable for accelerating or decelerating subjects.
Zone Area Switching is only available in Zone AF mode, and allows you to specify which part of the selected focusing zone should be given focusing priority. Select CENTER to maintain focus in the middle of the frame, or FRONT to switch the focus to a target at the edges of the frame when the original subject moves out of shot. AUTO tracks the subject you first focused on.
Please note that while the promised October firmware update for the X-Pro2 includes the faster AF system of the X-T2, it is not supposed to include the AF-C Custom Settings.

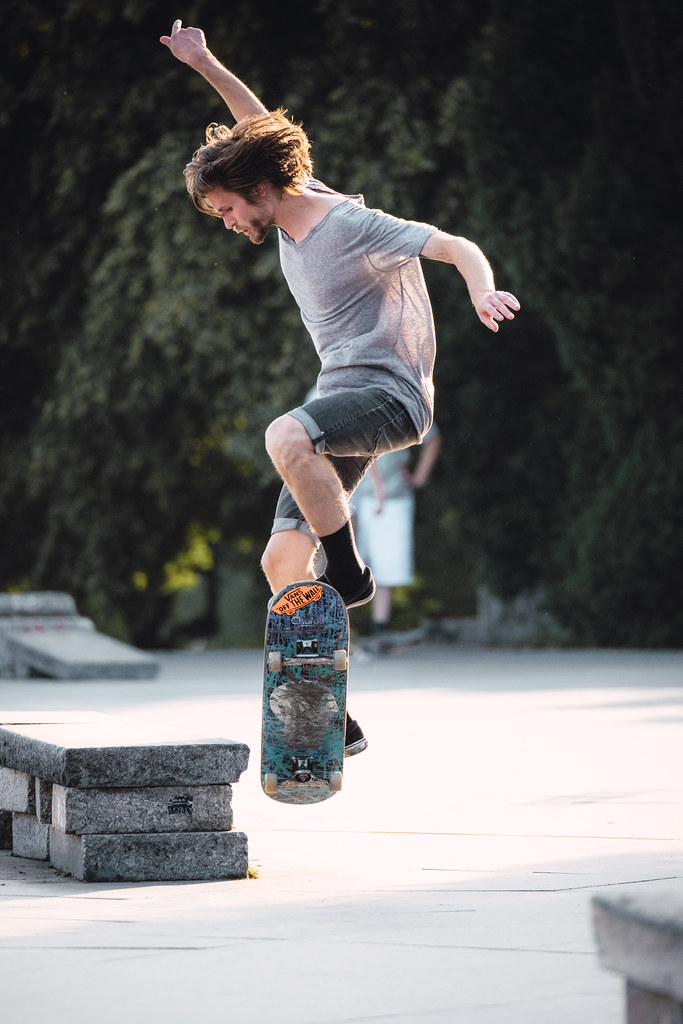
Views over Prague from the Metronome park
To test speed and accuracy of the improved AF-C tracking system, I climbed to up to the Metronome park in Prague (okay, I actually hauled an Uber). This location offers stunning views over the city, and it also hosts an area for skateboarders, which are an ideal target for AF-C tracking tests.

Skateboarders at the Metronome park
Using XF50-140mmF2.8 R LM OIS WR and XF100-400mmF4.5-5.6 R LM OIS WR “red badge” lenses, the autofocus of my early pre-production camera with very unfinished beta firmware didn’t have problems capturing the skaters there. Trying not to complicate things, I used the default General Purpose AF-C preset 1 and Zone-AF with the default (3 x 3) zone size for targeting.

A quick series of AF-C tracking shots with Zone-AF at 5 fps—and with a perfect keeper score of 100%
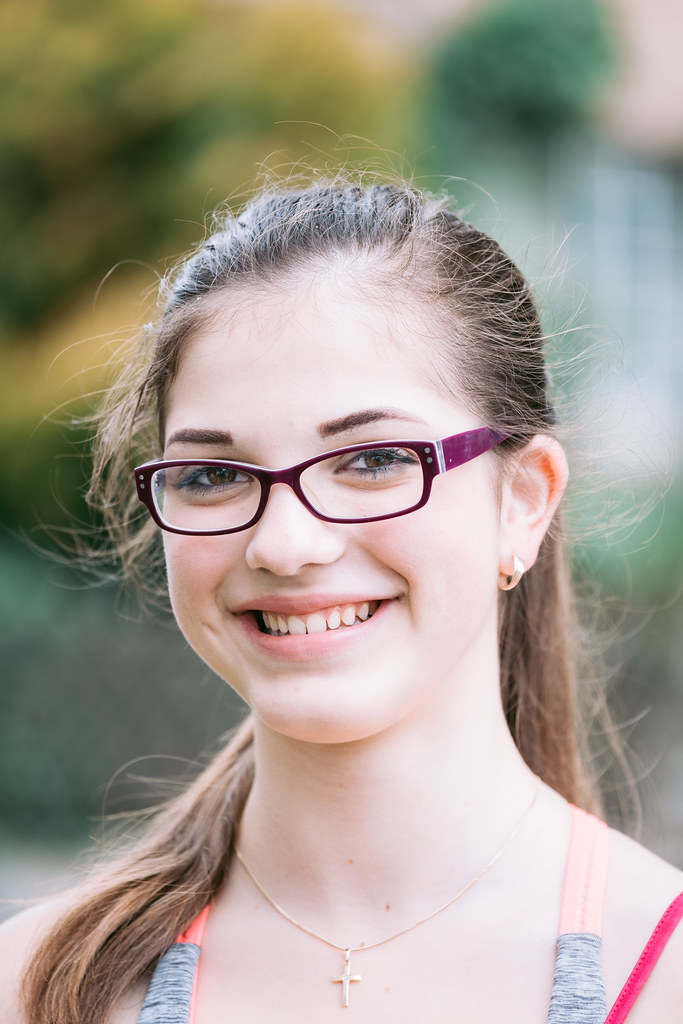
Back at home, I tried shooting moving subjects with minimal depth-of-field, making pin-point focus accuracy a priority.
Shooting close-ups of moving subjects with 140mm at f/2.8 (= very limited depth-of-field) and an off-center autofocus zone, my keeper rate dropped, as I demanded pixel-sharp results on the girl’s right eye. This drop was unavoidable, since even the smallest 3 x 3 zone encompassed the entire face plus parts of the helmet. Since the camera can’t read our minds, the focus will always be somewhere within the 3 x 3 AF zone, but not always on the right eye of the girl. In theory, using Single-Point-AF with the smallest available frame size could improve focus accuracy. However, even very experienced users will find it difficult to keep such a small AF frame exactly pointed on the eye of a moving subject. Still, as you can see in the above example, I managed to extract ten pixel-sharp results from a quick series of images that were taken at 5 fps. Click on the animated GIF images to review full-size samples of both AF tracking series.
Vertical Power Booster Grip
I consider the Vertical Power Booster Grip a highly useful addition to the X-T2. The grip makes holding the camera more comfortable, especially when it’s used with larger and heavier lenses. To make shooting upright easier, the vertical grip mirrors the shutter button, both command dials, the focus stick, the AE-L, AF-L and top-plate Fn buttons (each button can assume one of 32 different Fn functions, including NONE), and the Q menu button.
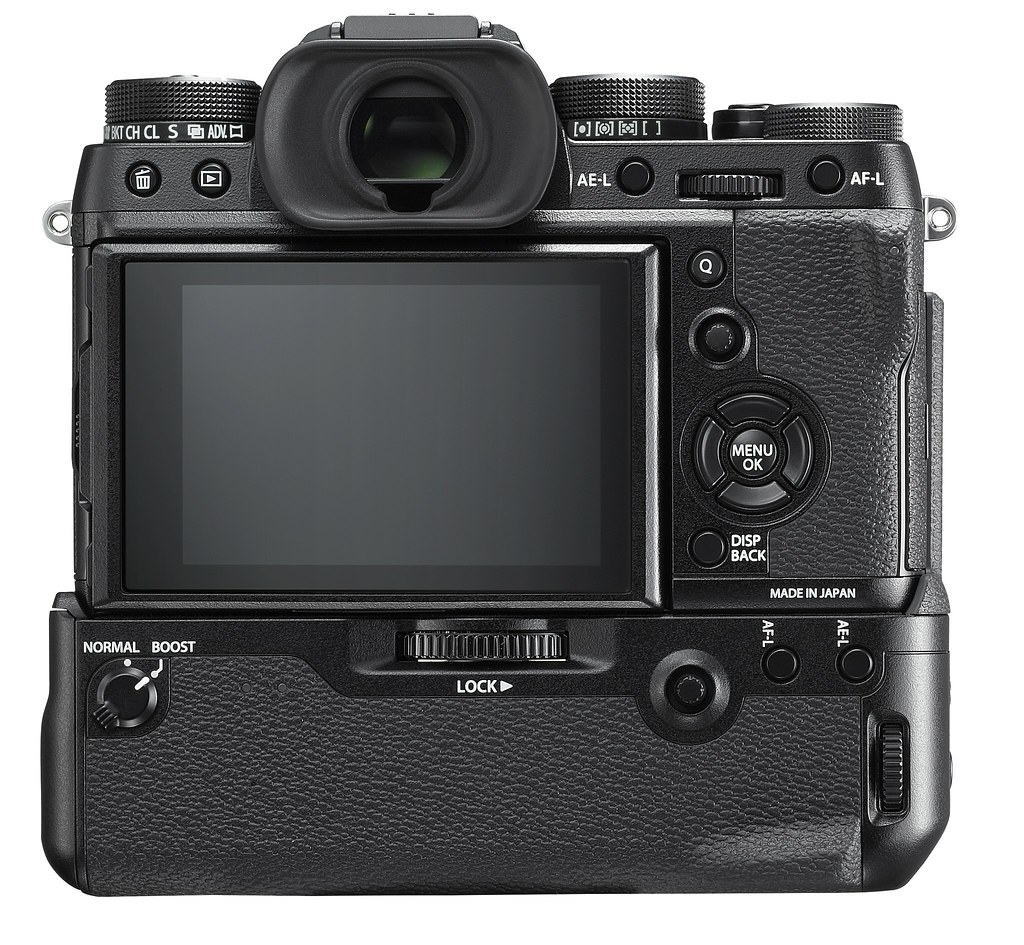
X-T2 with Vertical Power Booster Grip
There’s also a dial to quickly switch between Normal and Boost mode, and there’s a mechanism to lock all buttons and dials on the vertical grip. The grip features a 3.5mm headphone output and a 9V power input, and it can host one or two additional batteries. With a total of three batteries (one in the camera, two in the grip), the X-T2 can last approx. 1000 shots in Boost mode without recharging.

X-T2, XF50-140mmF2.8 R LM OIS WR
If weight is a consideration, you can use the X-T2 with only one or even zero batteries in the grip. You can also work without any batteries at all if you plug-in the 9V power supply that is included with the grip. When the camera is turned off, batteries in the grip will be automatically charged when the external power is plugged in. This won’t charge the third battery residing in the camera body, though. Luckily, the in-camera battery can be charged via an Micro-USB 2.0 or 3.0 cable. So there’s no need to ever remove a battery (or the booster grip) for charging purposes, and you can travel without a dedicated external battery charger. Just bring the provided 9V power supply and any available USB power source to charge up to three NP-W126(S) batteries at the same time.
For upright shooting, the Vertical Power Booster Grip mirrors the command dials, the focus stick and the AF-L, AE-L, Q and Fn buttons from the camera body. There’s also a headphone jack and a 9V power input to charge up to two batteries in the grip or to provide external power for the camera.
These features already set the Vertical Power Booster Grip apart from the more mundane Vertical Battery Grip for the X-T1, which has no charging capability and only hosts one additional battery. However, the most important function of the power booster grip is namely that: its power boosting capability. By drawing juice from two batteries at the same time, the grip increases the performance of the X-T2 in several key areas.
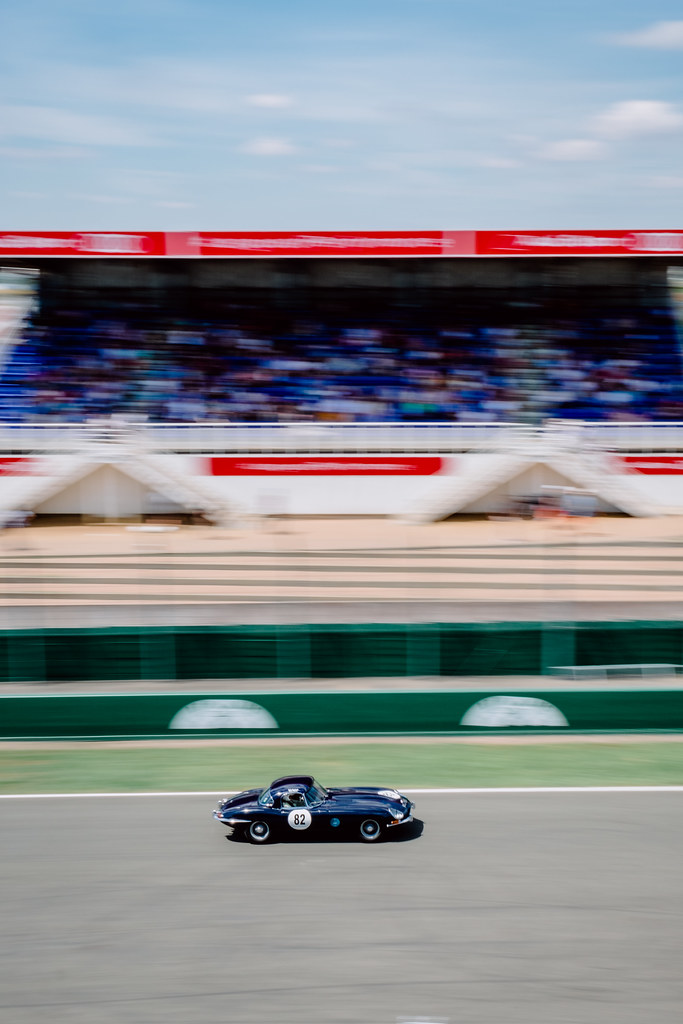
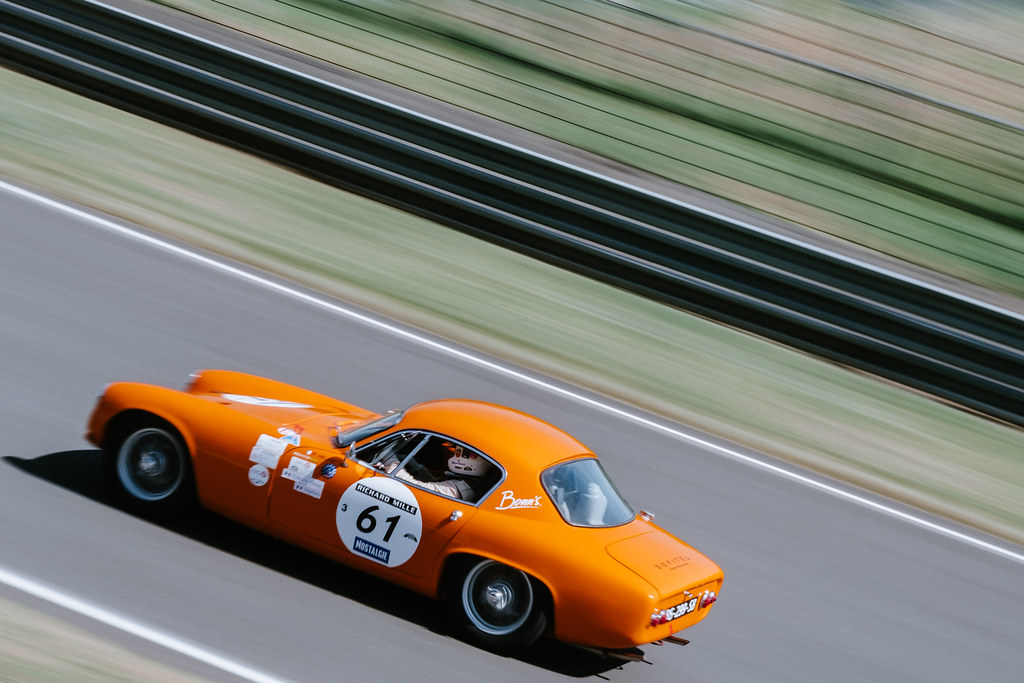
Upright shots (like this panning exercise) come easier with the Vertical Power Booster Grip
To avoid confusion, it’s important to distinguish between the camera’s regular boost mode (without the power grip) and the enhanced boost mode that is only available when the Vertical Power Booster Grip is connected to the X-T2.
Activating Boost mode in the X-T2 without the Vertical Power Booster Grip (body only) brings the following enhancements:
- Maximum AF speed rises from 0.08s to 0.06s. Of course, this specific number only applies to PDAF and certain lenses (usually the XF35mmF2 R) and is a typical “marketing spec”. However, it’s important to understand that overall AF speed and performance are always enhanced in Boost mode. Playing with the camera, you can feel the already fast AF getting even more responsive when Boost mode is enabled.
- The EVF refresh rate is raised from 60 fps to 100 fps. Since the EVF of the X-T2 is a “real-time viewfinder” with a display lag of only 0.005s, a higher refresh rate helps reducing the overall perceived lag. The more frame updates, the better. The higher frame rate also brightens the EVF display a bit.
Activating Boost mode on the Vertical Power Booster Grip offers the following additional advantages:
- The shooting interval (aka the minimum time between two shots in single-shot mode) is reduced from 0.19s to 0.17s.
- The shutter time lag (aka the delay between fully pressing the shutter button and the X-T2 recording the image, provided that the camera has already been “primed” and aperture and focus are in place) is reduced from 0.05s to 0.045s.
- The blackout time (aka the amount of time between two consecutive shots in burst mode during which the live view is unavailable because of the sensor read-out) is reduced from 0.130s to 0.114s.
- The maximum burst rate in high-speed continuous shooting mode (“CH”) is raised from 8 fps to 11 fps when the mechanical shutter is in use. Please note that an even higher burst rate of 14 fps is available in electronic shutter mode—without enabling Boost mode or attaching the Vertical Poser Booster Grip. Unlike previous models (including the X-Pro2), the X-T2 now supports AF-C focus tracking in electronic shutter continuous shooting mode. At least it does in theory, because this feature is still unfinished in the pre-production beta firmware version 1.39 this article is based on. It remains to be seen wether or not AF-C tracking during high-speed continuous shooting in electronic shutter mode will make it into the final product.
- The maximum per-take duration of 4K video recording is increased from 10 minutes to 30 minutes.

X-T2, XF100-400mmF4.5-5.6 R LM OIS WR
Boost mode in concert with the Vertical Power Booster Grip improves the X-T2’s performance in six areas that are critical for sports and action photographers—or for anybody who requires high burst rates, maximum AF performance and minimum response times. If you prefer to take it a little bit slower, you can conserve power by disabling Boost mode, and you can always remove the Vertical Power Booster Grip to use the X-T2 as a compact camera with small primes, such as the XF18mmF2 R, the XF27mmF2.8 pancake, the XF35mmF2 R WR or the upcoming XF23mmF2 R WR and XF50mmF2 R WR lenses.
Enhanced JPEG Engine
The JPEG engine is responsible for converting RAW data into images that feature Fuji’s trademark colors and gradations. Like the X-T10 and X100T (and unlike the X-T1), the JPEG engine (aka RAW converter) in the X-T2 uses very little compression to preserve as much image information as possible. Using the FINE quality setting, the resulting 24 MP JPEGs (6000 x 4000 pixels) are typically larger than 10 megabytes.
The X-T2 uses the same processing engine as the X-Pro2, so their image quality is virtually identical. The JPEG engine offers 15 different film simulations. The six color film simulations have been enhanced by protecting JPEGs against unwanted color over-saturation. Four Acros black-and-white film simulations (regular and with yellow, red or green filter) have been added to the legacy Monochrome modes, and there’s also a Sepia mode that almost nobody ever seems to use.

15 high-quality film simulations are the backbone of Fujifilm’s lauded JPEG engine: Provia, Velvia, Astia, Classic Chrome, Pro Neg. Hi, Pro Neg. Std, Acros (regular and with yellow, red or green filter), Monochrome (regular and with yellow, red or green filter), and Sepia. Click on the animated GIF images to view an album with original full-size versions of the animated sample images.
JPEG parameters in the X-T2 include color space, white balance, film simulation, color saturation, highlight and shadow contrast, sharpening, noise reduction and the Lens Modulation Optimizer. There’s also a new setting to add a film grain effect (weak or strong). Using the X-T2 or X-Pro2, many of the established JPEG parameters can now be changed in a more meaningful way. What used to be adjustable in measures of only ±2 can now be changed in measures of either ±4, or –2 to +4 (with 0 always serving as the factory default setting).
This means that bolder color and contrast setting choices can be applied before or after the fact using the built-in RAW converter. Thanks to the new sensor, the Push/Pull function of the built-in RAW converter allows after-the-fact exposure changes up to +3 EV (Push) and down to –2 EV (Pull).

The Shadow Tone setting (this example shows –2, 0, +2 and +4) affects the shadow contrast of a scene. Highlights remain untouched.

The Highlight Tone setting (this example shows –2, 0, +2 and +4) affects the highlight contrast of a scene, leaving shadow tones untouched

The Color setting (this example shows –4, –2, 0, +2 and +4 in an otherwise default Provia image) affect the color saturation of a scene. Since each color film simulation already comes with a distinct color envelope and contrast curve, you should always decide on a film simulation before making changes to the Shadow Tone, Highlight Tone and Color settings.
With the Grain Effect setting (this magnified X-Pro2 example shows Off, Weak and Strong), adding texture and micro contrast with an analog film grain look is easy. In principle, Grain Effect can be used in concert with all film simulations. However, it shouldn’t be used with Acros, because Acros already comes with its own ISO- and noise-dependent grain.
The most prominent feature of the new JPEG engine in the X-Pro2 and X-T2 is the Acros film simulation, which is loosely based on the analog Neopan Acros black & white film. Acros contains its own adaptive film grain simulation: the higher the ISO setting (and the weaker the noise reduction setting), the stronger the grain effect.
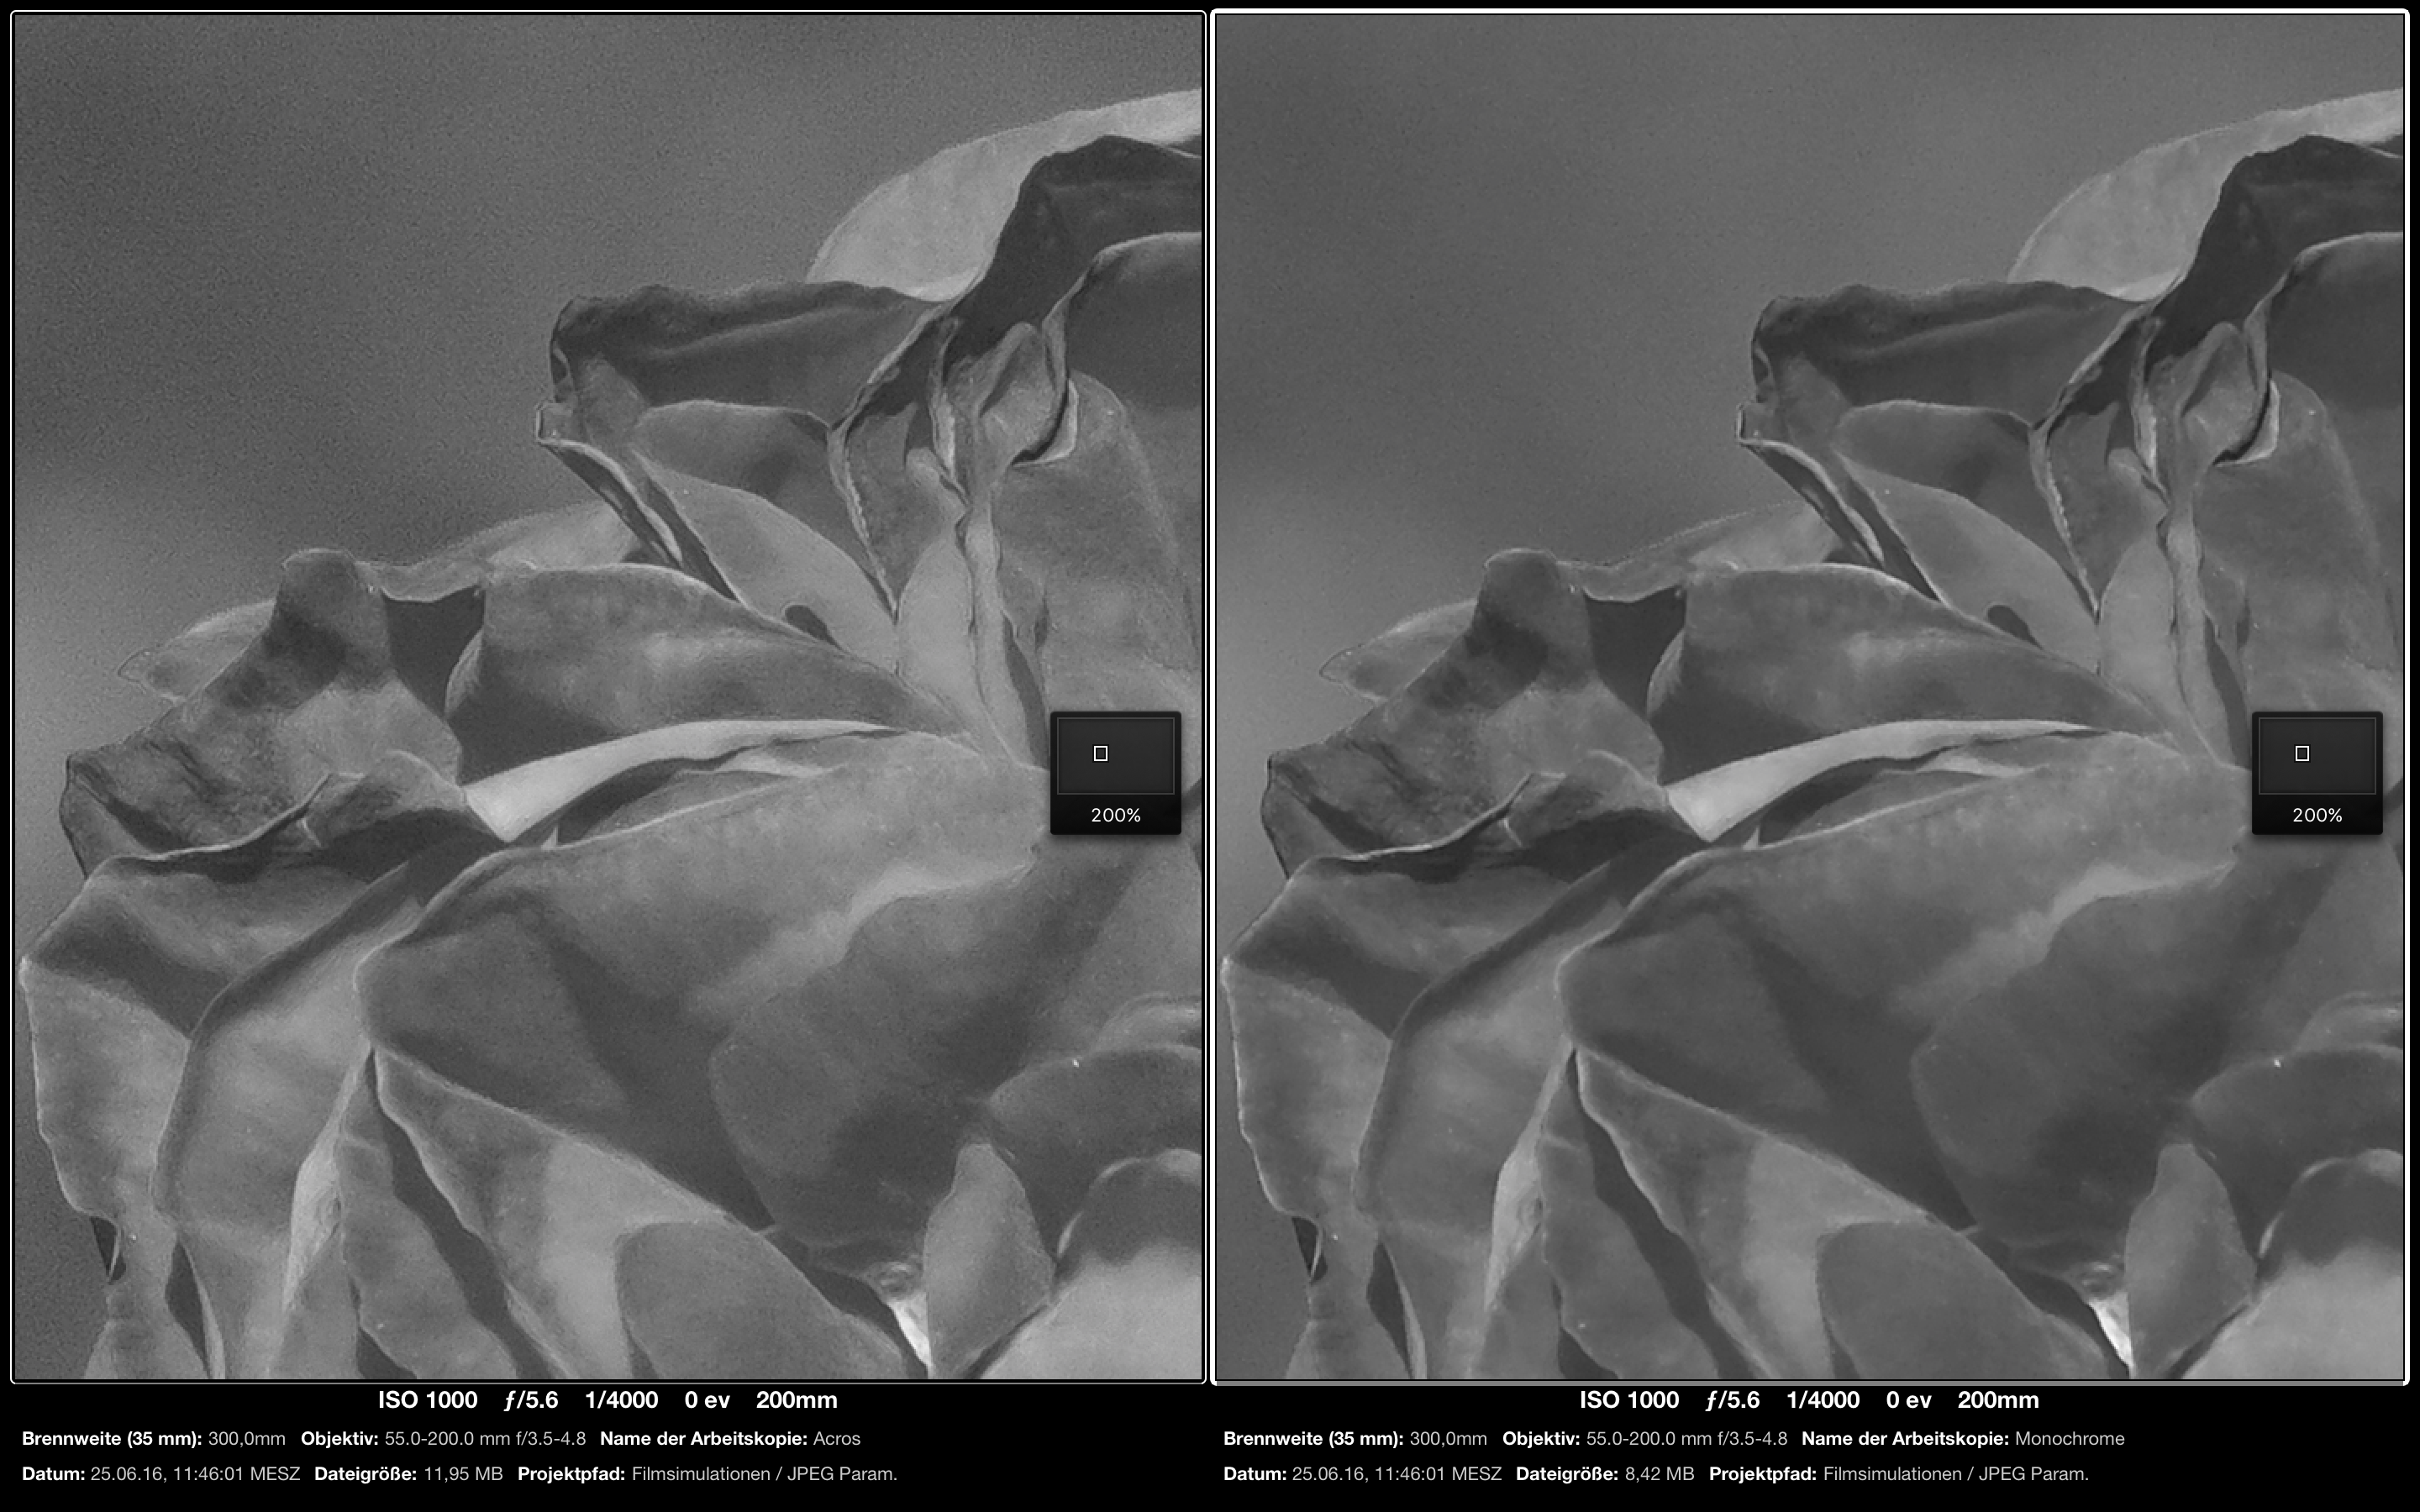
Using Acros, the built-in grain effect intensity changes in concert with ISO and noise reduction settings. In this ISO 1000 example, Acros grain is clearly visible on the left, while the standard Monochrome image on the right offers less texture and less detail, even though both images were processed with otherwise identical JPEG settings.
Dealing with high-ISO shots, organic looking grain can often also be achieved without using the Grain Effect, simply by decreasing the Noise Reduction JPEG parameter to the its minimum setting of –4. The X-T2 exhibits little color noise, and its luminance noise looks similar to film grain. So here we have it: Noise that we can actually like!
Acros is going a step further by using noise shaping to transform noise into a grainy look. This involves some smart processing, because noise is more dominant in the shadow parts of a digital image, whereas the bright parts remain mostly noise-free. The Acros simulation fills those noise-gaps with organic looking artificial grain, and it also makes sure that the tonality of the resulting image doesn’t contain any blocked shadows or blown highlights. No matter what part or tone you look at in an Acros JPEG, there will always be texture.

Comparing Monochrome and Acros versions of the same image, the differences are quite subtle in this animated GIF. The “Acros magic” can be found in little details, especially in the darkest and brightest regions of a shot.

To demonstrate these tonal differences, I have marked blown highlights and blocked shadows in both images. As you can see, the Monochrome version contains blocked shadows (blue) and blown highlights (red), whereas the Acros simulation raises the black point to get rid of blocked shadows and inserts organic looking grain (artificial texture) into regions with blown highlights.

These magnified crops demonstrate how Acros turns noise into organic texture and inserts additonal grain into otherwise noise-free areas with blown highlights: The crop on the left displays a regular Monochrome conversion, the crop on the right displays the Acros version with otherwise identical processing.
Thanks to Fuji’s clever noise shaping, Acros can be used with very high ISO and low noise reduction settings. Click here for an album with straight-out-of-camera Acros images that were shot with ISO settings as high as 12800 and 25600 and processed with minimal noise reduction (–4).
External RAW Conversion
But what about the RAWs? We have already discussed the compressed RAW format that cuts file sizes in half and increases frame buffer efficiency. Another change we mentioned is the fact that RAW files are now available for all ISO settings, including extended ISO settings of 100, 25600 and 51200.
Yet another change affects the contents of the RAW data. In previous X camera models, ISO settings beyond 1600 were realized by pushing the data during RAW conversion. For example, shooting at ISO 6400 meant that the RAW data for ISO 1600 was saved in the file and later pushed +2 EV in the internal or external converter during RAW conversion.

X-T2, XF55-200mmF3.5-4.8 R LM OIS, ISO 12800
This is not the case with the X-Pro2 and X-T2. Instead, these cameras amplify/push the signal to its final ISO destination before the RAW file is created. This puts less burden on the cleverness of external RAW converters, but it also means that high-ISO dynamic range is different from previous models, because gain-related highlight clipping is now already burned into the RAW file—so there’s no going back from overexposure after the fact. To avoid overexposed high-ISO RAWs, I recommend using the camera’s powerful DR function to expand highlight dynamic range by 1 EV (DR200%) or 2 EV (DR400%).
Sadly, not all RAW converters support the compressed RAW file format of the X-Pro2 and X-T2. Examples of Fujifilm-friendy converters that can handle both the uncompressed and compressed file formats are Adobe Lightroom, Silkypix, Photo Ninja, Iridient Developer and AccuRAW.
Lightroom and Silkypix can also replicate the film simulations of the X-Pro2 and X-T2 (including Acros). In fact, Lightroom’s film simulations for the X-Pro2 and X-T2 are better and more accurate than those for 16 MP cameras with the older EXR II processors. Click here for an album with sample images that compare straight-out-of-camera film simulations with their Lightroom counterparts.

There is a world beyond “Adobe Standard”: Lightroom’s replicas of the built-in Fujifilm color film simulations are pleasingly accurate. Minor differences can be spotted in dark areas (which tend to be a bit brighter in the Lightroom version) and in areas with highlight clipping, where Lightroom offers more texture and better dynamic range. That’s because unlike the X-T2 processing engine, which has to transform up to 14 RAW files per second into high-resolution JPEGs, Lightroom and other PC-based converters have ample time to apply advanced algorithms for highlight recovery.

Lightroom’s versions of Fujifilm’s Acros and Monochrome film simulations are also pretty good, but keep in mind that Lightroom (or Silkypix) cannot perform noise shaping and won’t turn noise into organic looking grain. If you want the “real” Acros look, you’ll have to rely on the JPEG engine (aka RAW converter) in your camera.
Let’s Play!
While I sound like a broken record recommending to shoot FINE+RAW, sometimes, you just want to play a little. The X-T2 features several JPEG-only modes such as the Motion Panorama function (which was absent in the X-Pro2), so-called Advanced Filters and a double exposure mode.
Advanced Filters are a collection of effect filters: Toy Camera, Miniature, Pop Color, High-key, Low-key, Dynamic Tone, Soft Focus and Partial Colors (color key). You get the idea. Some are prettier than others. Personally, I find the Miniature effect slightly amusing.

A straight-out-of-camera JPEG shot with the Miniature effect filter
Another popular JPEG mode is Motion Panorama, a sweeping panorama effect with automatic in-camera stitching. Smartphone users know all about this kind of image, and after the function went AWOL in the X-Pro2, it’s nice to witness its comeback in the X-T2, where it scored its very own position in the DRIVE mode dial.

Large X-T2 Motion Panorama shot with the camera held upright in Velvia mode (SOOC, 6400 x 2160)
You can choose between two panorama angles (medium or large) and pick one of four directions (left/right, right/left, top/bottom and bottom/top). This makes it possible to increase the height of a horizontal panorama by holding the camera upright and choosing “from top to bottom” when you are really panning from left to right.
Shooting panoramas with a higher resolution is not difficult, either. Shoot a row of overlapping single RAW images (you can do so handheld) and merge them in Adobe Lightroom. The resulting Pano-DNG can then be processed like regular RAW file.

Lightroom Pano-DNG with higher resolution (14,473 x 5,252) and more processing options
Another huge advantage of the RAW method is the increased dynamic range. The following image couldn’t have been shot in Motion Panorama mode for two reasons: 1.) The required shutter speed would have been too slow for a sweeping panorama and 2.) JPEGs don’t offer sufficient dynamic range to tone-map the image in order to reveal detail in the dark areas.

Lightroom’s Pano-DNGs offer the same dynamic range as single RAW files. This means that the benefits of the X-T2’s ISO-invariant sensor technology can be fully exploited, like in this 12,911 x 5,108 example.
There’s a practical limit for everything, though. By using a longer focal lengths, the tiles that make up the panorama cover a smaller angle, so you can create DNG-panoramas with a much higher resolution. However, going beyond 100 megapixels takes a toll on processing power, slowing down the development process even when your computer is state-of-the-art. So let’s be careful what we wish for! 100 MP medium format cameras are already a reality, and similar resolutions will soon populate the full-frame segment. Be prepared to pay for additional processing power.

This 43,037 x 8,627 Pano-DNG was pretty slow and sluggish to process in Adobe Lightroom CC, despite using one of the fastest available MacBook Pro configurations with maximum memory and a 1 TB SSD.
Dynamic Range
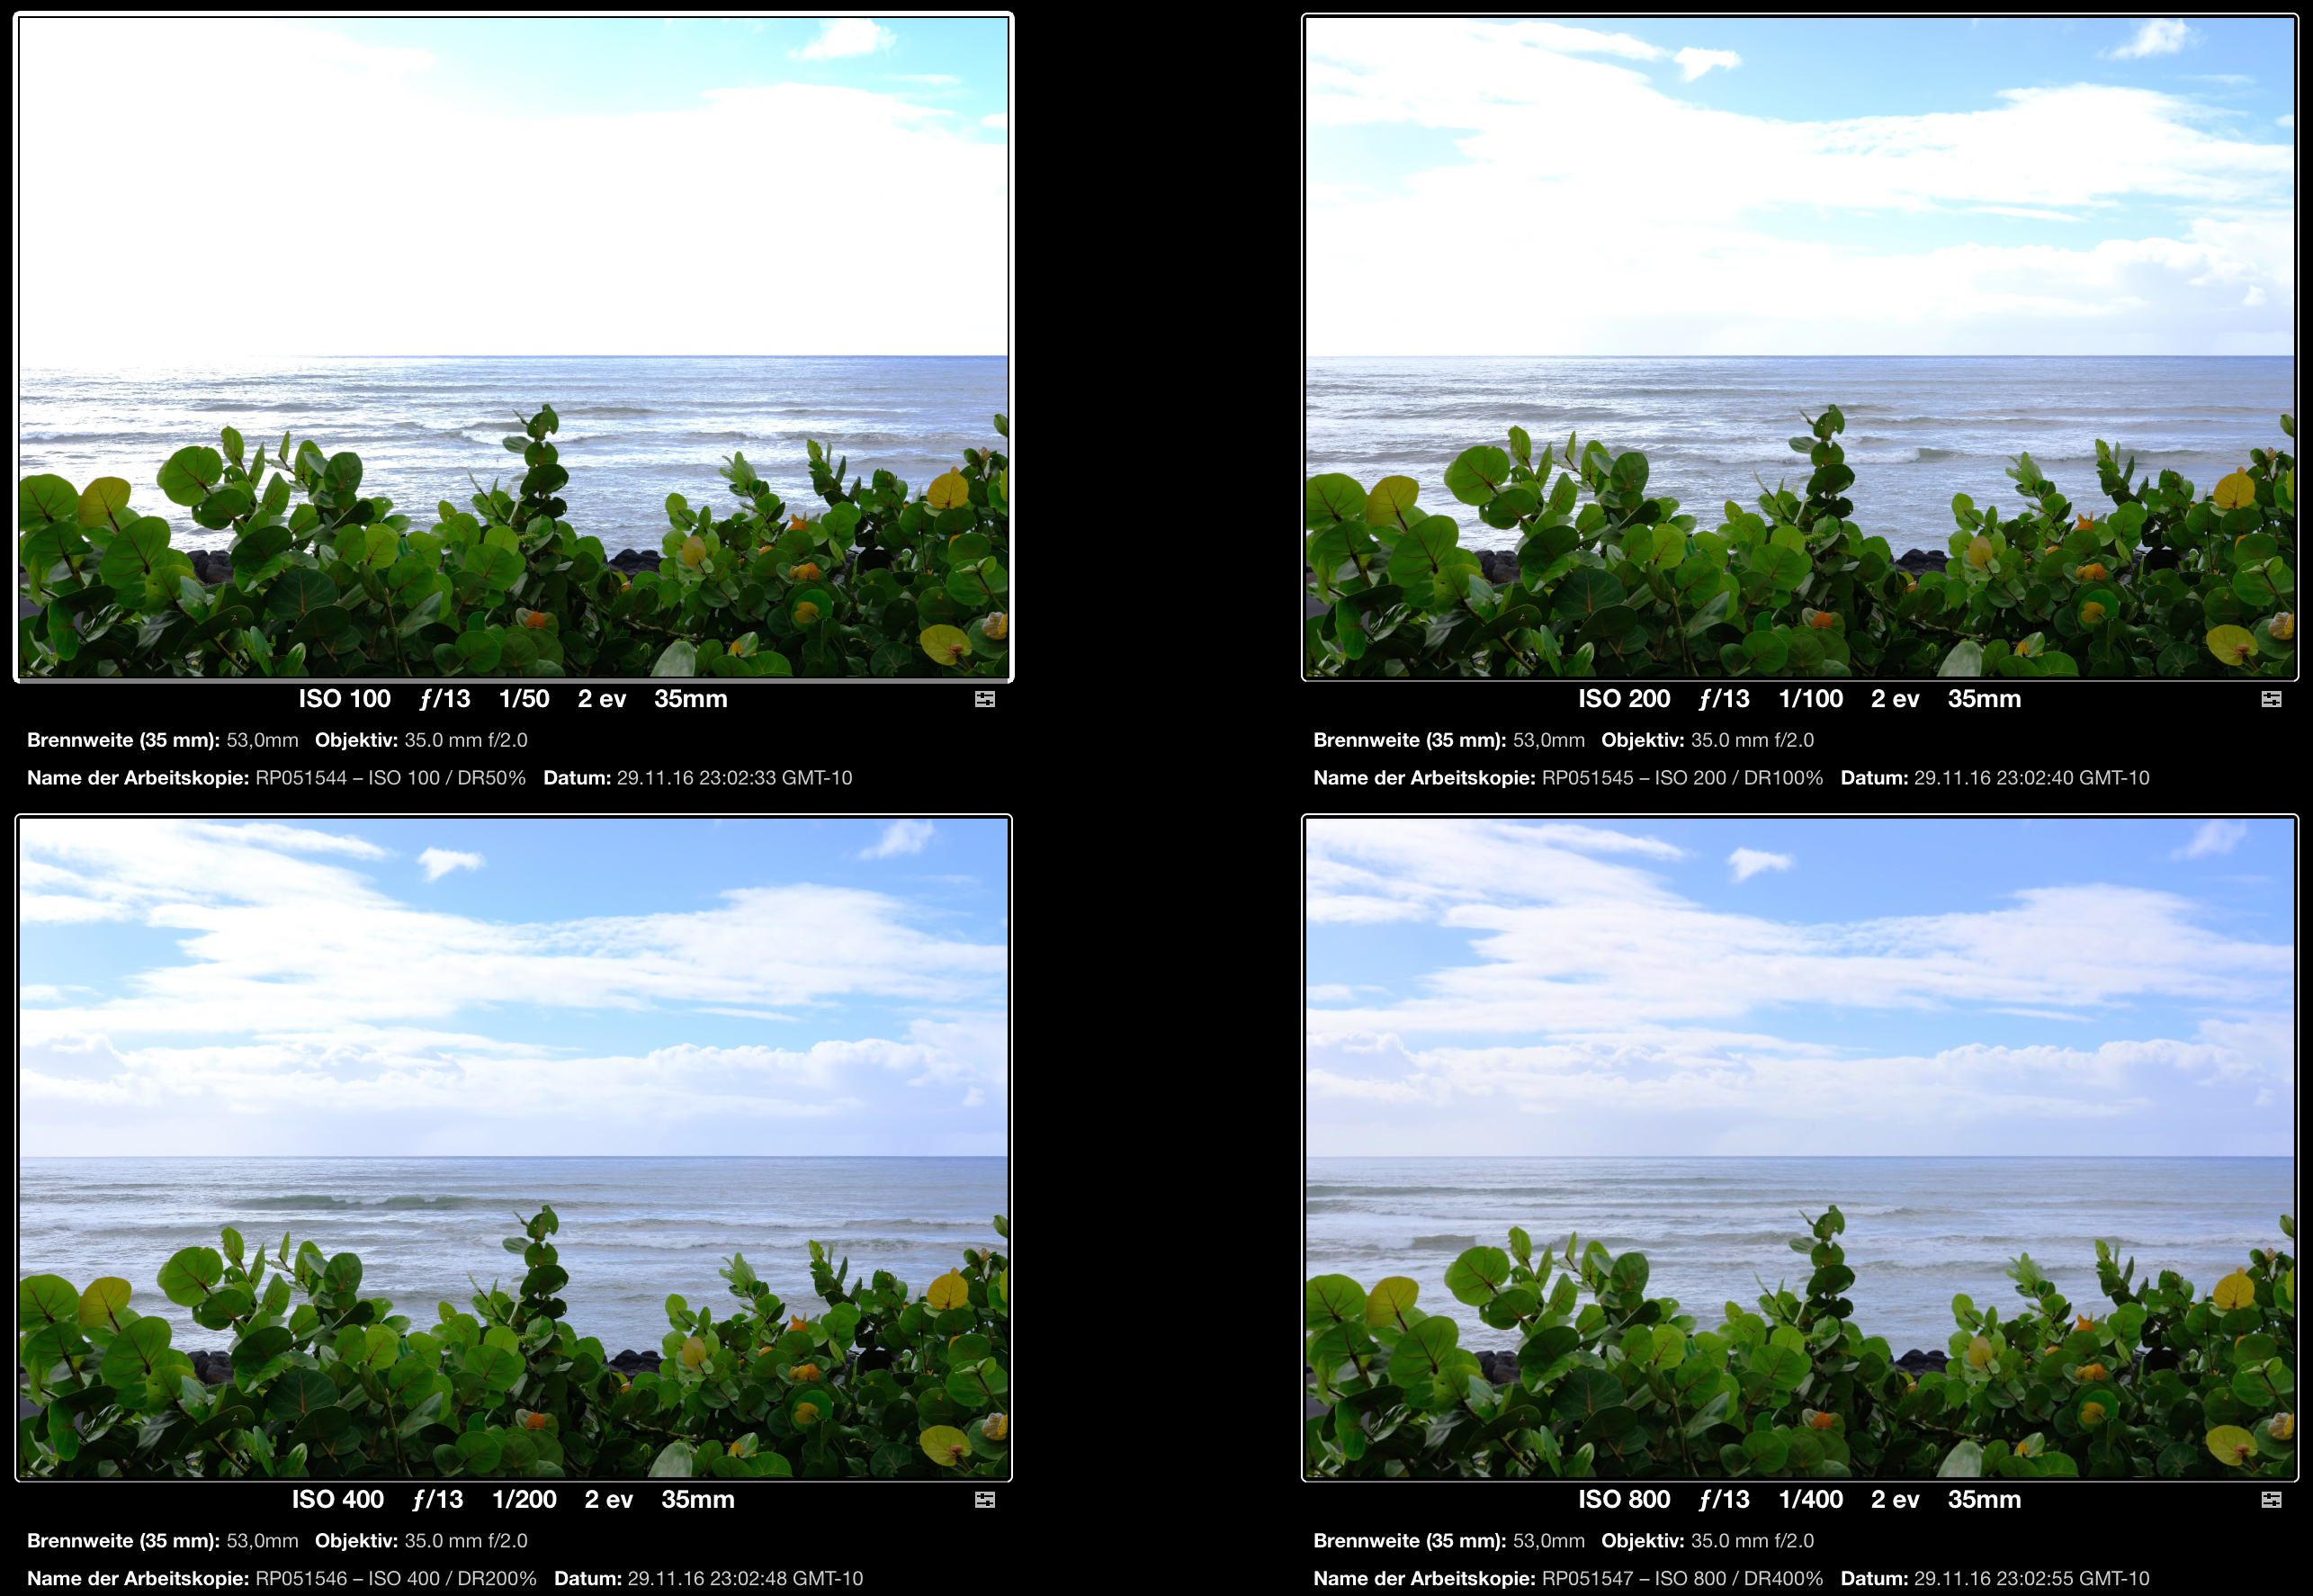
One scene, four DR settings (SOOC, X-Pro2)
In the example above, I used an X-Pro2 to photograph the same scene with DR50% (aka ISO 100), DR100%, DR200% and DR400% settings. While the exposure of the darker foreground remains very much the same in all four images, there are huge differences in how the highlights are rendered. As more highlight dynamic range is added, more color and texture is revealed in the bright sky and clouds.
The good news about the DR function of the X-T2 and X-Pro2 is that hard DR settings are now fully simulated in the live view and live histogram. For example, setting the camera to DR400% will also give you a DR400% live view and DR400% live histogram with 2 EV of additional highlight dynamic range. Other X cameras (with the exception of the X100T and X30) would only give you a DR100% preview, despite recording a DR400% image. Don’t use DR-Auto, though, as this setting will always give you a DR100% live view and histogram, even if the camera decides to use DR200% when you press the shutter button.
Properly simulating manual DR settings has implications on the Natural Live View (aka the PREVIEW PIC. EFFECT OFF setting). With the X-T1, X-T10, X-E2S and X-E2v4, deactivating the JPEG parameter simulation with PREVIEW PIC. EFFECT OFF is popular as a “RAW shooter mode”. This isn’t recommended with the X-T2 and X-Pro2, because the PREVIEW PIC. EFFECT OFF implementation of these cameras activates DR400% in the electronic viewfinder to expand the dynamic range of the live view image. However, this additional highlight DR only applies to the Natural Live View image and not to the actual image that’s recorded (unless DR400% happens to be manually set). This isn’t entirely new, because the X30 and X100T work in the same way. However, it’s a first for Fuji’s line of system cameras with interchangeable lenses.

DR100%, DR200%, DR400% (SOOC, X-Pro2)
The three images in the animated GIF above show a practical example of how the DR function can improve a scene. To illustrate the differences, I processed the same shot with three different DR settings. To do so, I had to shoot the scene with DR400%. While you can always reduce the highlight dynamic range after the fact, you cannot magically increase it later. From a purely technical standpoint, the DR400% version would be the best choice, as it delivers perfectly smooth tonality without any blown highlights on the skin and in the background. However, “technically perfect” can sometimes be a synonym for “boring”, that’s why I prefer the DR200% version in the middle. To me, it looks more natural and more alive.
ISOless Sensor
How ISOless (English article) or ISO invariant are the X-Pro2 and X-T2? Fujifilm has a history of delivering ISOless (German article) cameras. That’s how the powerful DR function works, and it’s also how you achieve amazing dynamic range in Lightroom and other external converters. The X-Trans CMOS III sensor comes with a noise floor that is significantly lower than its predecessor. With read noise that low, pushing up an image a few stops will virtually only amplify the shot noise.

This animated GIF illustrates the difference between a straight-out-of-camera Velvia shot and a version that was tone-mapped in Lightroom to reveal more shadow detail.
The following example is a direct comparison between a native ISO 1600 shot and the same scene taken at ISO 200 and pushed +3 EV during RAW conversion (= effectively also ISO 1600). Both versions were shot with an X-Pro2 and processed in Lightroom.
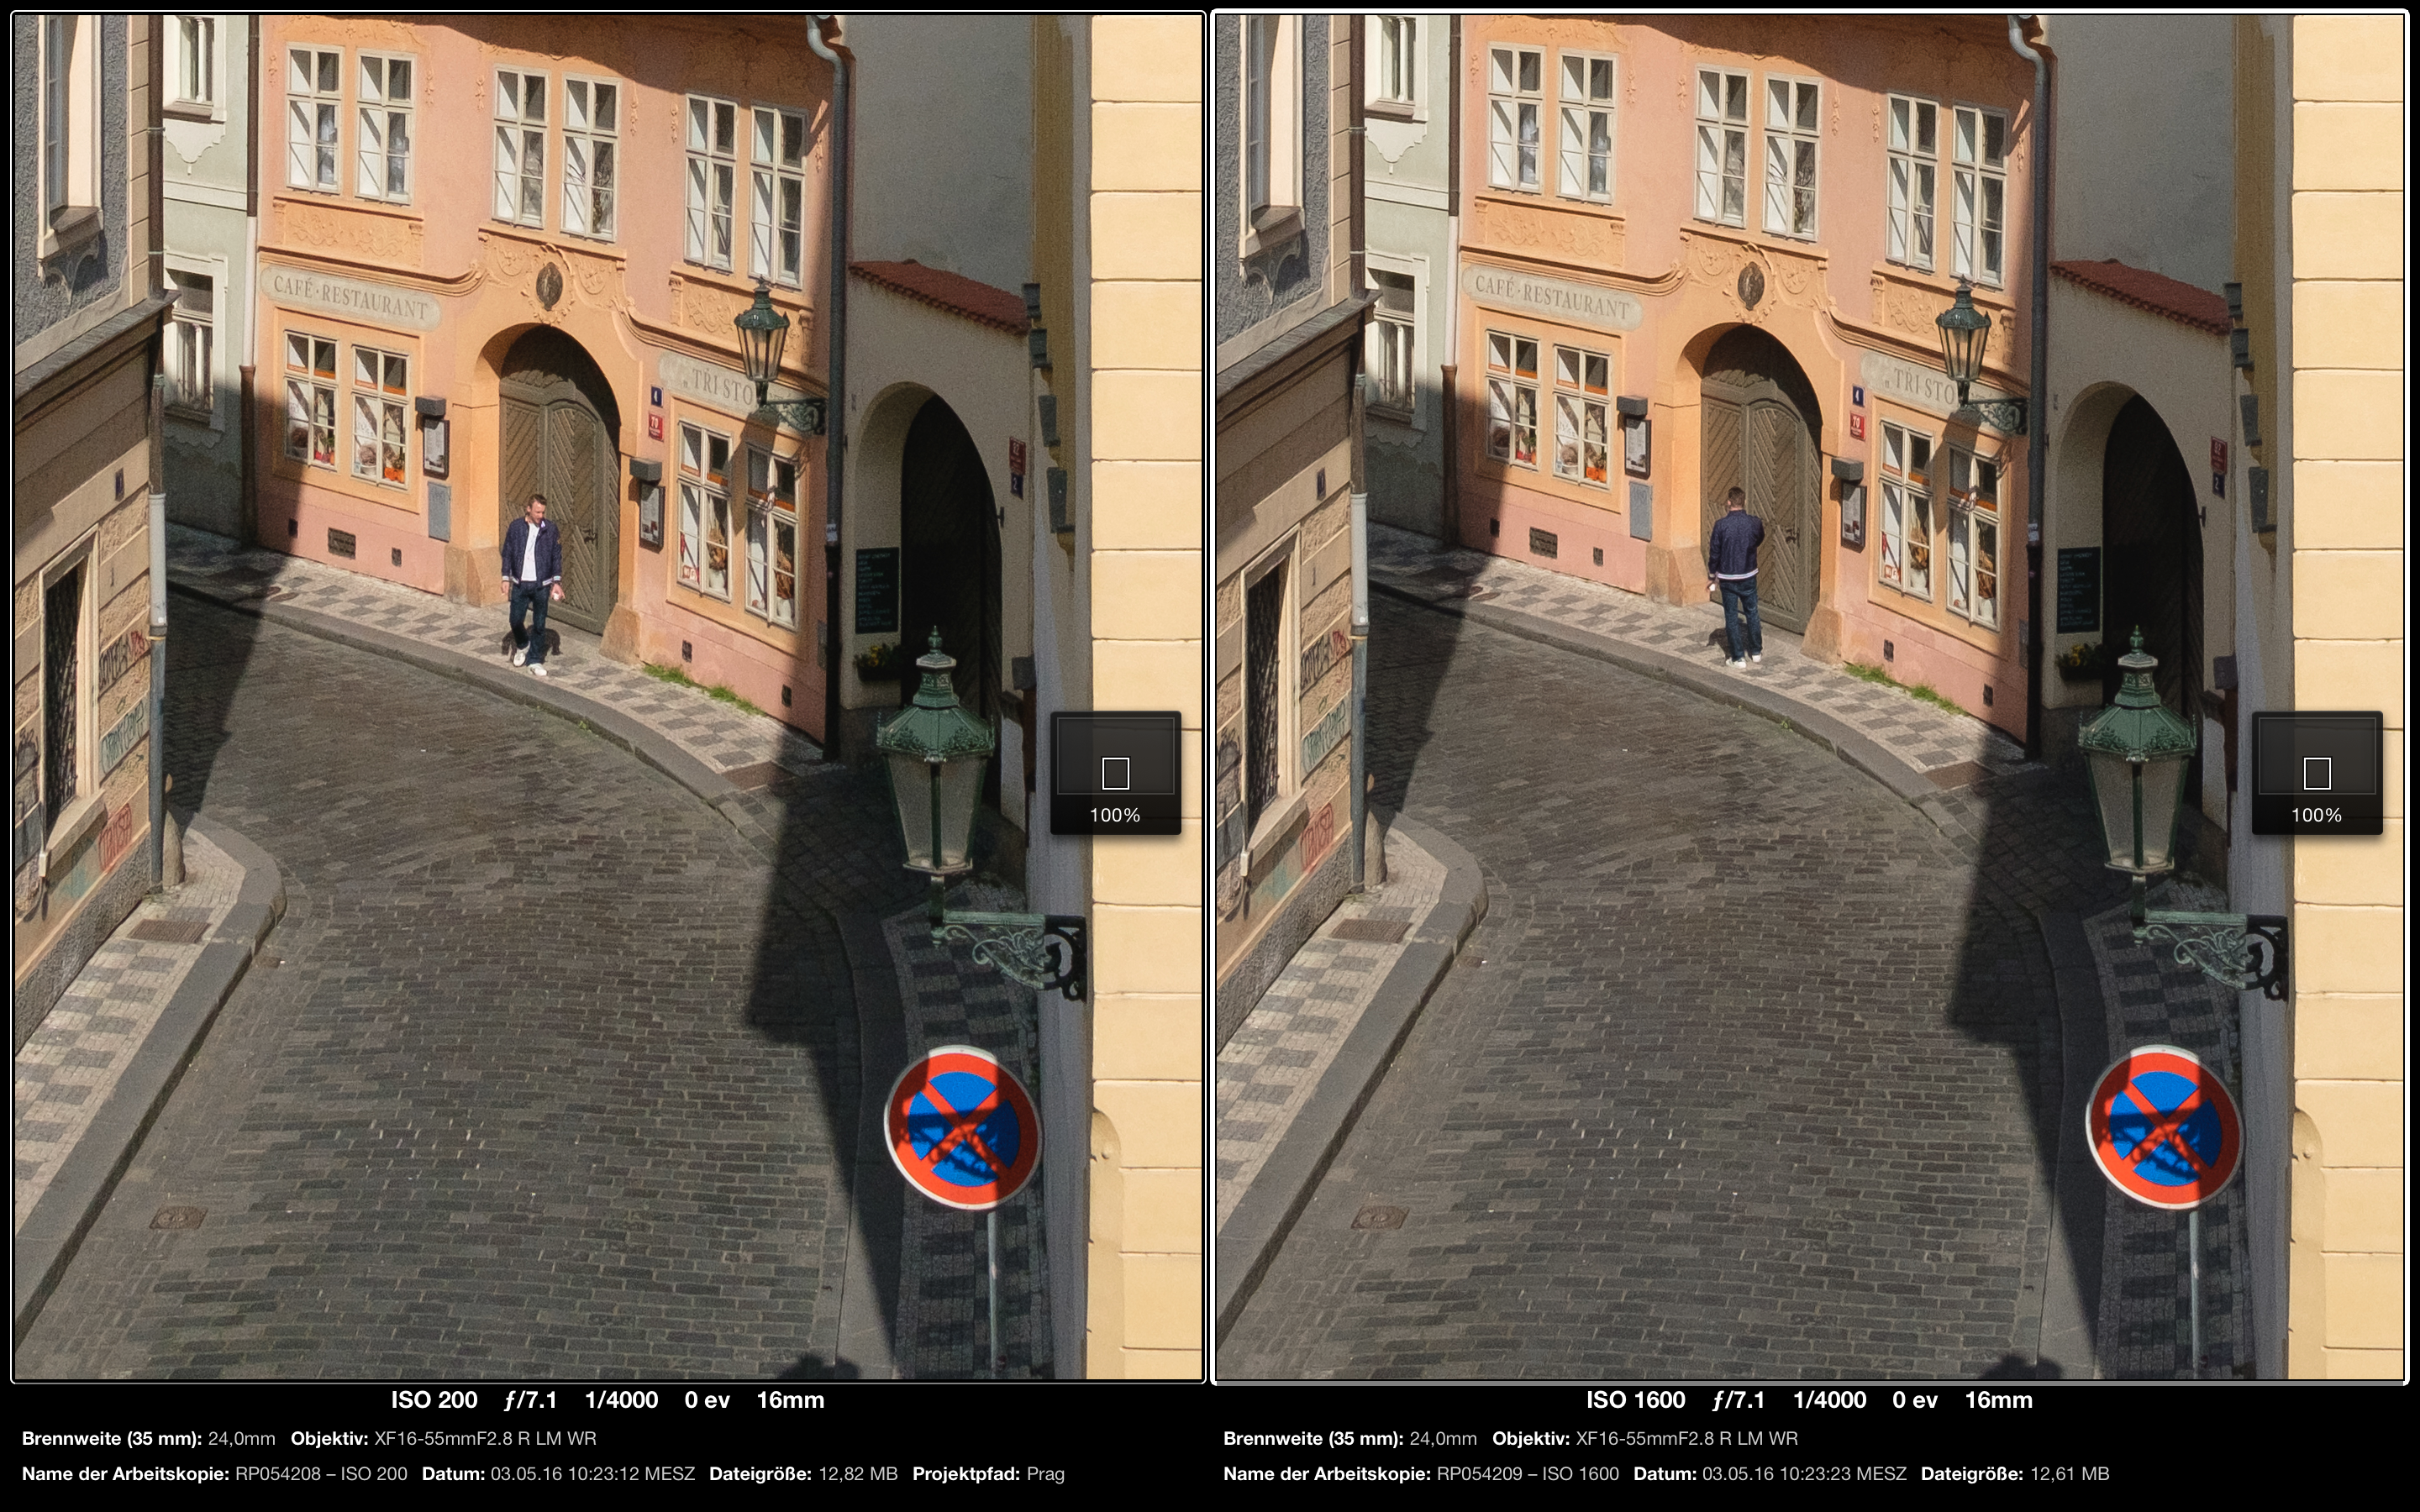
Native ISO 1600 vs. ISO 200 with +3 EV push processing
Can you spot significant quality differences between the two images? If you can’t, that’s a good thing. It illustrates that the camera’s dynamic range can be expanded by 3 EV without any additional noise penalty (always compared with a native ISO setting of the same brightness).
But what if we need more than 3 EV?As long as shot noise isn’t an issue, you can push your RAW files further, adding 4, 5 or even 6 EV of digital gain. The sensor in the X-T2 has so little read noise that it doesn’t matter much.
So the real issue is shot noise: Shooting with a low photon count leads to unfavorable signal-to-noise ratios. A popular remedy is HDR, but in the age of ISOless sensors, shooting brackets of three, five, seven or even nine different exposures truly feels medieval. Luckily, those days are mostly gone thanks to Adobe’s Lightroom’s capability to merge differently exposed RAW files and transform them into a high dynamic range DNG file.
As it turns out, two RAW files are sufficient to master almost any practical HDR scenario. We only have to make sure that the two images are exposed 4 EV apart from each other. Prepare your camera (X-Pro2 or X-T2) with these simple steps:
- Set DRIVE to BKT and select AE BKT with a variation of ±2 in the bracketing menu to activate the camera’s auto exposure bracketing.
- Select SET UP > BUTTON/DIAL SETTING > AE/AF-LOCK MODE > AE&AF ON/OFF SWITCH.
- Use aperture priority mode and select ISO 200.
To record and process the HDR shots, go ahead with these steps:
- Expose to the highlights! Using the live view and live histogram, frame your scene, and turn the exposure compensation dial until critical highlights aren’t blown.
- Save the exposure from step 1 by pressing the AE-L button. Do so without changing the framing of your shot.
- Now correct your locked exposure by +2 EV with the exposure compensation dial: simply turn it six clicks in the plus direction. This will shift your locked exposure up by two stops.
- Focus and press the shutter button to take the bracketing shot. Hold the camera very steady while it takes a quick burst of three consecutive AE bracketing shots (each with a different exposure). We are only interested in the last two of those three shots because their exposure differs by 4 EV.
- Import the RAW files of the last two bracketing exposures into Adobe Lightroom or Adobe Camera RAW, where you can easily merge them into a single HDR-DNG file using the HDR function. You can then process the HDR-DNG file in Lightroom like a regular RAW file.

A hand-held HDR shot that consists of two RAW files: Using ±2 EV AE bracketing, one RAW was conservatively exposed for the highlights, while the other RAW was shot with a +4 EV higher exposure to effectively mitigate shot noise in dark areas. Both RAW files were merged into a HDR-DNG file and processed in Adobe Lightroom.
If you aren’t fully familiar with the concepts of shot noise, read noise and ISO invariance (ISOless sensors), I recommend reading dpreview’s educational articles on these important subjects. Click here to get started.
Enhanced Video Mode and 4K Recording
Video used to be a major weakness of the Fujifilm X-series. Quality sucked, and it lacked many essential features. With the X-T2, Fuji wants to turn this weakness into a new strength by offering HD and 4K video with superior quality.
Fujifilm first had to address the issue of hardware infrastructure: Unlike previous models, the X-T2 offers a regular 3.5mm mic input, a 3.5mm headphone output in the vertical grip, and the option to stream 4K video to an external recorder via HDMI with 4:2:2 chroma sampling. In order to capture as much dynamic range as possible, the external 4K output can use a flat Log profile that Fujifilm calls “F-Log”. Internal 4K recording on SD cards is performed with 4:2:0 sampling at a data rate of 100 Mbit/s. You can also connect an external HD monitor to mirror the camera’s live view image.
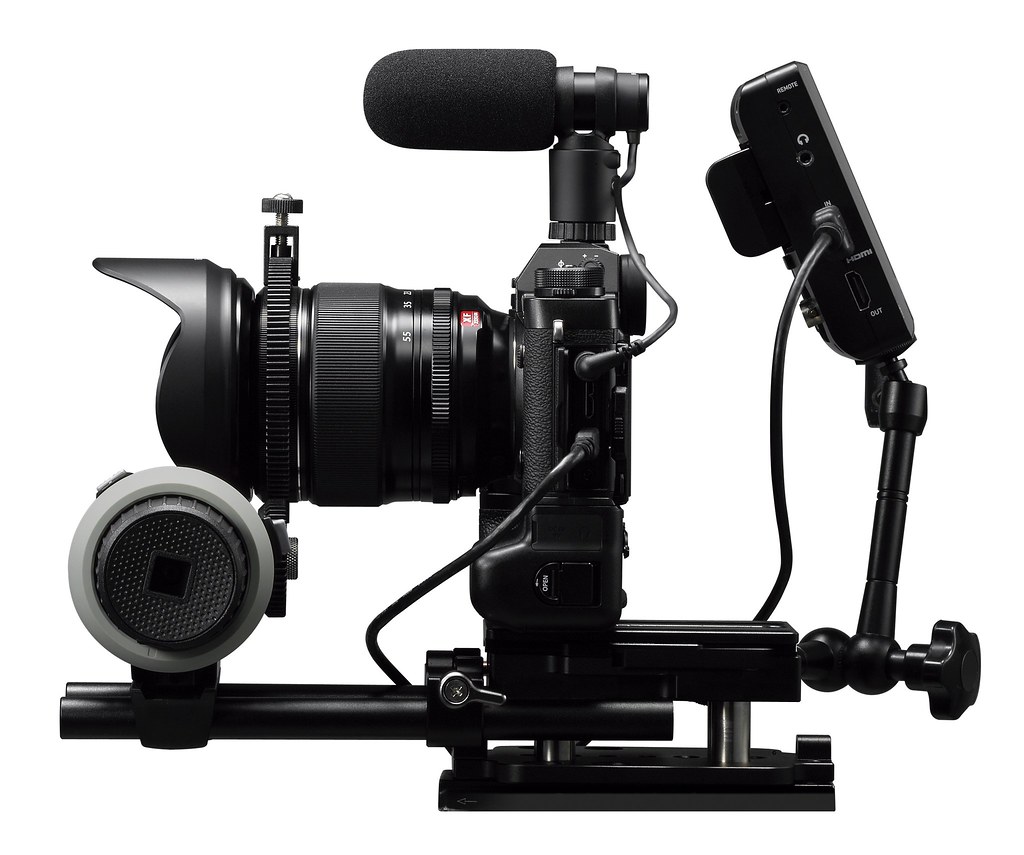
Getting serious with video: X-T2 with external microphone, external recorder and follow focus. Of course, using a follow focus on a focus-by-wire lens like the pictured XF16-55mmF2.8 R LM WR zoom lens isn’t particularly clever. Adapting genuine cinema lenses (for example, with a PL-mount to X-mount adapter) would be a more practical solution. Alternatively, one could simply rely on the much improved video autofocus performance of the X-T2.
In its current beta firmware stage, the X-T2 offers 16 different HD and 4K output resolutions, ranging from 720/23.98P to 2160/29.97P. I have to emphasize “current” here, because Fujifilm keeps adding video features and improvements with new beta firmware versions, mostly based on feedback from videographers who have been testing pre-production units of the X-T2.
The Movie Setting menu of the X-T2 appears to be a “work in progress”, as additional output formats and improvements keep popping up in new firmware betas. This is how the menu looks like in beta version 1.39, which was released on July 19.
In addition to new output formats and recording options, the latest firmware update also added Focus Peaking, contrast settings (Shadow Tone, Highlight Tone), color saturation and sharpness to the video feature set. Fuji is listening, and there is more to come. I assume Zebras and a live recording histogram will be next, and I’d also like to see the Dynamic Range function (DR200%, DR400%) included as a quick way to boost video dynamic range without resorting to the more sophisticated F-Log. All 15 film simulations are already available in video mode, and you can watch several 4K demonstration videos showing them off by clicking here.
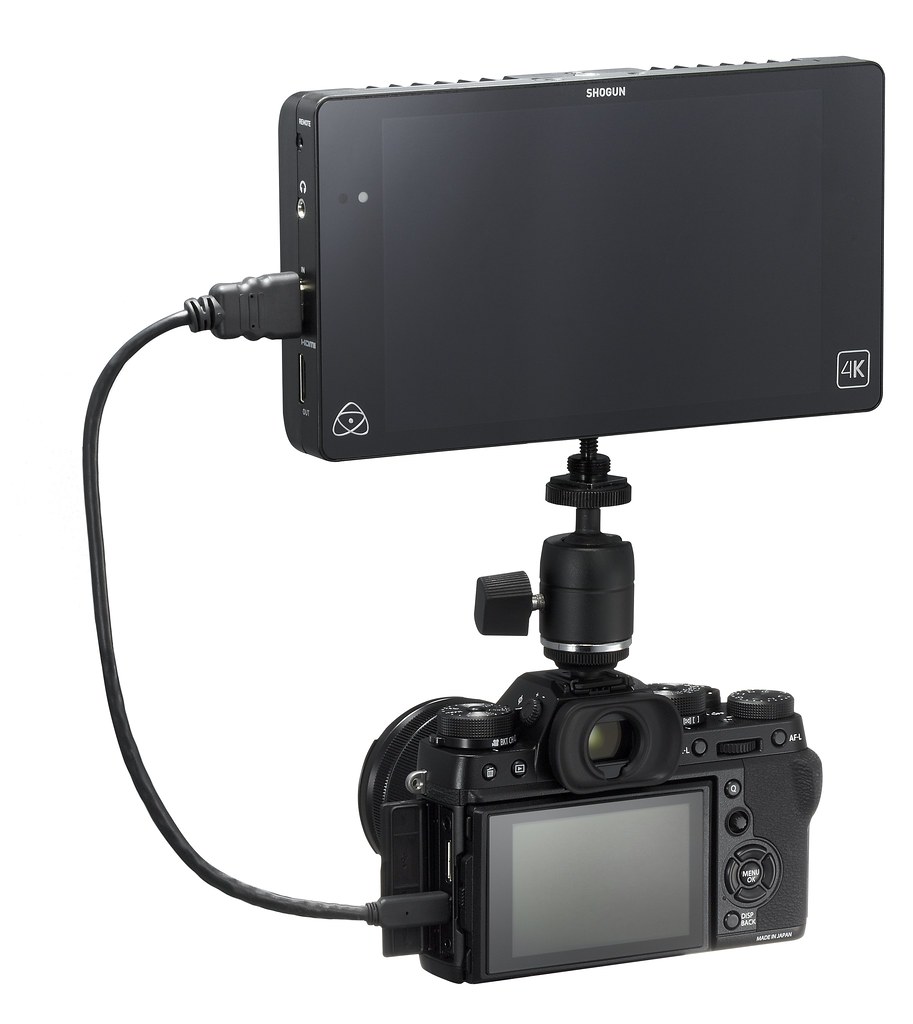
X-T2 with an external Atomos Shogun 4K video data recorder
The hardware side of things is already in place. As far as image quality is concerned, the HD and 4K output of the X-T2 is quite phenomenal—and Fujifilm keeps improving it, so the sample 4K videos linked in this article are already outdated, because they show the X-T2’s output quality before additional IQ improvements were achieved.
How did Fuji pull it of? And isn’t the X-Trans color filter array a genuine video killer? The key to success seems to be oversampling in concert with powerful signal processing. To create a 4K video with an output resolution of 3,840 x 2,160 pixels, the X-T2 is actually recording 5,120 x 2,880 pixels with a sensor crop factor of 1.17. That’s 1.8 times the required resolution. This rich signal is then downsampled to the actual 4K output resolution, and by doing so, demosaicing artifacts such as moiré, jaggies and false colors are eliminated by the camera’s powerful X-Processor Pro. In Full-HD mode, the overkill is even higher, as 3,000 x 1,687 pixels are recorded without crop for a 1,920 x 1,080 output resolution. That’s 2.4 times the required data.
Of course, the best 4K video quality doesn’t help when the image keeps being out of focus. Luckily, the new and improved AF system of the X-T2 also shines in video mode. You can use all three basic focus modes (AF-S, AF-C, MF), and you can adjust the focus frame’s position during live recording with the focus stick. Focus Peaking is now available in MF mode during recording, and subject tracking in AF-C mode has been substantially improved, as well. It’s now possible to successfully track moving subjects in 4K mode with very little depth-of-field, as demonstrated in the two quick examples below. To record them, I used a 140mm lens at f/2.8 in 4K mode (that’s a full-frame equivalent of 140mm x 1.52 x 1.17 = 249mm). Shooting hand-held, I had to rely on the OIS in the lens to keep the image halfway steady.
This is a short hand-held 4K AF-C demo video that I recorded during a recent Fuji X Secrets workshop. Click on SHARE to access the original 4K video file.
Another quick hand-held 4K AF-C demo. Click on SHARE to access the original 4K video file.
With excellent output quality and high-performance autofocus, Fujifilm has turned a formidable weakness into a veritable strength. Missing pieces such as Zebras or a live recording histogram are only firmware-related and will most likely be included in future updates. But as far as the hardware is concerned, the X-T2 can now be used in (semi-)professional video production environments.
Conclusion
The Good,…
It appears that Fujifilm has been working very hard to come-up with a “complete mirrorless camera” that can tackle almost any shooting situation and application, but without sacrificing the X-series DNA with its retro manual dials and controls. The X-T2 is compact, modular and robust, with a state-of-the-art sensor and a fast processor that ensure responsiveness and high-performance autofocus tracking. Improved ergonomics and the large electronic viewfinder make the X-T2 a pleasure to work with, and the optional Vertical Power Booster Grip is more than just a container for additional batteries. Image and video quality are both top-notch.
…the Bad,…
So what’s missing? Mostly details. The user-configurable My Menu should be able to store a few more items from the main menus, and an additional Fn button (as a replacement for the discarded video button) would have been a bonus. Frequently used functions like OIS Mode should be available as options in the Q menu or on Fn buttons—and why is there no indication in the display when the Natural Live View (PREVIEW PIC. EFFECT OFF) is in effect?
I assume some sports, action and wildlife shooters will be put off by the X-T2’s inability to adjust to quickly changing shooting conditions and requirements. Due to the retro concept with marked manual dials and controls, there’s currently no way to quickly change the entire camera configuration with pre-configured user presets. It would be nice if Fujifilm could find a clever way to add such presets without sacrificing the beloved retro concept.
Also missing are color RGB histograms (in the live view and during playback) and a highlight-priority metering mode. And what about user-favorites like a 24h clock display, multi-bracketing beyond three shots, or the ability to include copyright information in the EXIF data?
…and the Ugly…
As far as the new flash system is concerned, I am still waiting for samples of the announced EF-X500 flash and Nissin’s Fuji-compatible version of the i60A and Air Commander, so this topic will be covered in a separate article. However, the fact that Fuji’s wireless TTL concept relies on light signals instead of radio (and requires an expensive EF-X500 as commander) isn’t a particular source of joy for those who had high hopes for Fujifilm’s new flash system. On the other hand, the in-camera control of the flash units and groups looks really comfortable, so we’ll have to wait and see how things play out.
Another source of worry is the fact that my beloved Nissin i40 is not compatible with the current X-T2 firmware (beta 1.39). Assuming things stay that way, the i40 might even become incompatible with the X-Pro2 and X-T1 after these cameras will have received their promised flash system firmware upgrades. Will Fujifilm make improvements to the firmware to restore compatibility? Will Nissin offer (paid) firmware updates for the popular i40? The silence is deafening. And what about support for other third-party flashguns that are currently marked “Fuji-TTL-compatible”, like those from Metz and Meike?
So even after months of research and countless hours of putting heaps of information together in 12,000 words and hundreds of sample images, animated GIFs and videos, I have to conclude with William Goldman’s famous quote on Hollywood: Nobody knows anything.
Here’s a collection of links to sample albums that accompany this article:
- X-T2 Sample Images
- X-Pro2 Sample Images
- X-T2 AF Tracking Samples
- ISO Comparison
- Film Simulation Comparison (SOOC & Lightroom)
- Acros High-ISO Samples
- Le Mans Classic Samples
- Theresienstadt Samples
- X-T2 First Look Article Samples
And yes, I’ll also write a book about the X-T2.
Fujifilm X-T2USA: BHphoto / AmazonUS / Adorama / CANADA: AmazonCA / EUROPE: AmazonDE / Calumentphoto DE / AmazonUK / AmazonITA / AmazonFR / AmazonESP / PCHstore / WexUK / AUSTRALIA: CameraPro
Vertical Booster Grip: USA: BHphoto / AmazonUS / Adorama / CANADA: AmazonCA / EUROPE: AmazonDE / AmazonUK / AmazonITA / AmazonFR / AmazonESP / PCHstore / WexUK / AUSTRALIA: CameraPro
New NP-W126S Batteries: BHphoto / Adorama /
For your convenience, here’s a TOC with links to my previous X-PERT CORNER articles:
- X-E2 vs. X-E2S: Ending the Confusion
- First Look Review: Fujifilm X70
- First Look Review: Fujifilm X-Pro2
- First Look: Fujifilm XF1.4x TC WR Teleconverter Lens
- First Look: Fujifilm XF35mmF2 R WR
- First Look: Fujifilm XF90mmF2 R LM WR
- First Look: Fujifilm X-T10
- Using Firmware 4
- First Look: XF16mmF1.4 R WR
- Film Simulations in RAW File Converter EX Version 2
- X-T1: Tethering with Adobe Lightroom and Fujifilm HS-V5
- First Look: Fujinon XF16-55mmF2.8 R LM WR
- XF 56mm APD vs. XF 56mm
- New Firmware Features (3): X-T1 Firmware Version 3.00
- New Firmware Features (2): Using Camera Remote
- New Firmware Features (1): Using AF+MF
- First Look: Fujinon XF 50-140mm F2.8 R LM OIS WR
- Using the Fujifilm X100T
- First Look: Fujifilm X30
- First Look: XF18-135mmF3.5-5.6 R LM OIS WR
- X-E2: Behind Firmware 2.00
- First Look: Fujifilm TCL-X100 Teleconverter for X100(S) Cameras
- First Look: Fujinon XF10-24mmF4 R OIS
- First Look: Fujifilm X-T1
- First Look: Fujinon XF56mmF1.2 R
- Exposing Right
- Using Auto-ISO
- Using Face Detection
- First Look: Fujifilm XQ1
- PDAF & LMO Lens Firmware Updates Coming in November
- First Look: Fujifilm X-E2
- How Fuji could save the X-M1
- X-A1 vs. X-M1: Photo Ninja Edition
- X-A1 vs. X-M1: the Shootout
- Using the Fujifilm X-A1 [& X-M1]
- First Look: Fujinon XF23mmF1.4 R
- RAW Converter Shootout Results
- Ultimate RAW Converter Shootout
- First Look: X-M1 with New Kit Zoom and Pancake Lens
- Zeiss Touit vs. Fujinon XF
- Remote Shutter Control for X Series Cameras
- Apple Camera RAW, X-Trans and EXR
- First Look: XF55-200mmF3.5-4.8 R LM OIS
- Studio X
- Using the X100S
- Using the X20
- X100S vs. X100
- X20 vs. X10
- RAW, JPEG, Silkypix and “Fuji Colors”
- Adapting Third-Party Lenses (updated with Speed Booster)
- RAW for JPEG Shooters…
- Tips for Updating your Firmware
- How to Clean the X-Trans Sensor
- Using the XF14mmF2.8 R
- Decoding XF18-55mmF2.8-4 R LM OIS
- Comparing RAW converters: JPEG vs. Lightroom, Capture One, Silkypix & RPP
- XF14mmF2.8 R appears to be almost distortion free
- How to Expand Dynamic Range
- How to Use Extended ISO
- EXR, anyone?
- Capture One – When the Going Gets Tough…
- Using Shooting Profiles and the Quick Menu
Rico Pfirstinger studied communications and has been working as journalist, publicist, and photographer since the mid-80s. He has written a number of books on topics as diverse as Adobe PageMaker and sled dogs, and produced a beautiful book of photographs titled Huskies in Action (German version). He has spent time working as the head of a department with the German Burda-Publishing Company and served as chief editor for a winter sports website. After eight years as a freelance film critic and entertainment writer in Los Angeles, Rico now lives in Germany and devotes his time to digital photography and compact camera systems. His camera books are available at rocky nook and dpunkt Verlag.